Fidget Mat How to

Tutorial, Tips and Ideas


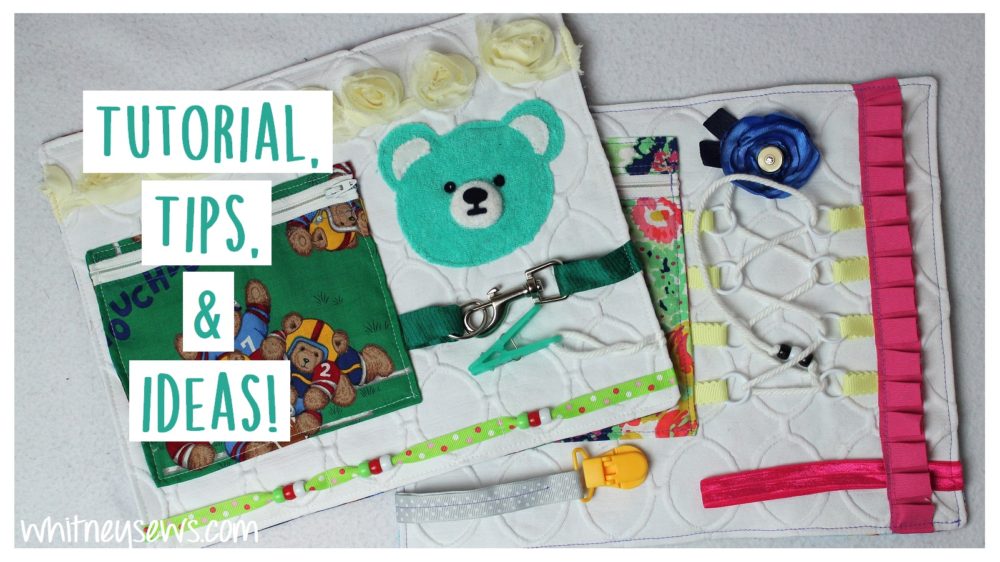
One of my amazing viewers asked if I could make a fidget mat tutorial. These are place mat sized mats with a variety of activities to sooth fidgeting and help the user develop or maintain skills and hand muscles.  They can be great for children, adults with Alzheimer’s or dementia, or anyone with special needs.  I created a couple of fidget mats for some elementary students and will be showing how I made them along with some extra tips and ideas for things you can incorporate in your own fidget mats.

We just moved so I hunted around my new sewing room looking for things to add to my mats.  I liked the idea of including a pocket so the kids can zip and unzip and hid treasures inside.  I also wanted to focus on textures, from the textured upholstery fabric base to pleated trims and more.

Check out my step-by-step tutorial for my fidget mat HERE!

Obviously not everyone will have the exact same clips and trinkets, so I also included extra tips and ideas you can incorporate in your own.  One of my biggest tips is to plan out the layout so each element either extends to the sides of the mat or tucks under something else.  This helps it look more thought out, but also makes sure everything is securely sewn down 2 or 3 times.

Have you made any fidget mats or fidget quilts before?  If so I would love to hear about them and see pics.  You can share them on the Whitney Sews Facebook page or on instagram using #WhitneySews

I’ll be back next week with another new tutorial!  Until then, Happy Sewing!

-Whitney-

Sewing How to – Shoelace Tying Helper for Kids

Felt Shoe DIY

It took us a bit, but we are (mostly) moved into our new house, got (slow) internet set up, and are back to (casual) homeschooling! Didn’t know we moved?? Check out my empty house tour HERE! It felt so great to get my sewing room set up enough to get back to sewing. The first thing I made was, of course, something for my kids. I made a felt shoelace tying helper for each kid so they can learn how to tie their shoelaces.

These shoes only take a few basic supplies – two pieces of felt, a heavy stabilizer (I used Pellon 65, but use whatever you have in your stash), 3/8 inch wide ribbon, and a 36 inch shoelace.

Felt Sewing Project

To start make a shoe shaped template, I’ll have the measurements I used listed below, but feel free to make your own template in any size you like.

After making your template there are only a few seams to sew making this a quick and easy project. Click HERE to see the step by step video tutorial!

Template measurements
Top to bottom – 6 ¾ inches
Width at the widest point – 3 ¾ inches
Width at narrowest – 2 ¾ inches
Ankle opening at largest – 1 ½ x 2 inches
Ribbon slits – ½ inch long in two rows spaced 1 ¾ inches apart

If you make this, or any other project from a Whitney Sews tutorial, please share a picture with me using #WhitneySews

You can watch more tutorials like this one HERE. Until next time, Happy Sewing!
-Whitney-

We Bought a House

Hi everyone!  I am so excited to share some news this week!  WE BOUGHT A NEW HOUSE!  If you’ve been following my vlog channel you already know about the struggles we had getting to closing day, but the day has come!  We bought a remodeled mobile home that sits on almost 2 acres of land.  We have been looking for a place with land for nearly 5 years and we fell in love with this property as soon as we saw it!

We started moving in the day we signed, but not before I filmed an empty house tour.  I thought it would be fun since I get requests for room tours and house tours all the time.  Check out my empty house tour HERE!


I’m really looking forward to getting my sewing room set up because I haven’t sewn anything in weeks!  There are several projects I have been planning for the past year or so, but didn’t have a large enough space to film them in (because of the amount of clutter in my sewing room!).  I’m hoping to tackle some of them very soon!

We currently do not have internet access at our new house, so I’m uploading for the McDonald’s in the next town 🙂

Not ideal…but works until we get something set up at home.  But I’m ready to head back home, so I hope you all are having a wonderful week.  Until next time, Happy Sewing!

-Whitney-

This entry was posted in Blog and tagged .

How to Sew a Fabric Book

Whitney Sews tutorial
We are currently packing up our entire house in anticipation of our move!  I keep coming across so many projects I want to make while I should be packing.  One such project is a printed panel for a fabric book.  So this week I used that panel and some scraps of fusible fleece to whip up a cute fabric book.

Back in October I made a vest from a printed panel and it reminded me how much I love panel projects!  The fabric panels come preprinted with all the details and instructions needed for an entire project including the seam allowances.  I’ve seen panels for projects ranging from vests to aprons and books to tree skirts.

In the case of a fabric book the creator does have to supply a batting or interfacing to give the pages their batting.  I did not have enough of a flat batting or medium weight interfacing that the instructions called for, so I used fusible fleece (like THIS).  I use fusible fleece for a lot of projects, so I end up with a lot of leftover cuts and pieces that were perfect for this book.  I also decided to double up on the amount of fusible fleece so my book ended up thicker and plusher.

In my video I show step by step how to sew a fabric book together.  Check out the video HERE!

My kids are having fun looking through the book.  It will be fun to incorporate later on in our homeschool lessons.  Did you know we’re a homeschooling family??  My oldest just turned 4 so we haven’t officially started schooling, but we already do a lot of games and activities that incorporate numbers, letters, and etc.  I recently picked up a ton of new homeschool activities and supplies, you can watch the haul HERE!

I hope you enjoyed this project as much as I did.  Until next time, Happy Sewing!

-Whitney-

Lined Zipper Bag – Serger Project

Serger Sewing Project
When it comes to homeschooling we have a LOT of items that need to be organized. Buttons, beads, magnetic letters, game pieces and much more! A few months ago I started making “cheater” zipper bags to hold everything. I call them cheater bags because even though the bags are lined there are serged seam allowances on the inside. They are a hybrid of my five minute zipper bag and the lined version, but even quicker because I skip the french seams. So let me show you how to make my lined zipper bags with a serger.

If you don’t have a serger, don’t worry!  You can overlock the edges with your regular sewing machine using a zig zag stitch.

With this type of zipper bag I prefer to have the zipper on the front instead of right on top like a traditional zipper bag.  This makes it easier for my kids to open and close the bags themselves.

Decide approximately what size you want your bag to be.  Cut the bag front the height and width you want.  Then cut the back the same width and 2 inches taller.  This allows the back fabric to wrap around to the front for that lower zipper look.  Speaking of zippers, any length will work as long as it is longer than the fabric width.  Any excess length can be trimmed off later.

Lets get into the tutorial so you can see just how quick and easy these bags are to make.  Watch the step-by-step video HERE!

Are you going to give these bags a try??  What I love the most is they can be made in any size imaginable and my kids can open and close them with easy.  Check out more of the zipper bags I’ve made in my last Sew Your Stash update HERE!

Until next time, Happy Sewing!

-Whitney-

Fabric Storage Bin

Sewing Tutorial

This year we got our youngest daughter a play kitchen along with a set of dishes.


She absolutely loves it, but definitely needed some help keeping everything organized. So I grabbed a few things from my stash and made her a fabric storage bin – the perfect size to hold all the plastic dishes.

Whitney SewsI chose to use Bosal In-R-Foam Plus as a stabilizer for the bin.  I love how much structure Bosal foam provides!  Skyler plays with the bin all day long and it is really holding up!  You can find the Bosal In-R-Foam Plus HERE!

I started with a scrap of Bosal foam measuring 20 x 12 inches.  Since the piece was so long to start with I kept it as one piece and used that to my advantage.  This meant I didn’t need to sew a seam at the bottom, but I had to make sure the fabric print was non-directional (or looks good from any side and doesn’t have a specific top to the design).

I fused the outer fabric to the foam and cut the lining to match.  After the sides were sewn I boxed the corners so the basket is 4.5 inches deep.  Making a fabric basket like this is actually really similar to making a tote bag.  If you want to learn more about making tote bags check out the playlist HERE!

Anyway, my basket finished right at 4.5 x 6 x 7 inches which was perfect for holding THIS dish set.  But you can customize the storage bin to suit your needs by changing the starting size and how deep you box the corners.

Check out the full step by step sewing tutorial HERE!

Is there an area in your home that needs some organization help?!?  I’ve been really focusing on sewing organization solutions for the toys in our house.  I have one more organizing video coming next week.  Until then, Happy Sewing!

-Whitney-

Drawstring Bag with Boxed Bottom

Tutorial from Whitney Sews

Now that the holidays are over I’ve been trying to come up with ways to keep our house more organized – especially the kids toys!  I posted two drawstring bag tutorials a couple of months ago and they inspired this bag.  I wanted to make sure it could hold both of our duplo block sets, so a boxed bottom was very important.  I also thought it would be fun to have a contrasting section at the top.

I started digging through my fabric stash to see what the kids might like.  I came across a Minnie Mouse print left from another project.  Skyler loves Minnie Mouse right now so I knew she would love this fabric for the bag.  After I found a couple of other coordinating fabrics I was ready to start.

Whitney Sews

The height of the two outer pieces added together should be a half inch more than the lining piece.  So my lining is 14 by 16, the contrast top is 14 by 5 inches and the bottom is 14 x 11.5 inches.

By the way the contrasting top is a great way to add visual interest.  It’s also a fantastic way to use scraps or make the most of a favorite print you don’t have a lot of.

Check out the step by step tutorial HERE to see just how easy this bag is to make!

So what is your favorite part of this bag? The contrasting top or the boxed bottom? Next week I’ll have another organizing DIY and until then, Happy Sewing!
-Whitney-


Crosses and Losses | Sampler Sew Along

Sampler Sew Along - Block of the Month Quilt Series

It’s time for the eighth block tutorial in the Whitney Sews Sampler Sew Along!  Haven’t heard about it yet?!?  Each month I’ll be sharing a step by step tutorial to make a traditional quilt block as well as how to sew the blocks together to create a sampler style quilt that finishes in a great lap quilt/baby quilt size. This week I’m sharing a tutorial for the Crosses and Losses block.  This one dates all the way back to 1929.

Sampler Sew Along

I share the step-by-step instructions for sewing the Crosses and Losses block HERE!

Don’t forget to share a pic of your finished block with #SamplerSewAlong so we all see it!

I hope you are enjoying the quilt-a-long as much as I am!  Until next time, Happy Sewing!

-Whitney-


Sewing Pattern 101 – The Pattern Instructions

Whitney Sews

It’s time for another Sewing Pattern 101 video!  This week I’m going over all the information found on sewing pattern instruction sheets.  No matter what major company your pattern is from (Butterick, McCalls, Simplicity, Vogue, etc) the same kinds of information will be included.

The instruction sheets start off showing design sketches of the front and back of each item that can be made from the pattern. Each option (or view) is assigned a different letter.  The next section will show each pattern piece provided labeled with a number.  This will help figure out which pattern pieces are needed to make the view you have selected.

The instructions also include a good amount of general sewing information.  You will find the allotted seam allowances, pattern markings, how to make adjustments to the patterns, and more.

Next up are the pattern layouts.  These are VERY helpful for figuring out the best way to lay out the pattern pieces.  You don’t HAVE to lay out your pieces the way the layout shows (especially if you are making alterations or using more/less fabrics than the pattern calls for) but it is helpful, especially if you are new to patterns.  You DO want to follow the grainline and fold markings, these are very important for the drape and cut of the finished piece.

Many patterns will also include a small glossary section defining a few specific sewing terms that you’ll come across in the pattern instructions.  Then it’s time for the actual sewing instructions.  They are divided into sections for each of the pattern views.  So find the view you want to make and start from there.

Check out the video HERE where I go into more detail about all the information on the sewing pattern instructions.

I’ll be covering more of the specific terms and techniques you’ll come across while using a sewing pattern in upcoming sewing pattern 101 videos.  Make sure to leave a comment if you have a request for a future sewing pattern video.  Until next time, Happy Sewing!

-Whitney-

Ho Ho Ho – May the Force Be With You

Costume by Whitney Sews

A couple of weeks ago Jeremiah was watching Star Wars Theory on youTube and showed me a really neat illustration of Santa drawn as Luke from The Force Awakens. Jeremiah wanted to know if I could make the costume.  I said yeah, then realized he meant could I make it to wear to some Christmas events this year.  So we set to work making a Jedi Santa costume.

BTW the original illustration was part of the Star Wars Theory channel merch and you can find it HERE!

We examined the design and broke it down piece by piece.  Then I went through my pattern stash and found all the patterns that would work for the costume.  This is why I LOVE having a ton of sewing patterns on hand!  You can see my pattern collection (as of this summer) right HERE!

Then came the hunt for fabric!  This was a huge struggle and I ended up only having 5.8 yards of red fabric to work with. Less than half of what I had hoped for, but I made some adjustments to my plans and was able to make everything work out.

I thought it would be fun to vlog the process of making the costume to share with you all.  I ended up with a TON of vlog footage!  You can watch the entire vlog HERE!

Since the vlog ended up being so long I made another video talking through the highlights as well as showing all the finished costume pieces and pics.  You can watch that video HERE!

So do you like different Santa costumes or are do you prefer more traditional ones??  We had so much fun planning and making this costume and Jeremiah loved wearing it.  I hope you enjoyed seeing everything.  Until next time, Happy Sewing!

-Whitney-