Dress Resize

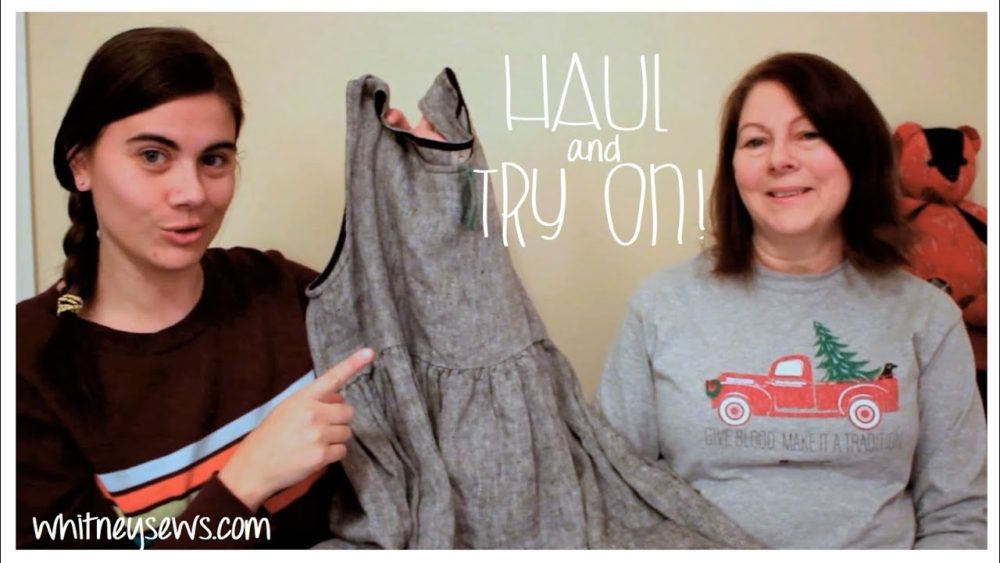
Anyone remember the thrift haul video I did with my mom last Winter??  In that video I showed a Son de Flor dress I found but it was too big and needed to be taken in about 4 inches.  You can see that haul HERE (in the try on portion of the video I had a clip on the back of the dress making it look like it fit).  

Now eight months later I finally got around to resizing the dress and I love it!  I wanted to do it right (which is why I put it off so long).  I started by seam ripping the skirt portion from the bodice then unstitching the sides of the bodice to the underarm.  There is twill tape around the arm opening so I carefully unstitched that as well for a couple of inches on either side of the seam.  I put the bodice on inside out and got an idea for how much I needed to take it in.  Took it off and pinned where the stitching lines would be and tried it back on.  I wanted to make sure I didn’t take it in too much where I wouldn’t be able to get it on and off since there are no closures on the dress.

When I was happy with the fit I sewed the new side seams and tried it on again.  Then I trimmed down the seam allowance, opened it up, and resewed the twill tape in place.  I serged the bottom edge of the bodice and top edge of the skirt (it was serged together before and I had to remove that stitching the separate the dress).  All that was left was to gather the skirt to fit the smaller bodice size and sew them back together.  

For some reason I had expected the resize to be harder than it was (mostly getting the twill tape to look nice again).  

I finished the resize last night and wore it today with a thrifted shirt underneath to add a cute collar detail.  I love how effortless this dress is to wear because it’s still a little loose fitting and comfy, but can easily be dressed up with a couple of accessories.  


I’m so bad at making plans to alter an article of clothing then never actually doing it.  For some reason I find working on existing items intimidating and would rather make something else from scratch.  But since this went so well maybe it will motivate me to tackle some of my other alterations!  

 Well, I hope you enjoyed hearing about my dress resize! Until next time, Happy Sewing!

-Whitney-

This entry was posted in Blog.

How to Make a Stuffed Bear – McCalls 7849 Sew Along

I was contacted by McCalls a few weeks ago and asked to make a video tutorial for them.  They know a lot of people have pulled out their sewing machines to make masks during the past couple of months and want to inspire them to continue to sew.  They came across my bear tutorials on youTube and reached out to me.  

I am so honored to be asked and have a chance to partner with such a well known brand!

This bear is quite a bit different than the other bears I’ve made.  It is 12 inches instead of 18, does not have a separate sole on the foot, and the arms/legs are connected to the body differently.  Plus it has a tail!  But there are some finicky parts that do make it a little trickier to make, but I’m showing every step of the process in the video below.

The pattern I usually use (Simplicity A2115) has fairly large pieces that don’t lend themselves well to making memory bears from baby clothing.  

This bear, being smaller, has smaller pieces that would make using baby/kids clothing easier.  

Oh and the best part is the pattern is available in print AND digital form from McCalls!  This makes getting your hands on the pattern so much easier.  

You can find my step by step tutorial HERE!

I hope you enjoy watching this tutorial and learned something useful from it. Until next time, Happy Sewing!

Whitney

**I was not paid to create this video, however the pattern and fabric were provided to me for free**

EASY Lined Tote Bag

Whew! It has been so long since I shared one of my regular sewing tutorials! Last week I was feeling sort restless and realized it had been several weeks since I had worked on a project. So I decided it was about time that I filmed a new tutorial. Some of the most popular videos I’ve shared over the years were bag tutorials – specifically tote bag tutorials. So I thought that would be a good place to start.

The bag I’m showing how to make today is easy – GREAT FOR BEGINNERS – and only takes a few supplies! The bag finishes about 12.5 x 11 x 4 inches, but once you know how to make one you can customize the bag to be any size you want/need.

You will need:

  • 4 body pieces (2 for outer and 2 for lining) – 16 x 16 inches
  • 2 strap pieces – 28 x 4 inches
  • 2 stabilizer pieces – 28 x 3 inches

Notes –

  • The fabric I chose was a lightweight upholstery fabric, a little thicker than regular cotton.
  • I really like using fusible fleece for this. It is easy to work with and gives the straps just a bit of thickness and structure, without being hard to sew through. You can find fusible fleece HERE.
  • I cut all my materials with a rotary cutter, acrylic rulers, a rotary safe glove, and cutting mat. This insures nice straight edges making the entire project easier to sew. You can find all my favorites HERE. *Shopping through my Amazon links helps support my sewing tutorials**

You can watch the step-by-step sewing tutorial HERE! Below is the written directions to go along with the video.

Sewing Instructions –

  • Start by laying two bag body pieces right sides together matching up all the raw edges.
  • Add craft clips to hold the layers together then sew around the sides and bottom with a half inch seam allowance.
  • Repeat for the lining matching the pieces up right sides together and clipping.
  • This time sew the sides and bottom, but remember to leave a 5 or 6 inch opening in one side for turning the bag through later.
  • Make sure to backstitch at the beginning and ending of each seam you sew. This keeps the stitching from coming undone.
  • Put your hand inside and flatten the corner so it forms a V shape with the seam going down toward the center.
  • The seam allowance on the top side and the under side need to go in opposite directions so they can nest together and lay flat.
  • Once everything is lined up add a couple of craft clips near the corner.Line an acrylic ruler up with the seam line and adjust until the corner of the bag takes up 4 inches along the side of the ruler.
  • Use a pencil or other marking tool to draw a line along the ruler edge. Add a couple more clips and repeat this process for each corner on the bag outer and lining.
  • Sew directly on the marked line on each corner. Then trim off the corners leaving a half inch of seam allowance next to the sewn line.
  • Boxing the corners is what gives the bag depth in addition to height and width.
  • Now onto the straps. Find the textured side of the stabilizer and lay it against the back side of the strap fabric.
  • The stabilizer needs to be centered as nicely as possible with a half inch of fabric uncovered along each long side.
  • Set your iron according to the stabilizer instructions and use it to fuse the two together.
  • When using the iron I’m setting it in one spot, giving it several seconds, picking it up and setting down in the next spot. I’m not sliding it around because that can stretch things out of shape.
  • Once both straps have been fused begin to fold over the edges toward the inside. Use the edge of the stabilizer as a guide and as long as you cut it straight and centered it fairly well you’ll get nice, even edges.
  • This is a quick and easy way to make straps that doesn’t involve having to turn a tube of fabric right sides out.
  • After both sides are folded over and pressed fold the entire thing in half, lining up the folded edges and press again. Add craft clips along the open side if needed to keep it all lined up.
  • Sew down both long sides to close up the open side and give the strap a nice look.
  • Turn the bag outer right sides out and we’ll get the straps attached.
  • Lay the strap on so the short ends are sticking up just above the top edge of the bag and the strap isn’t twisted.
  • Measure so each end is the same distance away from the side seam. I like mine 3 inches from the side.
  • Clip or pin in place. After the first strap is in place flip the bag over and repeat on the other side.
  • Take it to your sewing machine and sew across the strap ends to attach about a quarter inch away from the top edge of the bag.
  • Your bag lining should still be inside out.
  • You want to place the outer in the lining so they are right sides together.
  • Match up the side seams and top edges and clip them together.
  • Sew all the way around the top with a half inch seam allowance.
  • Remember the hole that was left in the side of the lining? Time to reach in and pull the entire bag right sides out through it.
  • Then tuck the seam allowance in at the opening, line up the edges and sew a top stitch near the edge to close it up or you can hand sew a ladder stitch if you don’t want any visible stitching there.
  • Grab the lining and push it down inside the bag body. Make sure the corners of the lining are sitting correctly in the corners of the outer.
  • Then adjust the top edges so they look nice. I actually took it over to my iron and pressed it so the outer fabric actually wrapped around to the inside just a small amount giving it a really nice look.
  • Then sew a top stitch all the way around about a quarter inch away from the edge.

And you’re done! I love that this bag is beginner friendly and perfect for everything from groceries to library books. I hope you give it a try, share a pic, and make sure to tag me so I see it.

Until next time, Happy Sewing!

-Whitney-

Adding a Fitted Nose to Your Mask

In my last post I shared all about the masks I’ve been making and donating to a local urgent care clinic. I have been hard at work since then and have made and given out more than 250 masks! I’m so thankful to be able to make so many and help others out.

The clinic has no other masks available for patients to wear while waiting and are currently relying on my friend and I for their entire supply. When making those masks I’m focused on speed and quantity.

However I have had a chance to make a few masks for my family and friends and have tried out a few other techniques on them. One of which is adding something to the nose to get a better fit. I saw a photo where someone had used a bit of twill tape sewn on the inside and a bit of wire to make a fitted nose piece. I gave it a try over the weekend and was very happy with the results.

I pulled a piece of 5/8 inch wide ribbon from my stash and cut a 2.5 inch long piece and got to work. With the ribbon, a mask, and a pipe cleaner I was able to achieve a much better fit at the nose (which helps prevent glasses from getting fogged up!). I used my sewing machine, but this can definitely be hand sewn if you already have a mask and don’t have a sewing machine.

I show exactly how it’s done (and how easy it is!) in my video HERE!

I hope you all are staying safe and healthy! I’m going to get back to making even more masks and will see you next time. Happy Sewing!

-Whitney-

This entry was posted in Blog and tagged .

Sew & Chat – Making Masks to Donate

Join me for a sew and chat while I make masks to donate to local clinics. These masks were requested to pass out to non-covid 19 patients (people dealing with allergies and that sort of thing) to wear in the office as well as to take home and wear as needed. The clinic requested masks made from two layers of cotton fabric and ties. I am using stash fabrics, thread, and other supplies to make as many as I can.

In the video I show the steps of making this style of mask along with many helpful tips. I also am chatting about how daily life is looking for us right now. Below the video you can find the written directions for the masks and a affiliate links for the supplies I’m using. There are many, many ways to make masks, this is just the style I am making. Grab a project to work on and join me while I sew!

Mask details –

  • The body pieces are cut to 6 x 8.5 inches (I show in the video how cut the fabric to get the best use)
  • The ties are made from 2 inch by 36 inch strips of fabric or extra wide double fold bias tape cut to 36 inches
  • Place two pieces of prewashed cotton fabric right sides together (feel free to add additional layers I’m only using 2 because that is what was requested)
  • Sew along the two long edges, backstitching at the beginning and ending
  • Flip to the right sides and press so the seams are lined up with the folds
  • Make two pleats along the length of the mask, each about a half inch deep, and clip in place
  • Sew along the short sides to hold the pleats in place
  • If using fabric for the ties iron in each long side by about a half inch (or just a little less) then fold in half and press again
  • Find the center of the tie and place the side of the mask there so the raw edges are tucked between the layers
  • Add a few clips to hold in place Start at one end of the tie and sew along the open folded edge across where the mask is inserted and all the way to the other end
  • Repeat for the second tie
  • Clip the threads and press the pleats and your mask is complete
  • The ties allow the mask to fit a variety of sizes and can be trimmed later if they are too long

Supplies Used –

I hope you enjoyed this sew & chat! Stay safe and Happy Sewing!

Whitney

How to Make a Preemie Memory Bear – Whitney Sews

Preemie Memory Bear tutorial from Whitney Sews

Over the past few years I have made over 50 memory bears, but last month I was given a preemie size sleeper and a few mismatch receiving blankets and had no idea what to do. The sleeper was super small (only 12 inches long!) and I had to figure out how to get the most use out of it for an 18 inch tall bear.

I spent an entire month trying to decide how to get the most material from the sleeper – but I was thinking within the same parameters I use for the rest of my bears. I finally realized I needed to go about making this bear in an entire different way. Instead of cutting into the outfit I would use it in its entirety and only add the bear’s head and arms to complete it.

I’ll be honest, this way of making a bear is not as straight forward and fool proof as making a regular memory bear. For a regular bear as long as you prep the right pieces and sew them in the correct order it will work out great. You can find my original bear tutorial HERE! The preemie bear I’m showing today is a little more fussy and fiddly to make, but DEFINITELY worth it if you have a very special preemie outfit.

Check out the entire video HERE to see exactly how the preemie bear is made!

I would love to know if you will be giving this type of memory bear a try! If you make this, or any other memory bear, I would love to see a picture. Please share one on the Whitney Sews Facebook page or tag me on Instagram!

Until next time, Happy Sewing!

-Whitney

All About Sewing Patterns – #ThePatternTag

One of my favorite sewing “supplies” are my sewing patterns!  I have close to 400 of them and they provide so much inspiration.  I love looking at the vintage patterns for classic styles and I pull different pieces from this one and that one for the costumes I make.  I thought it would be fun to make a tag video all about my patterns and share some of my favorites, most used, oldest, and many more.  I’ve been wanting to make this video for several months and finally had a chance to sit down on the floor and drag out the pattern crates on camera.

You can watch #ThePatternTag HERE!

A couple of years ago I shared a video showing EVERY pattern in my stash. I have purchased new patterns since then (and got rid of some as well), but the video is still a really good glimpse at my overall pattern stash. You can check it out HERE.

I’ve made a few other tag videos in the past. They are a fun way to get to know more about someone. You can find my favorite tag videos HERE.

I hope you enjoyed my pattern tag. I would love for you to do the tag yourself if you also have a sewing pattern stash. If you do make sure to use #ThePatternTag so I can find it. Until next time, Happy Sewing!

-Whitney-

Sew & Chat – Cosplay Plans

This week I really wanted to share a new video, but wasn’t sure how I could get one filmed and edited while still making enough progress on my cosplay project. Then I thought of a fun idea – what if I film a chit chat style video WHILE working on my cosplay. So that is what I did!

Last week I started my big cosplay for the year and have been spending every spare moment working on it (especially since it ended up needed about 72 extra hours of unplanned work…more on that in the video). The cosplay is going really well and I wanted to share the character, my plans, and how I’m putting it together with you all.

Grab a sewing project of your own and do some sewing with me while I chat.

I actually really enjoyed making this video. It didn’t take much extra time to film or edit so I was still able to make some good progress on my project. Let me know if you enjoy this type of video and want to see more like it in the future.

I need to get back to my sewing now. Until next time, Happy Sewing!

-Whitney-

January Update and Giveaway Winner

Last month I announced a Sewers Club box giveaway on my channel.

Today I’m sharing the winner who was randomly selected from all the eligible comments along with some updates.

I would to hear what you’ve been working on…maybe it will motivate me to get back to sewing! Also what are some plans or goals you have for this year? I’m going to try to teach my newly 5 year old how to sew. She wants to learn how to use a sewing machine soooo badly so I’m going to give her my old machine I got when I was about 15.

Until next time, Happy Sewing!

-Whitney-

This entry was posted in Blog.

Unboxing Sewing Packages & Giveaway

Over the past couple of months several companies have reached out to me inquiring if they can send their products to me to try. Many of them are not a good fit for me or my channel, but I did say yes to two of the companies. So today I wanted to show the sewing goodies I was sent. The items were provided for free, but I’m not being paid to talk about them.

The first item I received is a tailors clapper. I had never owned one before so was very interested in giving this one a try. I could tell right away the quality was great! The wood is incredibly smooth, so no rough spots to snag fabric. The grooves on the sides help the clapper fit nicely in my hand. I happened to be making my dungarees right after the clapper arrived, so it was the perfect project to test it on. The clapper helped the denim seams to lay nice and flat. I’m looking forward to using it on other projects in the future! You can find the clapper (along with more information) HERE!

The next package that showed up was a Sewers Club box. Sewers Club is a monthly subscription service. They deliver sewing projects right to your mailbox. The first thing I noticed was their adorable branding! As soon as I opened the box I was the card listing the items inside and their retail prices. I am always curious if subscription boxes are a good deal or not so I love how they list it all out with nothing to hid. Plus the box ships FREE within the U.S. and Canada.

The holiday box I received includes a panel print for a fun Santa apron as well as red material to line it with and a few other small items. You can use my affiliate link to save $5 off your first box! I also earn a percentage for referring you and it goes right back to creating sewing content for you to enjoy! You can find the link HERE!

The kind people at Sewers Club have kindly offered another box for a giveaway! Check out the video HERE to find out how to enter! *Make sure you leave your comment on the youTube video and not on this post*

Both items I shared would make great gifts for the sewers in your life (or yourself)! If you need some DIY gift inspiration check out my Handmade Holiday Gift Guide HERE!

Until next time, Happy Sewing!

-Whitney-

This entry was posted in Blog.