DIY Jedi Costume – Simplicity 5840 Walk-Through

Pattern Walk through with Whitney Sews

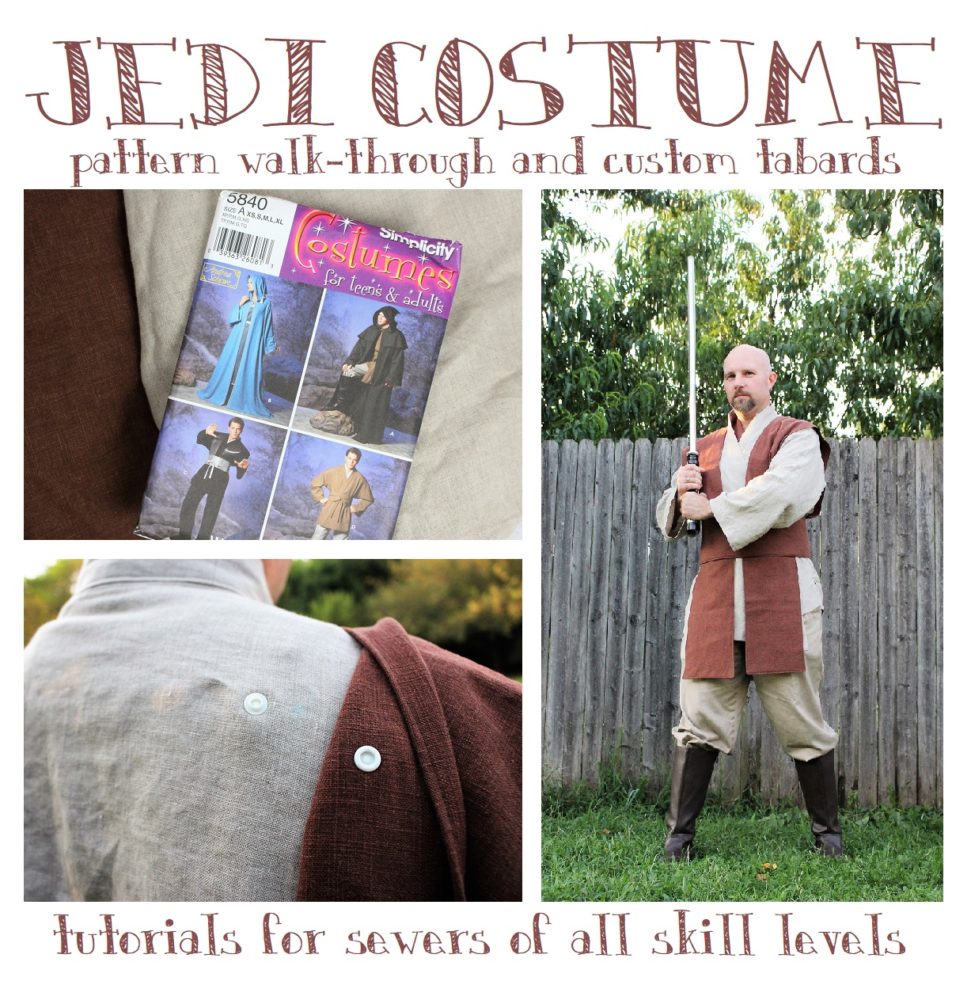
This week I’m very excited to finally be sharing another step-by-step sewing pattern walk-through!  These videos take soooo long to film and edit (at least double the time my regular tutorials take), but I hope it is helpful to anyone wanting to make a Jedi costume.  Today we’ll be working through Simplicity 5840 for the tunic and dickey and Saturday I’ll be sharing another video for the tabards and obi.

This is actually my third time working through this pattern!  The first time Jeremiah made the pattern (with me walking him through the process) and we came across the misprint on the tunic band piece giving the incorrect number to cut out.  That costume was not perfect, but was great for learning the ins and outs of the pattern.

The second time using the pattern I made my own costume that I LOVE!  I used a homespun fabric that is very lightweight and flowy.  While making that one I figured out exactly how to include snaps to hold the tabards in in place on the tunic and to close up the obi.  The best part is all the snaps are completely hidden from the outside so no one else would even know they are there!

A few months ago Jeremiah asked if I would make him a new Jedi costume. The main reason being he’s lost almost 50 lbs since the first one was made and it no longer fits!  Plus now that we know more about the pattern this version is much nicer.  You can see the new version and original very side by side below. 

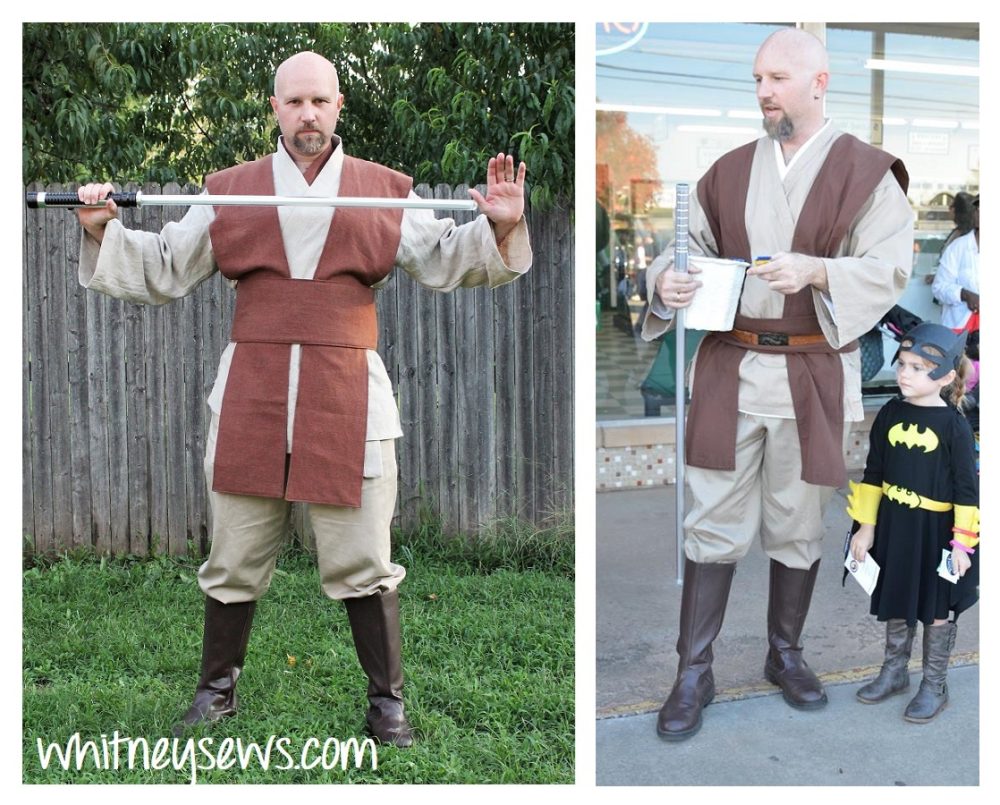
So you all get to benefit from our previous experiences and get the best of everything!

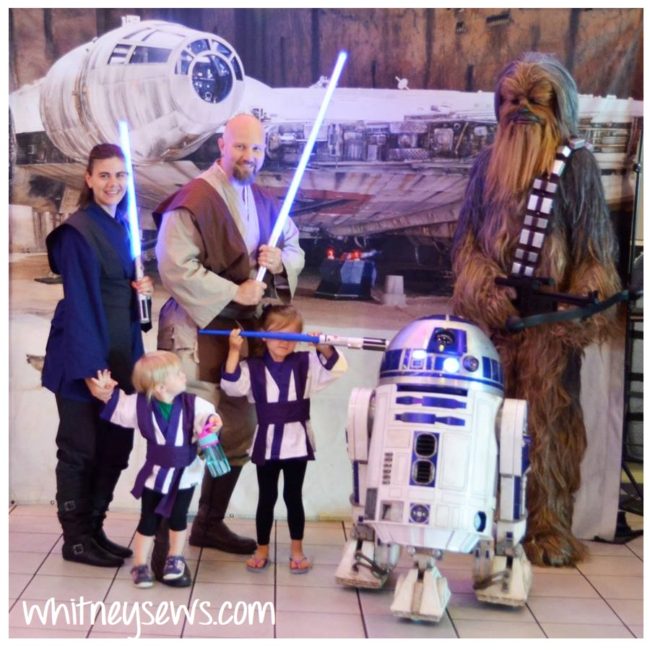
If you haven’t been around long you’re probably wondering “why in the world do you need so many Star Wars costumes??”  Well, I’m glad you asked! 😉  We are part of a group called JediOKC  that dresses up in Star Wars costumes for all sorts of events.  We do a lot of work with charities and I’ll be sharing a little more about that on Saturday.

For now let’s get into that step by step sewing tutorial!

As I said earlier, in part 2 of this series I’m sharing all my tips and info for making the tabards and obi to finish off your Jedi costume.  I LOVE using snaps on this costume (and some of my others!) to make sure the different pieces stay nicely in place.  This way I’m not having to worry about how I look and can instead focus on enjoying the experience.  You can find that tutorial HERE!

I have made several Star Wars themed costumes and projects over the years so I put them all together in a playlist you can find HERE!

Until Saturday, Happy Sewing!

-Whitney-

How to Sew a Clear Vinyl Tote Bag with Zipper

Whitney Sews
A couple of weeks ago I attended an event where only clear bags were allowed inside (for security purposes).  I don’t go ANYWHERE without a bag and enough supplies to take care of ANY situation.  Since I’m a super crafty person I took a few measurements and whipped up a clear  zippered tote bag.

I have a large wallet (plus sunglasses, keys, pullups for my youngest, wipes, and soooo much more) to fit inside, so I wanted my bag to end up measuring about 9 inches wide, 11 inches tall, and 3 inches deep.   This meant I needed to start with 2 body pieces measuring 13.5 x 13.5 inches and 2 strap pieces measuring 2.5 x 17 inches.  The fun part about this bag is since it’s clear you can spice it up with a contrasting zipper and thread.

Click HERE to watch the step by step tutorial!

As I mentioned in the video there is one thing I would change about this bag and that is to lengthen the straps.  The length I used was not long enough to actually wear the bag on my shoulder like a tote bag, making it a little inconvenient a few hours into use.  So next time I would add 5 or so inches to each strap for easier carrying.

But feel free to make your own version of the bag in any size/shape you like.  The best part of DIY is you can learn the techniques and adapt them to fit your own needs and ideas.

Speaking of DIYs I’m excited to announce that I’m part of a #sewtember collab with some other awesome creative ladies!

We will be posting tutorials to go along with FREE PDF sewing patterns throughout the month of September.  We would love for you to follow along with one (or more!) of them and share a pic of what you make.  Check out the video HERE for more info!

Until next time, Happy Sewing!

-Whitney-

HUGE Life Update and Tips for Motivation

Whitney Sews

This week I wanted to share some life updates.  We had a crazy busy summer and I thought I would take a few minutes to let you all in on everything.

I’ve been wanting to do this update for a few weeks and had planned on posting it on a weekend as a bonus video…but to be honest I felt a little burned out this week.  I wanted to talk about this because I know as a sewing youTuber it can appear that I am always full of creativity and have an endless amount of ideas and sewing energy.  It is true that having people expecting weekly content and wanting to put out great quality tutorials can be a fantastic motivator at times.  But I am human and there are times when my energy hits a wall…and that happened this week.  I actually have a few tutorials already filmed and ready to be edited, but editing was the last thing I wanted to do.

So instead I bumped my schedule around and am sharing my summer/life update today.  Chit chat videos are the quickest things to edit (so very little time actually spent at my computer) and that quick success will (hopefully) motivate me to start working on next week’s tutorial a little early.  This time around it was editing, but most of the time when I lose my motivation it has to do with sewing.

I think as sewers we all eventually come to a point where we run out of steam and don’t want to sew. Sometimes it’s because we have run out of ideas that interest us; other times it’s because of project failures making us feel like everything keeps going wrong.  So here’s a few tips for regaining that sewing motivation.

The first thing I try is simply taking a break.  If I’m not feeling like sewing I do something else – maybe lay in bed and watch a movie, read a book in one sitting, or cook something new.  If that doesn’t work I look through my unfinished projects and see if one of them inspires me to pick it back up.  If I’m still not inspired I’ll try to think of a very easy and quick project.  Something I can whip up really fast and keep running on that energy into another project (the exact same concept as editing the quick chit chat video to motivate me to edit the next).  And finally if none of those worked I will power through it!  I sometimes end up having to make myself work on a project, even if I’m not into it at all.  Most people don’t really have to do that last one, but I look at it like the old adage of getting back on a horse after a fall.  I can’t let my failures or lack of motivation keep me from something I love as much as sewing.  Motivation will come and go, but my love for sewing is here to stay!  Plus since I do need to create content on a weekly basis I can’t let myself stay in a sewing funk very long.

Enough chit chat – HERE is my video about all the things my family and I were up to this summer!

I hope you enjoy the video and found at least one of my tips motivating.  Until next time, Happy Sewing!

-Whitney-

8 Tips and Tricks Every Sewer Needs to Know

Whitney Sews SURPRISE! This week I’m sharing a bonus video full of sewing tips and hacks everyone who sews NEEDS to know!

I have been sewing for almost TWENTY YEARS (can you believe it’s been that long!) and I’ve definitely learned a lot over the years.  There are a lot of things I do that I feel are common knowledge.  But occasionally I stop myself and remember there were times when I didn’t know that “common knowledge” so obviously it’s not known by everyone.

So I put together 8 tips and tricks to share today and hope you learn at least one new thing.  Check them out HERE!

Do you have other tips you want to share??  I would love to hear them, so please leave them in a comment on my website or on youTube.  Until next time, Happy Sewing!

-Whitney-

This entry was posted in Blog and tagged .

Diamond Panes Block | Sampler Sew Along

Sampler Sew Along - Block of the Month Quilt Series
It’s time for the eleventh block tutorial in the Whitney Sews Sampler Sew Along!  Haven’t heard about it yet?!?  Each month I’ll be sharing a step by step tutorial to make a traditional quilt block as well as how to sew the blocks together to create a sampler style quilt that finishes in a great lap quilt/baby quilt size. This week I’m sharing a tutorial for the Diamond Panes quilt block.

Whitney Sews Sampler Sew Along

I share the step-by-step instructions for sewing the Diamond Panes Block HERE!

Don’t forget to share a pic of your finished block with #SamplerSewAlong so we all see it!

I hope you are enjoying the quilt-a-long as much as I am!  Until next time, Happy Sewing!

-Whitney-

Needle Book – EASY Sewing Project

Whitney Sews tutorial
Surely I’m not the only person who has several pieces of felt in their stash, but rarely used them! Mine are left from a Busy Book I made when my daughter was younger.  This week I was inspired by my felt stash to create a very easy (and useful!) needle book.

To be honest I have never owned a needle book before, and now I’m wondering why now!  It’s so handy to have all my pins and needles in one place.  It’s easy to grab and go anywhere I want sew.

Speaking of grab and go, make sure to grab a few pieces from your scrap stash for this project!  It’s a perfect way to feature those little bits and pieces of your favorite fabrics.  If they aren’t quite big enough, just piece a few together until they are large enough.  You can find the cutting measurements below – feel free to pin the pic so it’s easy to refer back to!

Whitney Sews Tutorial

After you have all your pieces cut you are ready to start sewing.  The entire project won’t take more than 30-45 minutes to sew.  You can follow along with the step by step instructions HERE!

I would love to know, what are your favorite 60 minute or less projects?  I’ve put together several of my favorites in a playlist that you can find right HERE!  If you give any of them a try (or any of my tutorials!) I would love to see a picture!  You can share them on the Whitney Sews Facebook page or on Instagram with the #WhitneySews.  I’ll be back next week with another new tutorial.  Until then, Happy Sewing!

-Whitney-

How to Mend a T-shirt

Whitney Sews

Last week my husband came to me and asked if I could repair a rip in one of his favorite t-shirts.  He needed the shirt to wear to a charity event, so I quickly fixed it up for him (I didn’t have time to film it, but did snap a before and after pic!).  So I set down a few days later and filmed step by step how to mend a t-shirt.  For the video I used contrasting fabrics so it would be much easier to see what I was doing.

Click HERE to watch the how to!

I hope this little mending how to helps you give new life to some of your favorite clothes.  But if your favorite shirts are beyond repair you can always turn them into a t-shirt quilt!  You can learn how to do that HERE!

Until next time, Happy Sewing!

-Whitney-

Fabric Banner DIY and FREE Pattern

Whitney Sews

Many years ago I shared a tutorial for a fabric banner.  I have made many different versions over the years for birthday parties, my filming background, and more.  This week I started decorating our homeschool room and knew right away we needed a fun fabric banner along one wall.  I hunted through my stash and found fabrics in the colors of the rainbow (minus indigo…) then I had the difficult decision of decided what color bias tape to use for the top.  That is what inspired today’s tutorial!  I wanted to match the bias tape to every single flag and I found a way to do that!  Today I’m going to show how to make a cute banner with interchangeable pieces.

If you haven’t seen the original tutorial, let me quickly explain what makes this banner so unique!  Each flag is made up of only one piece of fabric with a seam up the center of the back.  My mom showed me how to design the pattern (because she’s amazing!). This differs drastically from most banners where the flags are made of two triangle pieces.  I LOVE the one piece flags because they look nice and crisp, are fewer pieces to cut, and only one seam to sew on each.  The one downside is there is a little more fabric waste because of the unusual shape, but you can hang on to those scraps for paper piecing or other patchwork projects.

As you can imagine, this style of flag does require a specific pattern.  I have updated my original JPG pattern to an easier to print PDF that you can find HERE!  Don’t worry, it’s still FREE!

Back to the bias tape.  I have a TON of bias tape in my stash that needs to be used.

When the idea of tying the flags together popped in my head I knew it was a good one!  Each flag is sewn onto it’s own piece of bias tape and tied together with the next in a cute bow.  This makes the flags interchangeable!  Think of all the possibilities!  A birthday banner where the number can be changed each year!   Or a banner that can be changed to fit the month or season.

So are you ready to make your own banner??  You can find the step by step tutorial HERE!

I would love to see pics of your banner (and other projects you make) so make sure to share them on the Whitney Sews Facebook page or on Instagram with #WhitneySews.

Until next time, Happy Sewing!

-Whitney-


Tote Bag With Zipper Tutorial

Whitney Sews how to
 I’m so excited to share this week’s tutorial!  I’ve mentioned several times recently I don’t get to sew nearly as much as I used to (because my kids stopped napping).  So the majority of my projects are practical items we can actually use.  Bonus points if it helps keep our house and toys in better order!  This has meant making bags and bins in just about every shape and size imaginable.  I recently picked up a set of tinker type toys for my daughter and they inspired this week and last week‘s bags.  A zipper bag to hold all the plastic connectors and a tote bag with zipper for everything else.

How to by Whitney Sews

The most frequently requested tutorials are for tote bags with zippers and I FINALLY made one that I hope you will love!  As soon as I completed this tote I was coming up with several other versions I also want to make and share.

As you can imagine, a bag like this does require quite a lot of pieces in all different sizes.  So I made a separate 6 page PDF with everything from the yardage requirements to cutting details and much more.  You can pick up your copy over on my shop page or on Patreon if you are a second tier or higher Patron.

You will need 3 fabrics for your zippered tote.  I actually used flannel for the outer and quilting cotton for the lining.  I have an entire tub full of cute flannels that I never use.  I’ve decided instead of waiting for “flannel type projects” I’m going to start using them for anything I want.  I worked out great this time and I will definitely be using more of my flannel stash soon!

Is there a kind of fabric you have a lot of but rarely use??

Anyway, onto the reason you’re scrolled this far.  Click HERE to watch the step-by-step sewing tutorial!

I would love to see pics of the bags (and other projects you make) so make sure to share them on the Whitney Sews Facebook page or on Instagram with #WhitneySews.

Until next time, Happy Sewing!

-Whitney-

Zipper Bag with Bound Seams

sewing how to from Whitney Sews

This week I have a fun project to share! I recently picked up a set of tinker type toys at the thrift store for my youngest daughter (She LOVES working with her hands).  One of my favorite things to create are all sorts of bags for my kids to keep their toys organized.  Drawstring bags to hold wooden animals, zipper bags to store game pieces and more.  So I definitely I wanted to create a set of bags to hold all these new pieces.  The idea popped in my mind to make a tote bag with zipper top (which is one of my highest requested tutorials and next week’s project!).  Since there are a TON of smaller plastic connector pieces it seemed like a good idea to make a separate bag to hold those as well.

This week’s tutorial is the smaller lined zipper bag with bound seams.  This means all the seam allowances inside the bag are bound with bias tape.  It’s inspired by my 5 Minute Zipper Bag and the lined version that incorporated french seams.  The french seams add quite a bit of bulk to the edges of the bag, so this time I tried out binding them instead.  Cuts out all the bulk and finishes the raw edges so nicely.  Some of you may be wondering why I love this style of zipper bags so much instead of lining them in the traditional method, that is because I like making sure the lining won’t be moving around and trying to come out each time the bag is dumped over.

Pick out the two (or three) fabrics you want to use and grab some seam binding (or make your own using THIS tutorial) and cut out the pieces using the measurements listed below.

Whitney Sews Tutorial

Now you’re ready to sew the bag together!  Watch the full how to HERE!

I would love to see pics of the bags (and other projects you make) so make sure to share them on the Whitney Sews Facebook page or on Instagram with #WhitneySews.

Until next time, Happy Sewing!

-Whitney-