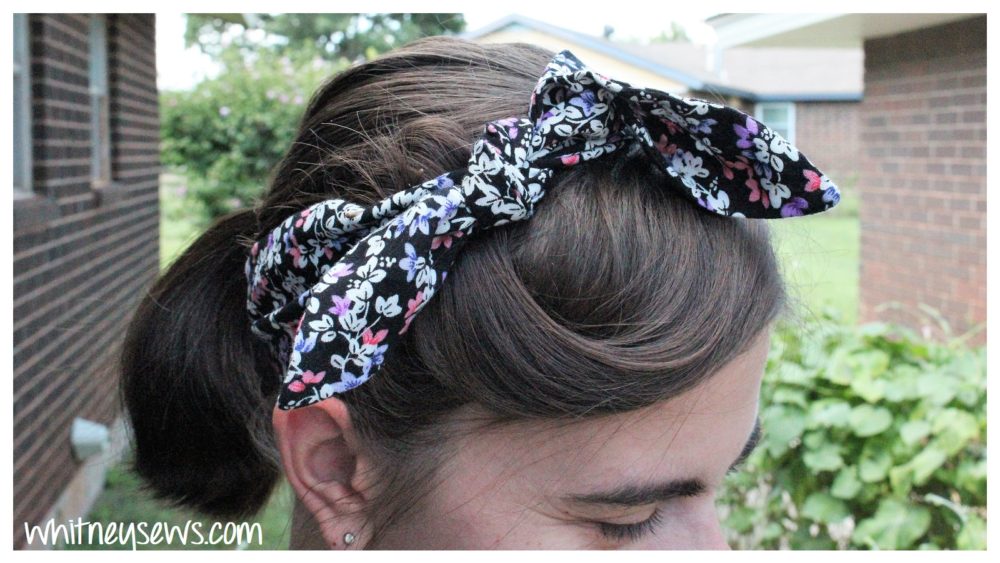
The Ultimate Guide to Pricing Memory Bears

In 2018 I posted my first memory bear video sharing step by step how to sew a memory bear. I also shared a handful of other bear making videos with additional tips and information. More than 500,000 people have watched to learn how to make bears. The number one question I get now, pertaining to bears, is how much to charge for them. So today I’m sharing my ultimate guide to pricing memory bears.

When I started my memory bear sewing business I had to decide on a price to charge for my bears. I came up with a system for pricing that worked well for me. It all starts with making a practice bear.

Step by step memory bear tutorial

In all my bear sewing videos I encourage making a practice bear. It allows the sewer time to learn the pattern and make any mistakes that will be made, before cutting into irreplaceable materials. But the practice bear isn’t only for gaining confidence with the sewing pattern, it is also to time exactly how long it takes to sew a bear.

When I’m sewing I can guess how long it takes me to make something, but my guess is usually wrong. I will forget to account for how long hand sewing takes or the time spent ironing on interfacing. You want an accurate number for how many hours you spend making something (this works for other handmade items, not just bears). Your time is valuable and you deserve to be paid for ALL your time spent working.

Time EVERY step – from planning the cutting layout to the very last stitch. Then you are ready to start figuring out how to price your bears.

I explain everything in the video linked HERE. Give it a watch and let me know what you think.

Does the guide in my video help you price your memory bears? If so please share this post so others will see it. Until next time, Happy Sewing!

Barbie Clothes YOU Can Wear!

In light of the new Barbie movie, my thrifted Barbie collectable doll book, and the fact that I own more than 550 sewing patterns…it just makes sense to go through my pattern collection to find patterns that can be used to sew real life classic Barbie looks.

As a competitive cosplayer I love using sewing patterns as a starting point for my costumes. I will used pieces from multiple patterns together to get the exact look and design I need. But the patterns I’m sharing today are more straight forward and would only need smaller adjustments to look like what Barbie wore.

Growing up I had a few Barbies and really enjoyed dressing them up in different outfits. My mom even made clothes for my Barbies. (Which btw bless her for that! Sewing on that small of a scale is not easy.) Her mom made clothes for her Barbie as well and Mom still has her doll and the clothes my Grandma had made. Several years ago I came across a reprint of the exact Barbie pattern my Grandma used all those years ago and it is so special to me.

But today we aren’t talking about making clothes for 11.5 inch dolls, but rather recreating those doll designs for people. I have selected several classic Barbie looks from the collectable Barbie book and found sewing patterns with very similar designs so you can sew real life classic Barbie looks for yourself!

You can see all the Barbies and patterns in the video linked HERE!

Leave a comment letting me know which Barbie look is your favorite. Maybe it’s one from the video or one I didn’t cover that you want me to see. Until next time, Happy Sewing!

How to Get FREE Sewing Supplies

As someone who has been sewing 20+ years I know the cost of sewing supplies can really add up! I have managed to build up a large stash of sewing materials and supplies, but I paid very little money. That is because I spent many years figuring out how to acquire sewing supplies cheap and even FREE. Today I’m sharing my top 5 ways to get FREE sewing supplies…and it’s not what you think!

You can hear the 5 ways to get free sewing supplies in my new video HERE!

What do you think of the tips?? Have you tried them before? Let me know in the comments along with any other ideas you have. Until next time, Happy Sewing!

Whitney

Making a Quilt, To Make a Dress?!?

There are definitely some unusual aspects to the world of competitive cosplay. Odd supplies and unique techniques and actually commonplace. This time around it’s not weird materials, but the fact that I’m making a quilt so I can make a dress, a quilt dress to be exact.

The quilt dress I’m talking about is the dress worn by Jane Powell in the final scene of Seven Brides for Seven Brothers.

The quilt dress was the brain child of Walter Plunkett, the film’s costume designer, but because of the film’s low budget he had to take a few shortcuts. His shortcut led him down to the thrift store, where he found some handmade quilts. The costuming team turned those quilts into stunning dresses.

My goal is to recreate the dress from scratch starting with designing and piecing the individual quilt blocks. In the spirit of the thriftiness of Walter Plunkett I’m making the entire project using only materials already found in my stash.

As you can imagine, this is the start of a rather large project. I share many more details and show my progress in the video HERE.

https://youtu.be/znb9AN4K3hY

As you can imagine, this is the start of a rather large project. So leave me a comment of encouragement and make sure you’re subscribed on youTube for future updates on the dress!

Until next time, Happy Sewing!

Whitney

Quilt Coats – Love ’em or Hate ’em

Quilt coats. They are very popular right now, along with quilt dresses, quilt bags, and just about quilt everything. You can’t scroll through Instagram or Pinterest very long without seeing something made from an old quilt.

I know there are a lot of opinions about quilt coats and if handmade quilts should or should not be cut up and repurposed. I’m not here to argue that point. I’m here to talk about the quilt coat I’m making…from scratch.

Yes, I am making a quilt, pieces of a quilt really, to then make a coat. When I restarted Sew Your Stash last Fall I knew I wanted to make something with my scraps. I don’t really need another quilt so I decided to make the quilt coat I had been dreaming about.

My favorite method of quilting with scraps is paper piecing. It doesn’t involve as much accurate cutting or sewing as traditional quilting. I ended up getting out my Accuquilt cutting machine and realized I had two dies (the large triangles and the kite die) that would work for making spider web quilt blocks. I made a spider web quilt several years ago. That time around I hand cut all the pieces which took much more time!

With the spider web quilt being paper pieced I can sew a little here and a little there as I have time. I have pieced 50-55 triangles so far and will need many more, but it’s a good start! I’ve incorporated tons of scraps from old projects making this a fun walk down memory lane as I sew. The linked video shows how I use the accuquilt to go from a piece of newspaper to a finished quilt block.

So, what do you think of quilt coats? Do you love them or hate them?

Until next time, Happy Sewing

Whitney

Giant Gift Bag: Sewing for St. Jude

What do you do when you have a large, bulky gift to wrap?? Make a giant gift bag that can be used year after year!

I partnered with St. Jude and JoAnn Fabrics to bring you this tutorial and tell you about St. Jude’s lifesaving work. I used three yards of the Holiday Deer fabric designed by Madison, a former St. Jude patient along with three yards of a stash fabric and a wired ribbon from Dollar Tree.

The best part about a project like this giant gift bag is you can customize it to whatever size and shape you need.

But before I get to the tutorial I want to talk a little bit about St. Jude. My favorite thing about St. Jude is the families never receive a bill for the treatment their child receives. Instead of worrying about finances and how bills will be paid, families can focus on their children and the care they are receiving. The way St. Jude is able to provide this type of care is through the generosity of donors like you and me.

St. Jude has asked me once again to participate in their fundraising campaign this holiday season. I have set a goal of $500 and hope we can not only reach that goal, but give generously above and beyond. Last year we also had a $500 goal and ended up raising an amazing $1,060!

You can donate to St. Jude through my link HERE!

Now onto the tutorial. This giant gift bag is VERY easy to make, but looks SO incredible!

Watch the full tutorial HERE!

Please like and share the video to help more people see it and hear about the work St. Jude is doing to help end childhood cancer. If you feel led to donate you can do so HERE. Until next time, Happy Sewing!

Whitney

Sew Your Stash – Update

Did you know Sew Your Stash is back?!? Sew Your Stash originally began in 2017 when I realized I needed to stop buying, buying, buying and actually start using what I had. The original challenge lasted three years and 14,000 people joined in with me. We made so many amazing things from our stash fabrics!

Now two years since the original challenge ended I found myself with an overflowing stash once again. I realized it was time to restart the challenge. Six hundred people have already joined in on the Facebook group and I would love for you to join too!

Today I’m sharing ALL the projects I made from August through October using my stash fabrics. I’m so happy with how many things I made; it is a TON!! I made costumes, bags, a backpack purse, and so much more. I even started a quilt coat from scraps and am trying my hand at English paper piecing. You can see ALL the projects in my Sew Your Stash update HERE!

I mention a TON of videos and resources in the video. The links for all of them are in the video description box on youTube, so make sure to click through to youTube to find them all.

As we head into the holiday season I have partnered with St. Jude. This is my second year partnering with them and I’m so honored to help out. Last year we raised a total of $1,060 and I would love to do even more this year. If you aren’t familiar with St. Jude, they have helped bring the childhood cancer survival rate from 20% to 80% with their breakthrough research and treatment. The best part is the families never receive a bill! It is funded by people like you and me so the children and families can focus on healing rather than worrying about finances. I will have a video coming soon sharing more details and a project inspired by a fabric designed by a St. Jude patient. I have a donation page set up if you are interested in donating to St. Jude and making a difference in the lives of St. Jude patients and their families! You can click HERE to donate.

I hope you all have a wonderful week! I will be back soon with more tutorials. Until next time, Happy Sewing!

Whitney

Making a Costume from the Thrift Store

This Halloween I was challenged by Central Oklahoma Goodwill to create a costume using items found at a Goodwill store. I thought it was a fun idea so I took on the challenge and made a costume from the thrift store. The costume I made is Vanellope from Wreck-It-Ralph.

Before I headed to the store I made a list of costumes I could make based on different characters who wear normal-ish clothing. So clothes I could find at the thrift store and after some small DIYs, look like what the character wears.

One character I really wanted to do was Vanellope. So when I found the aqua hoodie I was so excited! The hardest part was obviously her mismatched striped leggings. I ended up making them using two different striped t-shirts.

You can see all the DIYs I did in my youTube video HERE!

I’m so thrilled will how the costume turned out! It’s really comfortable since I made it from real clothing. Since I cosplay and attend several conventions each year I will definitely be wearing this costume many times. What thrift store costume would you put together??

Until next time, Happy Sewing

Whitney

*The clothing was provided to me by Central Oklahoma Goodwill in exchange for making the costume*

EASY Kangaroo Pocket – Sweatshirt Upcycle

Several years ago I was wearing a sweatshirt and remembered how much I prefer hoodies for their kangaroo pockets. I decided right then that I needed to make a kangaroo pocket tutorial using a t-shirt as my material. It took me a few years to thrift a plain sweatshirt I liked and I’m finally showing you how to make a super simple kangaroo pocket to transform an old t-shirt.

When I was originally inspired for this project it was from a sweatshirt with a large print on the front (so not ideal for this upcycle). I thought a plain sweatshirt with with a pocket made from one of my kids outgrown graphic tees would be so fun. But in the end I found this grey sweatshirt with a bleach stain on the front. It was from the basement of a local thrift store where they have a fill-a-bag for $5 sale. It’s sort of a last chance for clothes that didn’t sell or are too damaged to sell in the regular section. I snagged the sweatshirt, a few other clothes to wear, and a jean skirt – new with tags, but with a busted zipper (I’ll be upcycling it in an upcoming tutorial). The sweatshirt and skirt would have likely ended up in a landfill since they are damaged, but I was able to get them both and give them a whole new life.

When I got home I dug through my “clothes for cutting” pile (the part of my stash where I keep clothes I plain to repurpose as materials. None of the graphic tees had the look I wanted and suddenly I noticed a teal and grey striped shirt from my kids that was an exact match to the sweatshirt. It was meant to be!

Once I had my supplies the project was so fast and easy to make. I started by measuring a hoodie in my closet to see what size my pocket needed to be. Below are the measurements I ended up using. I went with a quarter inch seam allowance on the sides and a little bigger at the top and bottom to keep my stitching lined up with the edges of the stripes.

Once your pattern is made you’re ready to start and you’ll be amazed how quickly you can transform a sweatshirt from drab to fab!

Watch the step by step tutorial HERE!

So what do you think? Did I save this old sweatshirt and make it wearable again? I’m looking forward to cooler weather so I can start wearing it.

Want to see how I have upcycled other clothing my kids have outgrown?

My daughter loved her cat shirt and wanted to wear it even after it was outgrown. I did some careful cutting and used it for the top portion of a pinafore dress. She loves the dress and how I was able to extend the life of her shirt. Watch that tutorial HERE!

Let me know how you like to upcycle clothing in the comments. Until next time, Happy Sewing!

Whitney

Making Liz From the Magic School Bus

I love dressing up as Ms. Frizzle, but I’ve been using a generic stuffed dragon as my Liz. I want a more accurate Liz based on the book illustrations. This week I cut up my daughter’s first costume to repurpose the material as a Liz for Ms. Frizzle.

I never even thought of making Liz until I found Simplicity 8715.

As soon as I saw the pattern I instantly thought of this costume and knew I had to make myself a new Liz. The next question is what fabrics to use. I sat on it for a few months, not knowing what to use and not really ready to get started. Then I remembered the costume I made for Peyton when she was an infant. Peyton wore it two years in a row to our local Medieval Faire and Skyler wore it as well. The dress has long been outgrown and just asking to be reused.

You may be wondering, why not just buy new fabrics? Well at the beginning of August I restarted my Sew Your Stash challenge. Back in 2017 I realized I had begun collecting fabrics more than using fabrics, so I started Sew Your Stash and challenged myself to shop my stash before shopping at a store. Over the next 3.5 years I made countless projects from my stash and so many Whitney Sews viewers joined in and sewed amazing things from their stashes. Between the end of the original challenge and now I have rebuillt my stash (with new and thrifted materials as well as clothes intending for repurposing) and need to focus once again and using what I have. You can join me in the Facebook group to see what I’m sewing from my stash and share what you’re making.

Since I put myself on a buying ban I got creative and chose to repurpose the beautiful green velvet dress into my new Liz. Click HERE to see how I did it.

So what do you think I should make next using the fabrics and clothing in my stash??

Until next time, Happy Sewing!

Whitney