DIY Halloween Vest | Fabric Panel Project

Which witch and the who

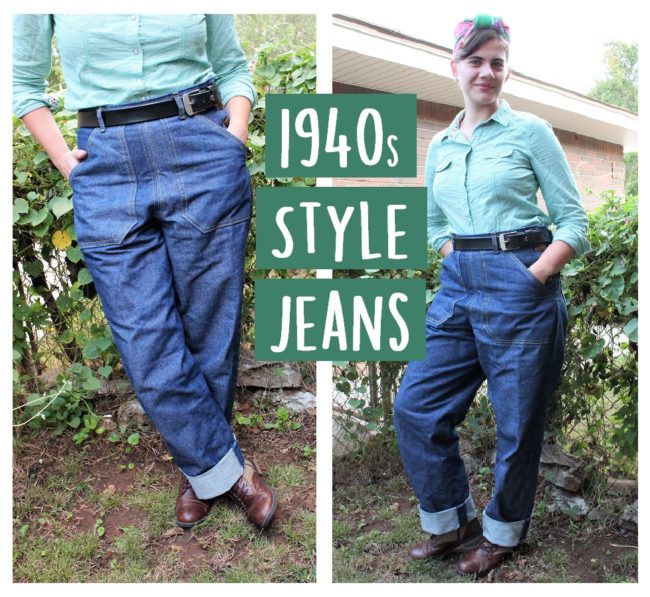
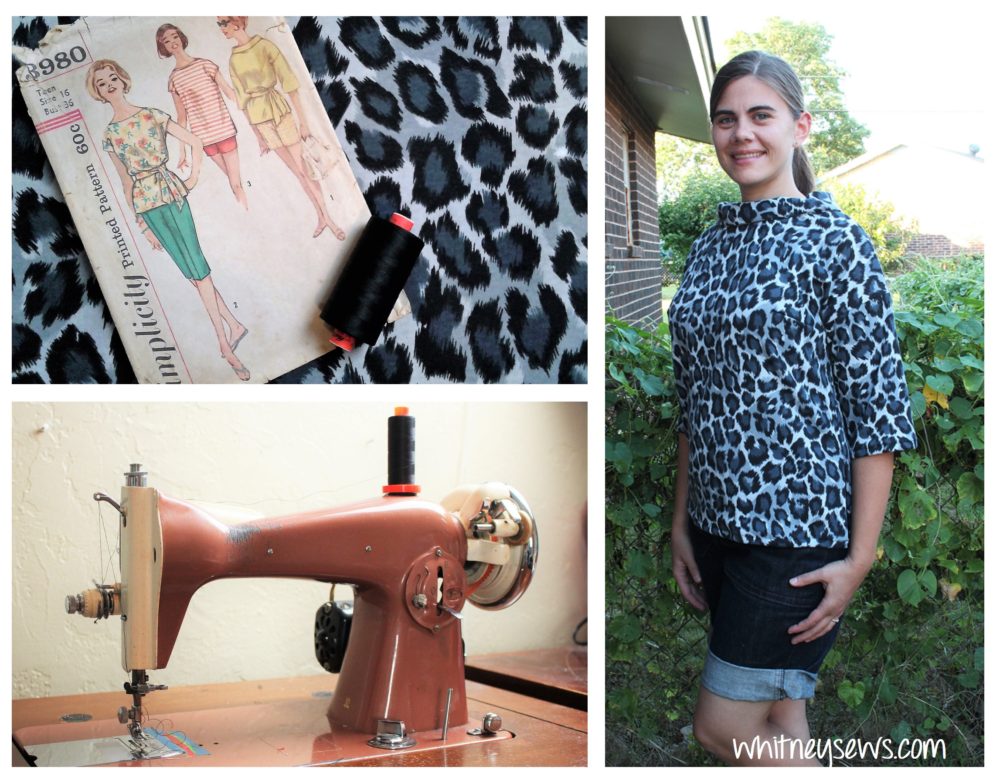
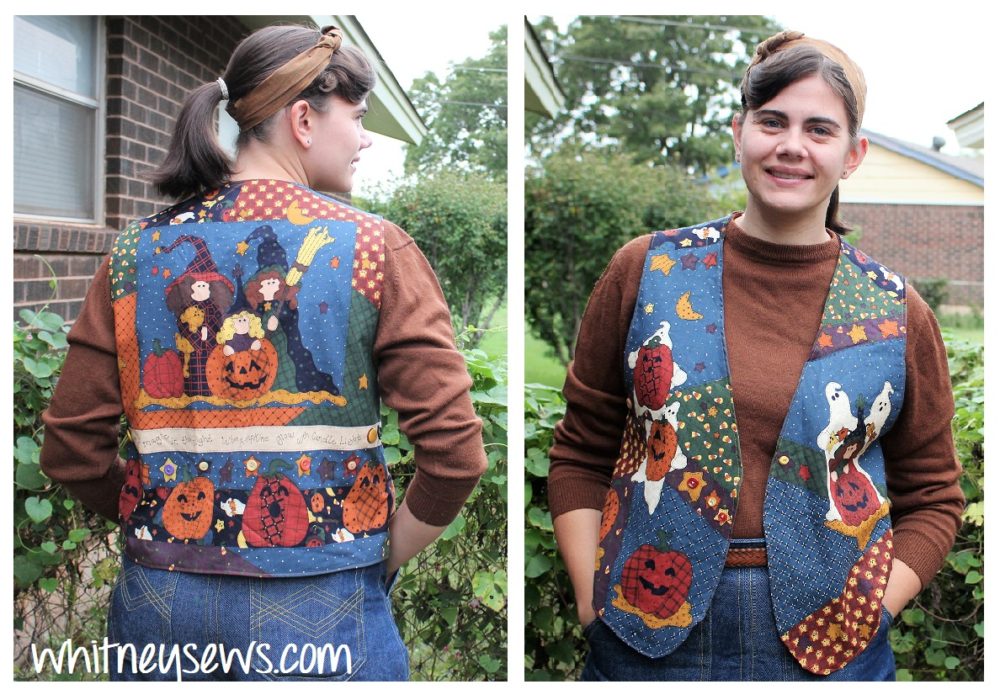
Since Halloween is quickly approaching I thought it would be fun to create a cute Halloween vest using a preprinted fabric panel. A sweet lady named Janice sent this to me recently (along with a ton of other sewing goodies!) and it brought back a ton of fun memories for me. Growing up my mom made most of my clothes and some of her own.  She often worked with sewing patterns, but I do remember several times when she used fabric panels to make vests, aprons, fabric books, and more.

The neat thing about printed panel projects are all the designs are printed on, so there are no appliques, piecing, or fabric matching needed most of the time.  Of course this can also end up looking a little flat and one dimensional.  An easy way to add the dimension back in is with buttons, puffy paint, beads, and trims.

The first time I sewed a panel project it was a Charlie Brown tree skirt back in 2011 or 2012.  I added a ton of buttons and beads to it (which ended up not being a good idea…presents don’t sit well on it and it’s uncomfortable to step on).

This vest project actually had buttons printed on so I selected 16 buttons from my stash that were a similar size and color to be sewn on top of each.  After the embellishments were added I was ready to sew the vest together.

See how it all came together in the video HERE!

So have you made projects using fabric panels before?? I would love to hear about yours, so leave a comment on youTube or here on the blog. Until next time, Happy Sewing!
-Whitney-

Sewing Vintage Style Jeans

Sewing Vintage Fashion

As I’m transition my wardrobe to a 1940s inspired style I KNEW I still needed a pair of jeans.  So I set out to create my own pair of 1940s jeans.  I looked at TONS of photos on Pinterest and Instagram of 1940s jeans and reproductions and selected all my favorite elements.  The double cuff at the bottom, large pockets, side button closure, and the overall fit.  I made sure to incorporate all of those into my jeans.

I love how my jeans turned out, but it was a long journey to get them made with plenty of struggles along the way. I started with Simplicity 8447 as my jumping off point.  Then made tons of alterations to the pattern including removing the darts, taking in the legs and crotch, drafting pocket patterns and a lot more!  I made a few practice pairs then ordered a bolt of denim for the final version.

1940 style jeans

This was my first time making anything larger than a tote bag out of denim, my first time using topstitching thread, and my first time making this many alterations to a pattern.  I’ll be honest, I doubted myself and my skills through several parts of the process.  But I was determined to keep going and make something I could be proud of!

Check out the video HERE to see exactly how I made my jeans!

The jeans turned out exactly how I wanted.  But I’ve already learned new things to help make my next pair even better!  YEP, I’m planning on making more vintage style jeans in the future!  If I had been asked years ago, or even last year, if I would make my own jeans I would have laughed.  But it’s an amazing feeling to create my own wardrobe staples.  I hope to learn more and more with each pair I make!  I’m planning on the next pair being a more fitted 1950s style pair with a hidden zipper closure in the pocket.  This will require a whole new pattern drafting and several more practice pairs, so I’m not sure when I’ll be able to start, but I can’t wait!

Would you ever try making your own jeans?!?  What’s the hardest thing you’ve ever sewn??

Until next time, Happy Sewing!

-Whitney-

Anna’s Choice | Sampler Sew Along

Sampler Sew Along - Block of the Month Quilt Series

It’s time for the sixth block tutorial in the Whitney Sews Sampler Sew Along!  Haven’t heard about it yet?!?  Each month I’ll be sharing a step by step tutorial to make a traditional quilt block as well as how to sew the blocks together to create a sampler style quilt that finishes in a great lap quilt/baby quilt size. This week I’m sharing a tutorial for the Anna’s Choice block.


Part of the Whitney Sews Sampler Sew Along
I share the step-by-step instructions for sewing the Anna’s Choice block in the video HERE!

Don’t forget to share a pic of your finished block with #SamplerSewAlong so we all see it!

If you want more details on the supplies I use in my videos, you can find them all HERE!  I set up an Amazon storefront so all my most used items are in one place and if you use my link to purchase anything I get a small percentage for referring you and that goes to help create more quality content like this video tutorial.

Until next time, Happy Sewing!

-Whitney-

DIY Letter Board Bag – Sewing How to

Letter board bag using velcro letters

I shared on my vlog channel recently that I had a set of velcro letters I had saved for over a decade.  The letters came with a t-shirt that had a large velrco patch on the front.  You could use the letters to spell out messages.  I wanted to repurpose the letters into something fun for my kids to play with.  Several people asked me to share a tutorial for whatever I made, so here is the letter board bag DIY!

One side of the bag has 4 rows of velcro where any message can be displayed and the other has a zipper pocket where the letters can be stored.

Letter Board Bag Sewing How to

The video also includes an easy way to make your own velcro letters.  Check out the full step by step tutorial HERE!

We are a homeschooling family, so I made this bag for my kids to practice spelling and reading, but it would be fun for anyone to carry as a clutch.

By the way, here’s those measurements again from the video in case you didn’t get them written down.

Letter Board Bag Measurements

What would you write on a bag like this?

Until next time, Happy Sewing!

-Whitney-


Sewing a 1960s Pattern with a 1960s Machine

Creating a shirt from a 1960s Simplicity pattern on a 1960s sewing machine

I love wearing vintage style clothing and thought it would be fun to sew a 1960s inspired shirt using my sewing machine from the 1960s.  I found a couple of vintage sewing patterns in my collection for knit shirts and some fabric a viewer sent me recently.  I couldn’t decide between the two, so I asked on instagram which I should use for my 1960s inspired shirt.


Simplicity 3980 was the winner!  Make sure you’re following me on Instagram so you can vote in my other polls! I followed the pattern to create view 1, a drop shouldered shirt with a cowl neck.  This is a great casual shirt for Autumn and I can not wait to wear it.

See how the shirt came together HERE!

So what do you think, did I do the pattern justice?  Would you like to see more projects like this where I’m following vintage patterns?

BTW did you know I have a huge giveaway going on right now?!?  It’s to celebrate Whitney Sews reaching 100,000 subscribers on youTube.  Check out the giveaway HERE so you have a chance to win!

Until next time, Happy Sewing!

-Whitney-

Whitney Sews 100,000 Subscriber Giveaway!


You see that face?!? That is my excited face for reaching 100,000 subscribers on Whitney Sews.  I started posting tutorials on youTube in 2009 and would have never guessed so many people would watch and subscribe!  As a way of saying thank you to all you lovely people I am hosting my biggest ever giveaway!

You can see all the goodies I’m giving away, and find out how to enter HERE!


Shop some of the giveaway prizes and help support Whitney Sews!


Feel free to share about the giveaway using #WhitneySews100KGiveaway so your friends know you entered 🙂

Best of luck and Happy Sewing!

-Whitney-


Sewing Pattern 101 – Selecting and Understanding

How to pick the perfect sewing pattern and understand the sizing

This week I’m kicking off my Sewing Pattern 101 Series!  As I shared in my last Sew Your Stash Update, I have made it a goal of mine to use more of my 300+ sewing patterns.  Along the way I’ve been sharing pattern reviews as well as step by step tutorials.  But I wanted to do a separate series breaking down sewing patterns so they are easier to understand for beginners.  In this first post I’ll cover selecting a sewing pattern as well as all the information found on the envelope and what it means.

Before going to the store to pick out a pattern you want to start by taking your own measurements.  The three most important are bust (the fullest part of your chest), waist (natural waist which is the smallest part of the body), and hips (around the fullest part of your hips and bum).  Sewing patterns are sized differently than store bought clothing, so you will need to use your measurements to determine which pattern size is right for you.

In the video I cover how to find a sewing pattern using the pattern catalog and locating the actual pattern in the cabinets. When you look at the sewing pattern you select you will notice there is a ton of info listed on the envelope!  So I’m also sharing what that information is and how to read and understand it.

You can find all of that and more in the video HERE!

I would love to know if you use sewing patterns already.  If so do you have a favorite pattern company?  If not, do you feel like you are ready to select a sewing pattern and give it a try? What other topics would you like to see covered in a future Sewing Pattern 101 video?  I’m always open to suggestions and requests!   Until next time, Happy Sewing!

-Whitney-

The BEST Memory Sewing Projects – Huge List With Tutorials

Tons of projects for keepsake sewing

I love keepsake sewing!  It is truly an honor to be entrusted with preserving memories by creating special items using a loved ones clothing!  It is something I never thought about until last year when I was asked to sew some projects for a friend using their father’s clothing.  He had recently passed away and the family wanted some tangible items to help them through their grief.  I made a large denim rag quilt using the jeans and t-shirts they provided.

a keepsake quilt

It turned out wonderful!  The quilt brought joy to a widow and opened my eyes to another way I can use the talents I’ve been blessed with to help others.  As a surprise I used some of the leftover material to create my first memory bears for the grandchildren.

Memory bears made from clothing

I loved surprising my friends with the memory bears!  Since then I have made many more bears.  Each bear (and every other memory item) is so special and rewarding to make!

Need some inspiration for other keepsake projects to preserve precious memories using your loved ones clothing?!? Today I’m sharing a whole list of projects that are perfect for memory sewing. They are all projects I have made in the past and have step by step tutorials for on my channel.  The projects range from t-shirt quilts showing off several t-shirt designs to ornaments made using the leftover scraps and much more discreet plus many more in between.

Find all the inspiration you need in my video HERE!

What was your favorite project on the list?!?  Will you be making any of them?  I would love to hear about it!

Until next time, Happy Sewing!

-Whitney-


Sew Your Stash – End of Summer Update

Update on my summer sewing projects

It’s that time again, for a Sew Your Stash update!  I’m sharing all my summer sewing projects and how they fit with my newest Sew Your Stash goal – to use more of my sewing patterns.  I’m switching my style over to a vintage inspired wardrobe (more on that HERE), so it was a great time to start making some 1940s and 1950s inspired clothing.  I made some good progress into using my 300+ sewing patterns!

I was able to use about 7 patterns (which is a lot for just a few months) and go ever each project along with pics in my update video HERE!

I can not wait to keep working on using my patterns as well as my fabric stash!  I think my favorite thing I made this summer were the 1940s inspired shorts.  They were a last minute idea, but I love them, and am getting so much wear out of them already!  The shorts are so comfy to wear and finally used up a piece of denim from my stash.

What is your favorite item shown in the video? I would love to know!

Don’t forget you can join the Sew Your Stash facebook group to share the projects you are making from your stash.  Until next time, Happy Sewing!

-Whitney-

Rail Fence | Sampler Sew Along

Sampler Sew Along - Block of the Month Quilt Series

It’s time for the fifth block tutorial in the Whitney Sews Sampler Sew Along!  Haven’t heard about it yet?!?  Each month I’ll be sharing a step by step tutorial to make a traditional quilt block as well as how to sew the blocks together to create a sampler style quilt that finishes in a great lap quilt/baby quilt size. This week I’m sharing a tutorial for the rail fence block.

Block 5 of the #SamplerSewAlong
I share the step-by-step instructions for sewing the rail fence block in the video HERE!

Don’t forget to share a pic of your finished block with #SamplerSewAlong so we all see it!

If you want more details on the supplies I use in my videos, you can find them all HERE!  I set up an Amazon storefront so all my most used items are in one place and if you use my link to purchase anything I get a small percentage for referring you and that goes to help create more quality content like this video tutorial.

You might be interested in knowing that I’m currently hosting a giveaway for the 32 piece Ultimate Presser Foot Set from Madam Sew!  Check out the video HERE where you can see the unboxing and enter to win your own!

Until next time, Happy Sewing!

-Whitney-