Tote Bag With Zipper Tutorial

Whitney Sews how to
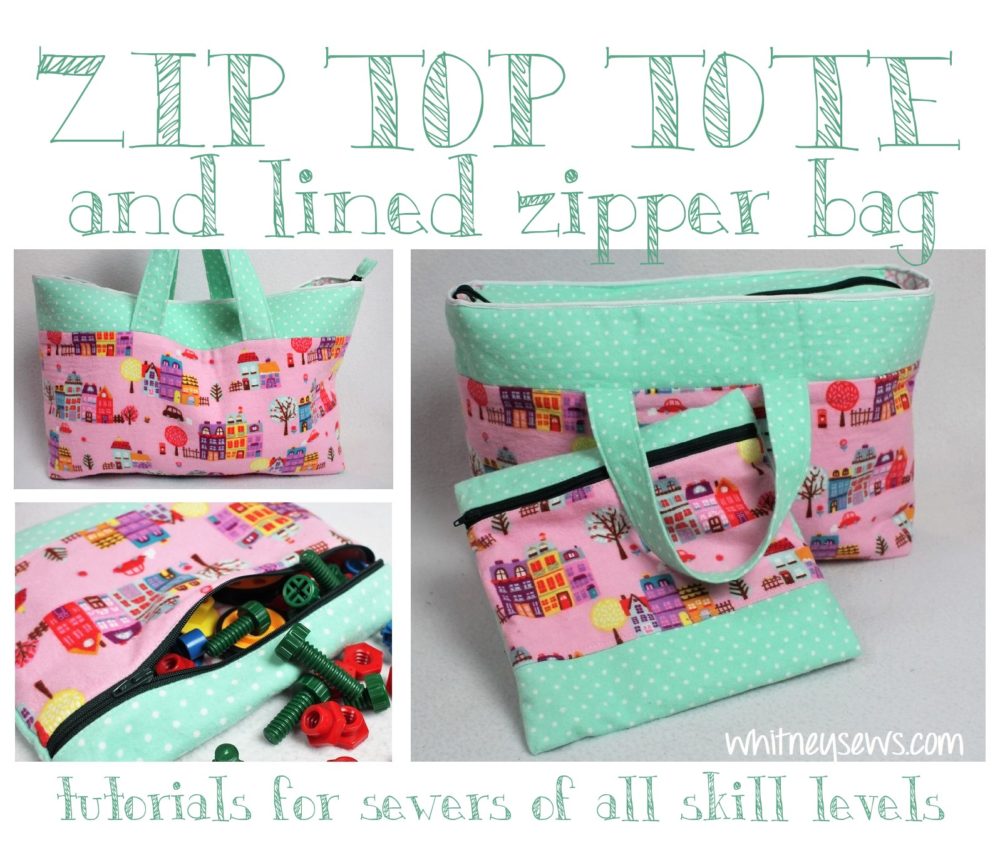
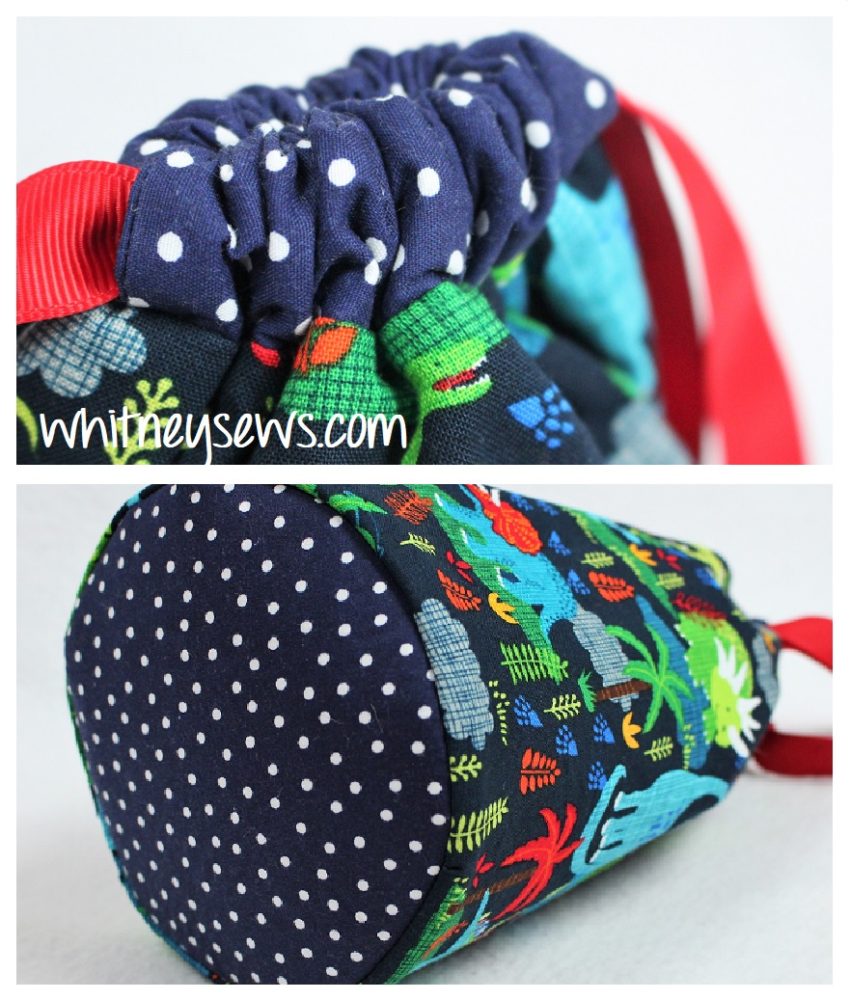
 I’m so excited to share this week’s tutorial!  I’ve mentioned several times recently I don’t get to sew nearly as much as I used to (because my kids stopped napping).  So the majority of my projects are practical items we can actually use.  Bonus points if it helps keep our house and toys in better order!  This has meant making bags and bins in just about every shape and size imaginable.  I recently picked up a set of tinker type toys for my daughter and they inspired this week and last week‘s bags.  A zipper bag to hold all the plastic connectors and a tote bag with zipper for everything else.

How to by Whitney Sews

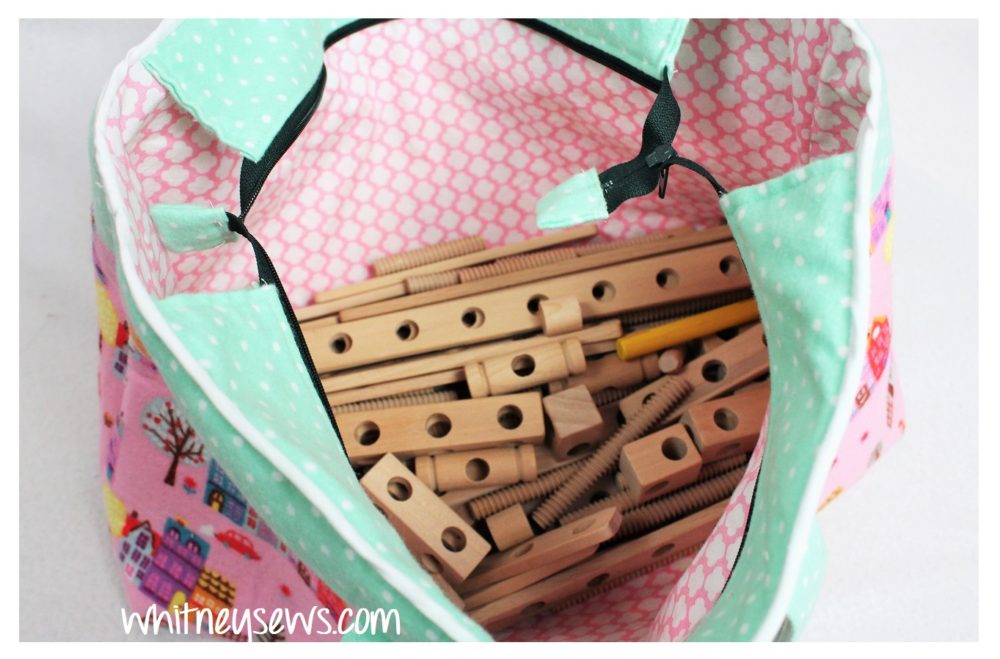
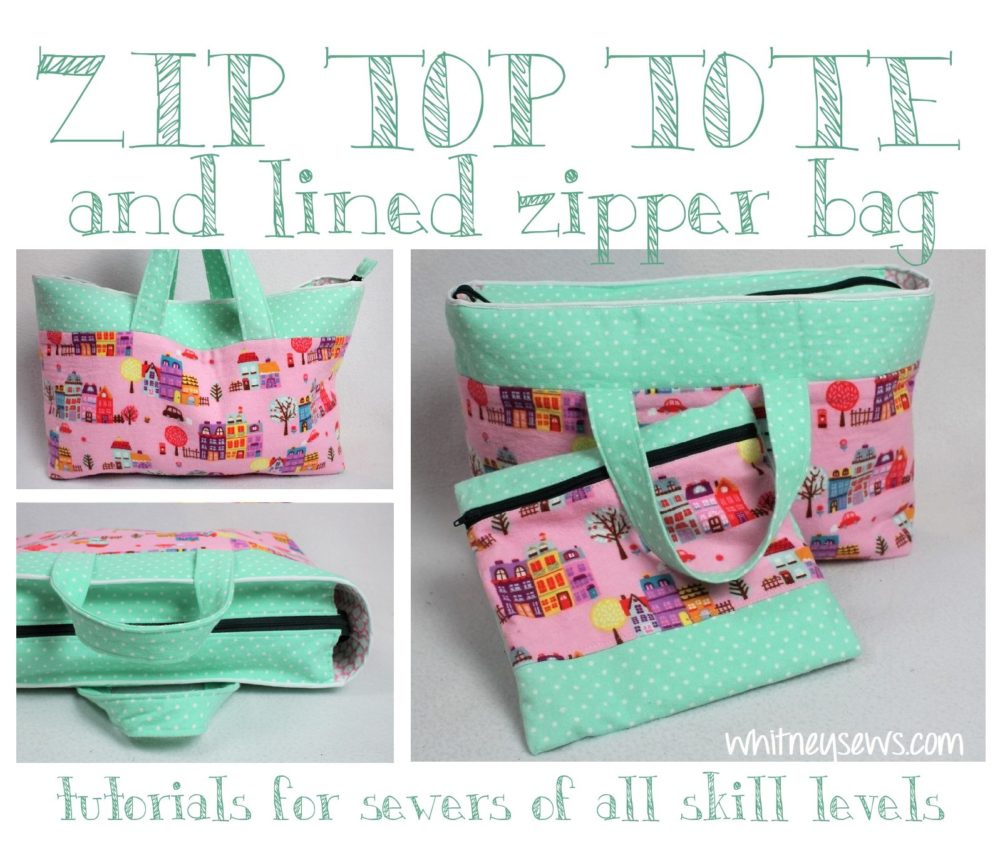
The most frequently requested tutorials are for tote bags with zippers and I FINALLY made one that I hope you will love!  As soon as I completed this tote I was coming up with several other versions I also want to make and share.

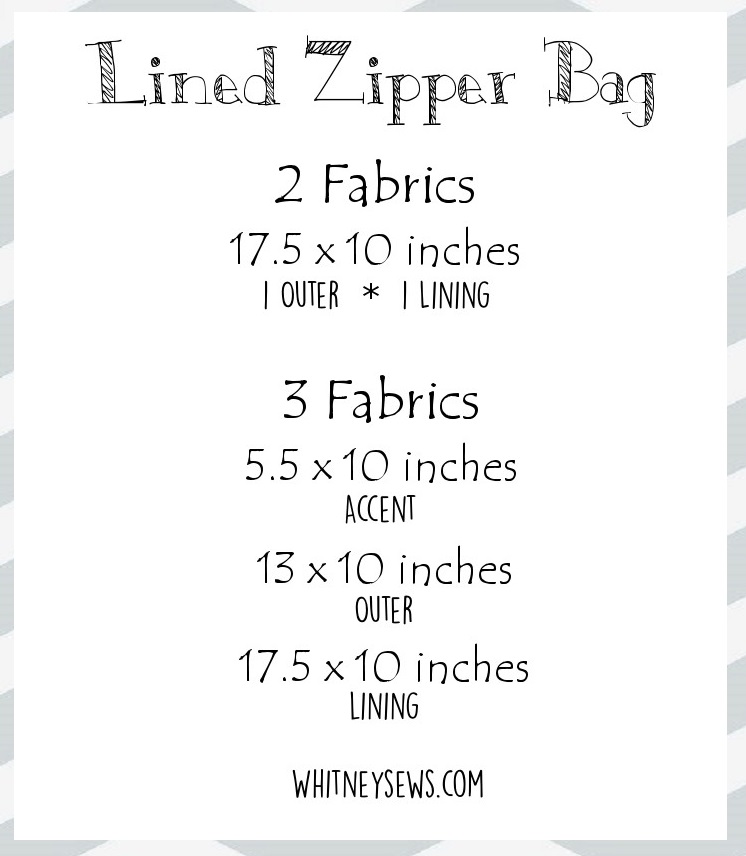
As you can imagine, a bag like this does require quite a lot of pieces in all different sizes.  So I made a separate 6 page PDF with everything from the yardage requirements to cutting details and much more.  You can pick up your copy over on my shop page or on Patreon if you are a second tier or higher Patron.

You will need 3 fabrics for your zippered tote.  I actually used flannel for the outer and quilting cotton for the lining.  I have an entire tub full of cute flannels that I never use.  I’ve decided instead of waiting for “flannel type projects” I’m going to start using them for anything I want.  I worked out great this time and I will definitely be using more of my flannel stash soon!

Is there a kind of fabric you have a lot of but rarely use??

Anyway, onto the reason you’re scrolled this far.  Click HERE to watch the step-by-step sewing tutorial!

I would love to see pics of the bags (and other projects you make) so make sure to share them on the Whitney Sews Facebook page or on Instagram with #WhitneySews.

Until next time, Happy Sewing!

-Whitney-

Zipper Bag with Bound Seams

sewing how to from Whitney Sews

This week I have a fun project to share! I recently picked up a set of tinker type toys at the thrift store for my youngest daughter (She LOVES working with her hands).  One of my favorite things to create are all sorts of bags for my kids to keep their toys organized.  Drawstring bags to hold wooden animals, zipper bags to store game pieces and more.  So I definitely I wanted to create a set of bags to hold all these new pieces.  The idea popped in my mind to make a tote bag with zipper top (which is one of my highest requested tutorials and next week’s project!).  Since there are a TON of smaller plastic connector pieces it seemed like a good idea to make a separate bag to hold those as well.

This week’s tutorial is the smaller lined zipper bag with bound seams.  This means all the seam allowances inside the bag are bound with bias tape.  It’s inspired by my 5 Minute Zipper Bag and the lined version that incorporated french seams.  The french seams add quite a bit of bulk to the edges of the bag, so this time I tried out binding them instead.  Cuts out all the bulk and finishes the raw edges so nicely.  Some of you may be wondering why I love this style of zipper bags so much instead of lining them in the traditional method, that is because I like making sure the lining won’t be moving around and trying to come out each time the bag is dumped over.

Pick out the two (or three) fabrics you want to use and grab some seam binding (or make your own using THIS tutorial) and cut out the pieces using the measurements listed below.

Whitney Sews Tutorial

Now you’re ready to sew the bag together!  Watch the full how to HERE!

I would love to see pics of the bags (and other projects you make) so make sure to share them on the Whitney Sews Facebook page or on Instagram with #WhitneySews.

Until next time, Happy Sewing!

-Whitney-

Sew Your Stash – Spring Update


I will be completely honest with you all, I have lost my sewing mojo!  This happens to me once or twice a year because of the quantity of projects I have to come up with to put out a new tutorial every week.  Usually it is creative burn out where I can’t come up with a single creative thought.  However that isn’t my current problem.  For the past couple of weeks I’ve been mentally exhausted between potty training (pray for me), having a vehicle break down beyond repair, trying to get our old house sold, and more.  When I finally get a few minutes to sew I have no desire to start a new project.  So this week instead of a new sewing tutorial I decided it was best if I shared a Sew Your Stash update instead.

If you aren’t familiar with the Whitney Sews Sew Your Stash Challenge you can find out more about it HERE!  It’s a challenge I set for myself to focus on using the fabrics and supplies from my stash before buying new.  I extended the challenge to anyone else who has their own fabrics stash and wants to join in.

It’s a good thing I keep a running list of items I make using my stash because I had definitely already forgotten a few of these.  In the last three months I managed to use some pleather, leather, corduroy, a weird monkey fabric, and a whole lot more (plus several cute fabrics!).

You can see everything I made HERE!

What is your favorite item shown in the video? I would love to know!

Don’t forget you can join the Sew Your Stash facebook group to share the projects you are making from your stash.

BTW do you do any online shopping!? Did you know you can use that shopping to help support the Whitney Sews content you enjoy?!?

If you are shopping through Amazon I would love for you to use my Amazon referral link. By clicking the link first (then continue to shop on Amazon as normal) Amazon knows I referred you and sends me a small percentage. That money goes right back into creating high quality sewing tutorials for you to enjoy!

I greatly appreciate your support in any form, from using my referral links to sharing my videos with your friends!

Until next time, Happy Sewing!

-Whitney-


Drawstring Project Bag | Sewing How to

Sewing How to
I am OBSESSED with this bag!  I love the way it has the shape of a fabric bin, but is really a drawstring bag with handles.  The best part is all the things I can carry in the bag.  I always hear about crafters taking knitting, embroidery, and other projects with them, but I never have a project to take when I’m out and about.  I would like to get in the habit of having ongoing projects or small mending I can take on the go and this will (hopefully) be my new drawstring project bag.

The secret to the “fabric bin” look is selecting an outer fabric that has a nice bit of structure on its own.  Something like an upholstery fabric or a medium weight denim would work well.  If you don’t have a heavier fabric to use, another option is to use a fusible fleece or fusible foam with a cotton fabric.  HERE is my favorite fusible fleece and HERE is my favorite fusible foam!  Fuse the stabilizer to the fabric before starting to sew then make the bag the same as shown in the tutorial.

Whitney Sews
You’re probably thinking this bag looks complicated to make with a ton of pieces in all different sizes.  I am happy to report that is incorrect!  The entire bag (excluding the straps) is made of six pieces that are ALL the same size!  No complicated numbers or odd pieces to keep sorted out.  If only every project could be that straight forward!  Pick out the two (or three) fabrics you want to use and cut out the pieces using the measurements listed below.

Whitney Sews

Now you’re ready to sew the bag together!  As long as you follow my step-by-step tutorial it really is not hard to make.  In the video I also show how to make an insert for the bottom of the bag. Watch the full how to HERE!

I would LOVE to see the bags you make!  Please share your pics from this or any other Whitney Sews tutorial on my facebook page or using #WhitneySews on Instagram.  Until next time, Happy Sewing!

-Whitney-

ISpy Bag Tutorial

from Whitney Sews

Many years ago I made something called an ISpy Bag for a Whitney Sews tutorial.  I saved the ISpy bag until I had kids and they loved playing with it for quite a while.  That bag met a terrible fate (the corner of a tile step) and I thought it would be fun to make another one using some different techniques. So that is what I’m sharing today.

If you don’t already know, an Ispy bag is a pouch with a clear vinyl window in the front.  It is filled with some sort of filler (rice, plastic pellets, beads, etc) along with little trinkets the person can try to find inside.  They are great for young children who need something to keep their hands and minds busy (but to be honest, I love playing with them too!)

My original ISpy bag was unfinished inside and those raw edges could be seen through the vinyl.  I’m sure I’m the only person it ever bothered, but I found it very annoying!  So my main goal with this bag was to find a way to fully finish the inside and outside…and I succeeded!

This bag is PERFECT for using fabric scraps!

You will need to cut the following pieces

Front Top/Bottom - (2 outer and 2 lining) 4 x 1.5 inches
Front Sides - (2 outer and 2 lining) 5 x 1.5 inches
Vinyl - (1) 4 x 4 inches
Backing - (1 outer and 1 lining) 5 x 5 inches

Once all your pieces are cut you are ready to sew.  Watch my step by step sewing tutorial HERE!

I put my ISpy bag in our car kit so my kids can enjoy it while we’re driving to and from town (longer distance now that we live rurally!).  I’ll be sharing everything in our car kit this Friday on my vlog channel.  You can subscribe now (HERE) so you don’t miss the video when it comes out!  Until next time, Happy Sewing!

-Whitney-

One Hour Blanket

Whitney Sews Tutorial
Let’s be honest, there are times when even the most skilled sewer wants (or needs) to make a quick and easy project.  Maybe it’s a last minute baby shower gift or just a cozy blanket to keep on the couch.  Today I’m showing how you can make a One Hour Blanket.

Most fabric stores have super cute preprinted or presewn panels.  They can be finished like a quilt with a batting, backing, and binding or they can finished like a blanket with a soft backing fabric.  I picked up one of the panels on clearance at Wal-Mart a while back along with a fleece blanket for the backing.  From start to finish it took less than an hour for a blanket that looks like it took a LOT longer.

You don’t have to just use preprinted panels!  You can use an cute fabric you like or even a top you’ve pieced and don’t want to quilt.  I use this same method for finishing my t-shirt “quilts”.

Whitney Sews Tutorial

Click HERE to watch and see just how easy it is to make a blanket!

What is your favorite under an hour project?  Besides this style of blanket I also love whipping up zipper bags and drawstring bags because they have so many uses.  You can find some of my favorites HERE!

I’ll be back next week with another new tutorial.  Until then, Happy Sewing!

-Whitney-

Flying Geese | Sampler Sew Along

Sampler Sew Along - Block of the Month Quilt Series
It’s time for the tenth block tutorial in the Whitney Sews Sampler Sew Along!  Haven’t heard about it yet?!?  Each month I’ll be sharing a step by step tutorial to make a traditional quilt block as well as how to sew the blocks together to create a sampler style quilt that finishes in a great lap quilt/baby quilt size. This week I’m sharing a tutorial for the Flying Geese block.  This block is very important historically because it was used to help guide escaping slaves in the underground railroad.

Sampler Sew Along

I share the step-by-step instructions for sewing the Flying Geese Block HERE!

Don’t forget to share a pic of your finished block with #SamplerSewAlong so we all see it!

I hope you are enjoying the quilt-a-long as much as I am!  Until next time, Happy Sewing!

-Whitney-

Reusable Produce Bags

Tutorial from Whitney Sews

One of my favorite parts of summer is all the delicious, fresh produce!  But one thing I don’t love are the plastic produce bags.  They tear sooooo easily and I end up with so many.  I decided to start making my own reusable produce bags.  I can pop the fresh fruits and veggies into the bags at the store or farmers market (take everything out for weighting) and not have to deal with all those little plastic bags.

I have some double gauze fabric in my stash that I’ve been wanting to try out.  It was interesting to sew with because of how the fabric is woven and I like the look and feel of the finished bag, but I’m not sure how long it will last before the fabric starts ripping around the stitches.  For the rest of my bags I think I’ll stick to basic cotton.

Speaking of stitches, the produce bags are sewn with french seams and a double turned top edge so there are no raw edges inside or out.  So these bags can be tossed in the wash whenever needed without any worry about fraying.

Check out the step by step video tutorial HERE!

I’m far from perfect when it comes to waste, but I’m always looking for things I can reuse – cutting back on cost and trash.  Currently I use cloth menstrual pads, compost my kitchen scraps and old papers, purchase second hand clothing, and donate unused items.

Looking for other fabric/DIY low waste alternatives??  I have a playlist full of tutorials from unpaper towels to cloth pads that you can check out HERE!

BTW did you hear the exciting news from last week?!?  I got a package from youTube!  Want to see what’s inside??  You can see the unboxing HERE!

I’ll be back next week with another new tutorial.  Until then, Happy Sewing!

-Whitney-


Drawstring Bag with Circle Bottom

Whitney Sews Tutorial
I’ve been wanting to make this bag for so long, but to be honest, the math intimidated me.  Once I realized there were some easy formulas to follow to figure out the circle size and body size I jumped right in!  I guess those algebra and geometry classes really did have a purpose… This week I’m showing step by step how to sew a drawstring bag with a circle bottom.

There is a PDF that goes along with the video tutorial that covers the needed supplies, cutting details, and a worksheet with everything you need to customize the bag to any size you want!  You can find the PDF HERE or on Patreon as a reward for all my second tier and higher patrons.

One of the supplies covered in the PDF is fusible foam used in the bottom of the bag.

This helps the bag stand up ALL ON ITS OWN and hold just about anything you want to put inside.

Whitney Sews sewing how to
Some of you are probably wondering if a bag like this is hard to sew, especially if you’ve only sewn projects with straight seams. If you sew slowly and adjust the fabrics often to make sure they stay lined up it really isn’t difficult.  It’s a great project to practice curves because it’s gradual and consistent.

Check out the step by step tutorial HERE!

I would love to hear what you would use this bag for and what I should keep in mine!

That is all I have for this week, I’ll be back next Wednesday with another sewing how to.  Until then, Happy Sewing!

-Whitney-

So Many Updates!

Last weekend we took a quick trip up to Branson for a little vacation at Silver Dollar City…basically my favorite place on Earth.  I didn’t have time to film a new tutorial, but that’s OK because I have a lot of updates to share.

It has been 6 weeks since I injured my finger.  Haven’t heard how that happened? Check out that video HERE!  I show how my finger is healing, talk about my new Patreon page, share some projects I’m planning and more.  PLUS I announce some giveaways!

Check it all out in this week’s video HERE!

*Make sure to leave your entry comment on the youTube page and not here on my website to be entered*

I’ll be back next week with a new sewing tutorial.  Until then, Happy Sewing!

-Whitney-