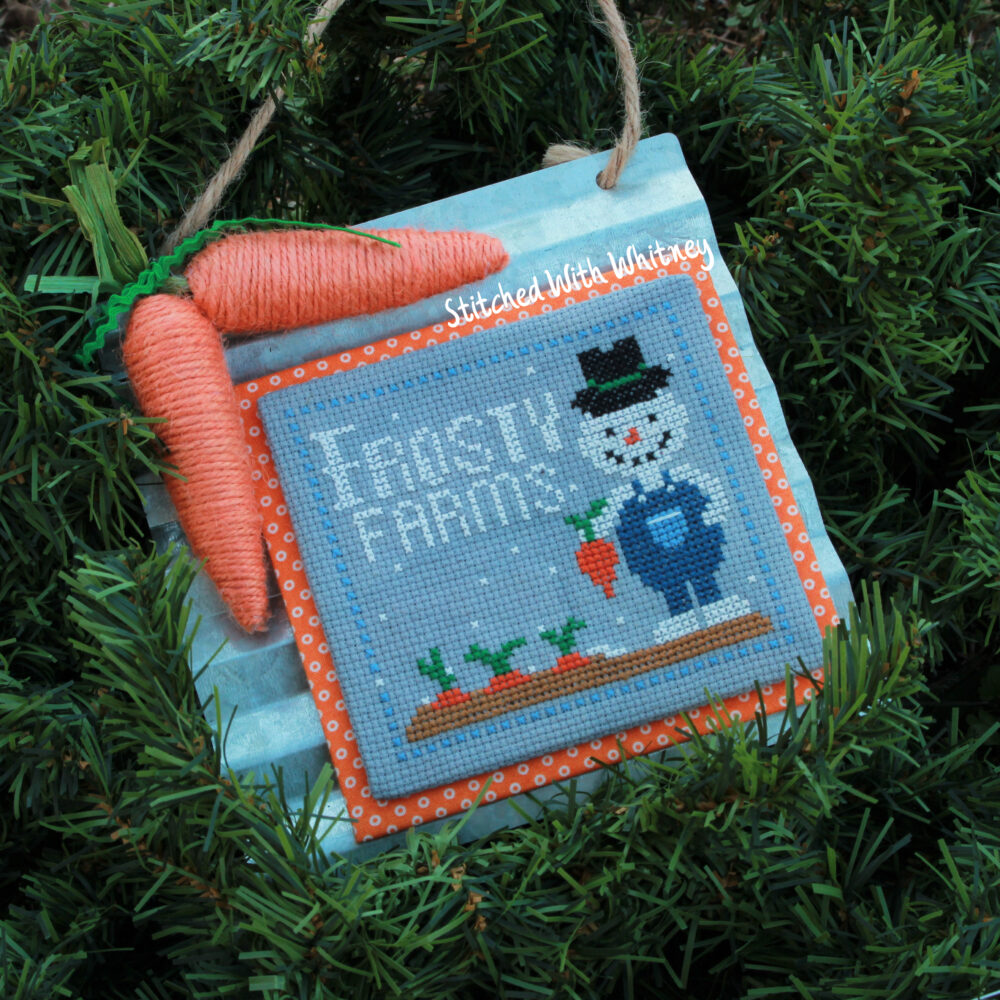
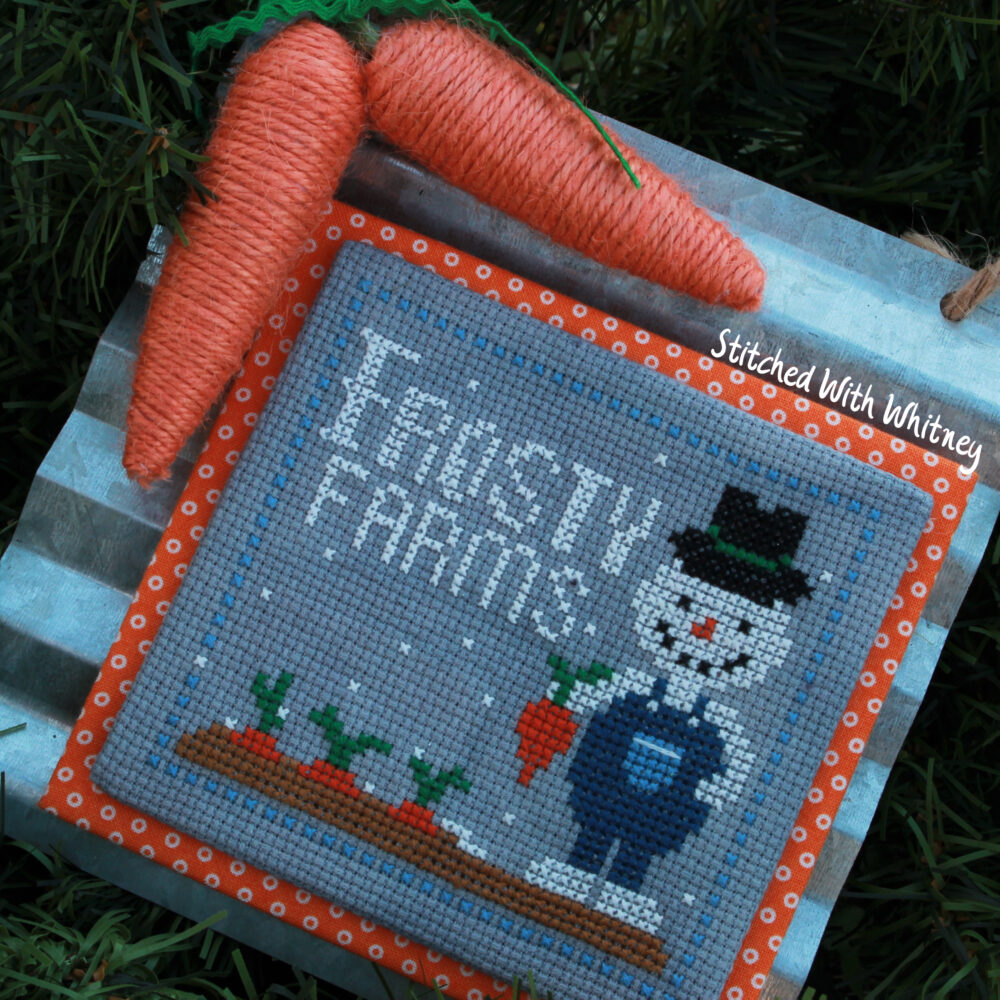
A few weeks ago I published the third cross stitch pattern in my Crop of Characters series – Frosty Farms. It’s one of my favorites and the design that gave me the idea for the entire series. To celebrate the new release I’m having a sale on all of my Crop of Character designs. Until the end of November they are 10% off in my etsy store.
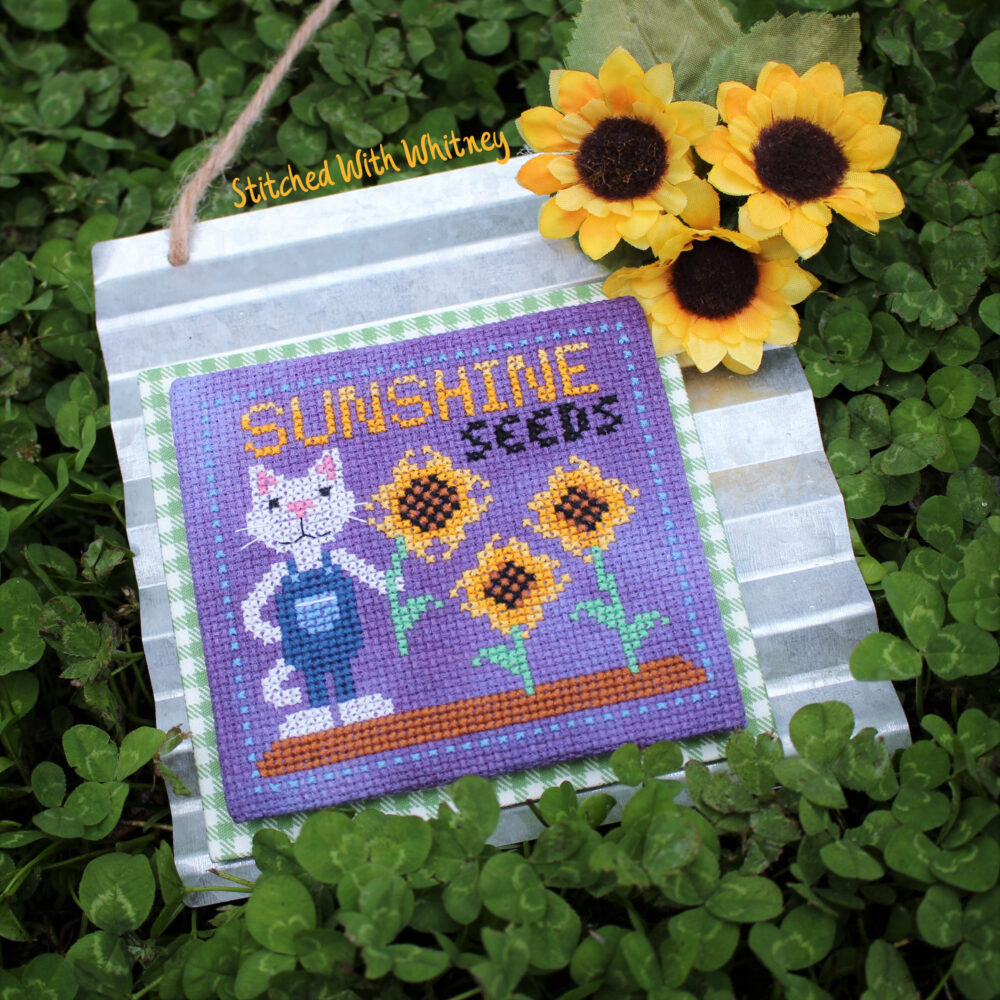
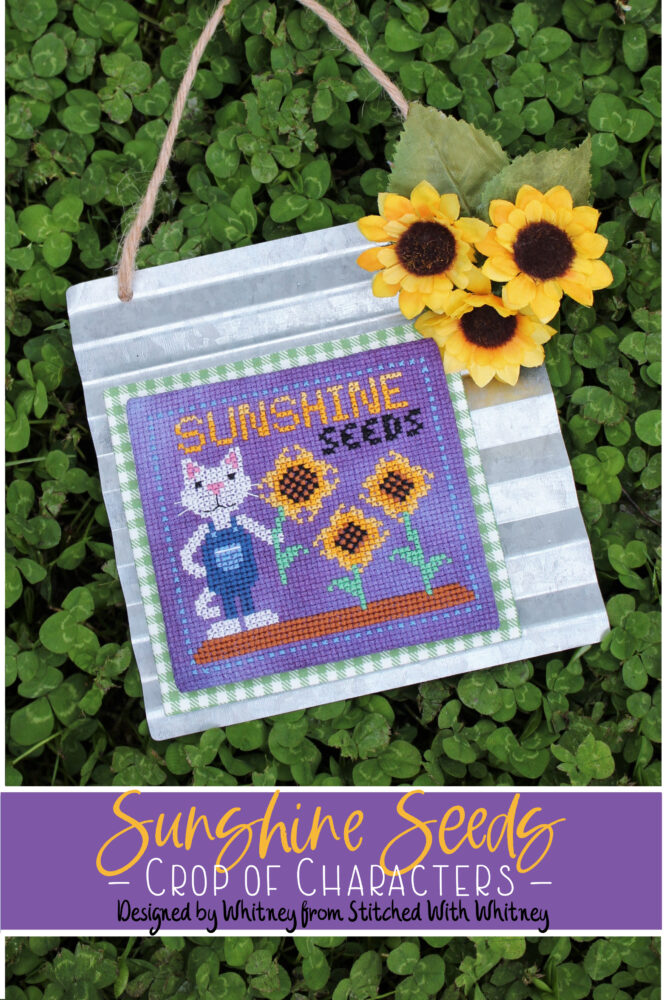
So far in the series I’ve shared Sunshine Seeds for Summer.
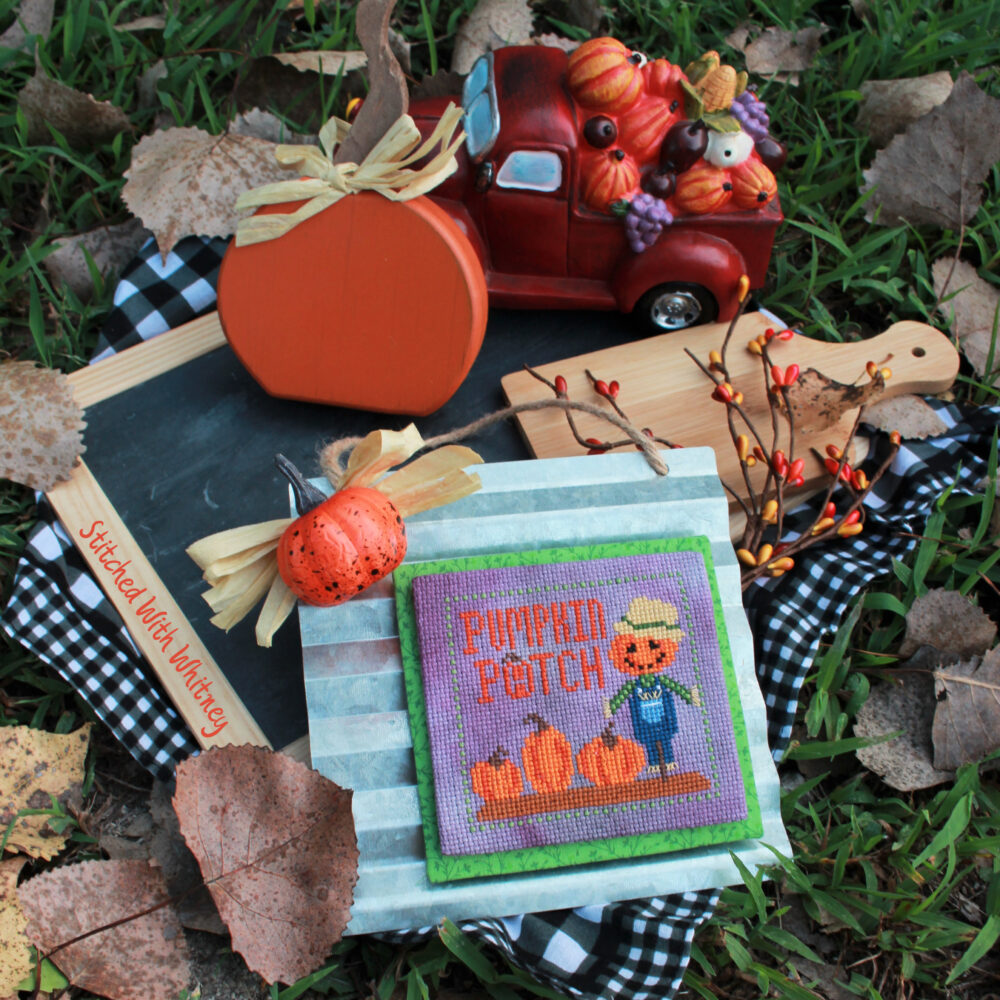
Pumpkin Patch for the Fall.
And now Frosty Farms for Winter.
Any guesses what the character and crop will be for Spring? The first person who comments the correct character and crop will get a FREE copy of the pattern when it is released! (Comments must be left on this post on my website- WhitneySews.com )
I have been working on some other cross stitch designs as well that I can’t wait to share in the future!
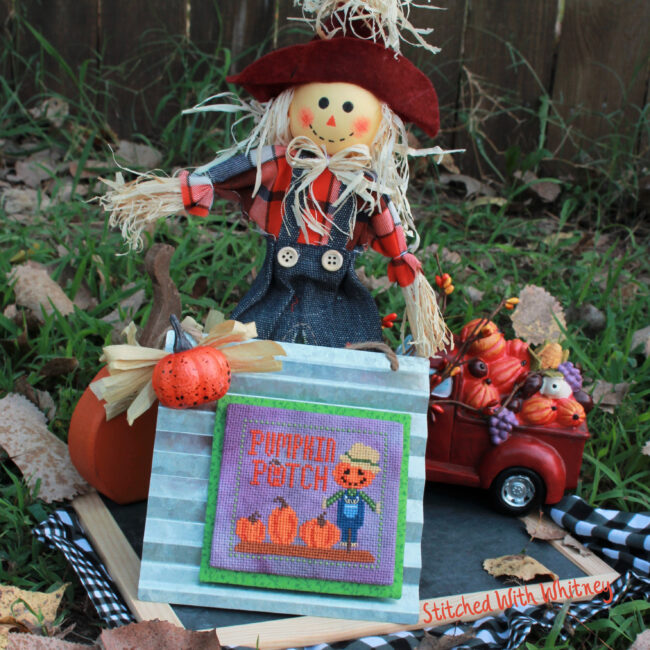
It has definitely been a bit since I’ve posted here…but I have been keeping busy. I have been doing a lot of cross stitching (and homeschooling and reading and taking care of chickens, etc). I have designed and posted two new patterns in my etsy store.
The design features a cute pumpkin headed scarecrow growing his own pumpkin patch. I think he is absolutely adorable! You can find that pattern HERE.
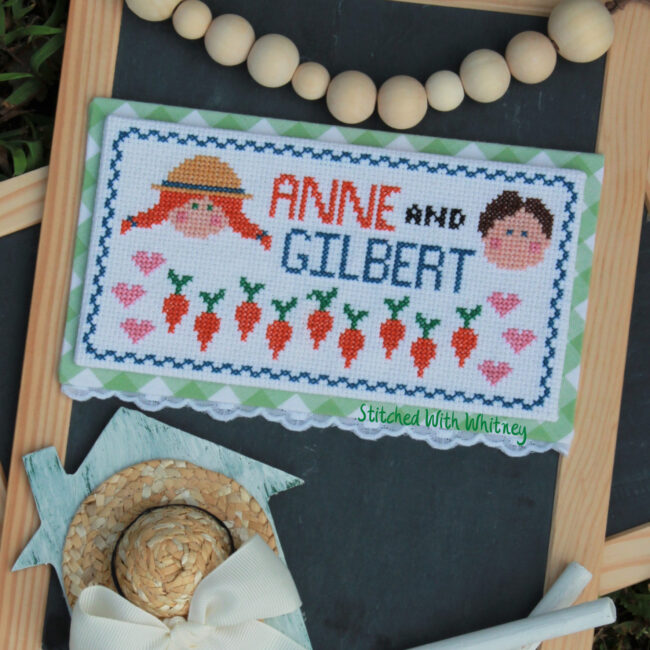
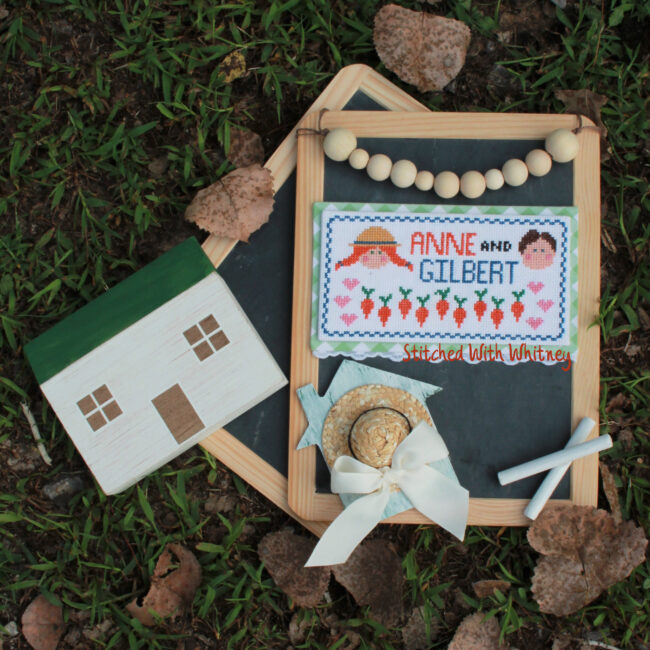
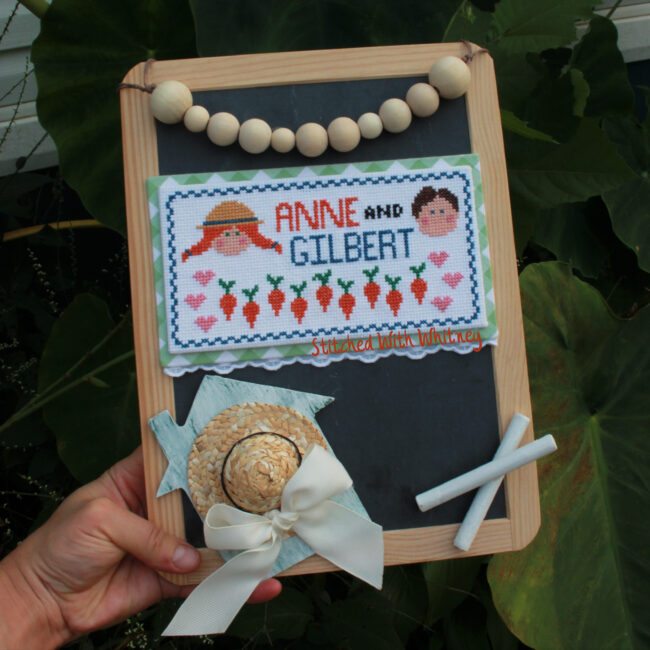
The second pattern is one inspired by Anne of Green Gables. Someone from our church loaned us the VHS tapes (the 1985 one) when I was a young teen/pre-teen and I fell in love with Anne of Green Gables! I was listening to the audio book again recently and knew I had to make a cross stitch in honor of Anne.
One of the most memorable moments was Gilbert pulling Anne’s braid and calling her carrots then the reference to it at the end of the movie when they are walking through the pasture. *swoon* I thought a sweet little stitching bringing those moments together would be adorable.
Anyway, I knew as soon as I designed the piece that it HAD to be finished on a slate! I searched and searched and searched for a realistic looking slate and finally found one (by accident) at Mardel when I was buying a writing curriculum for my daughter.
You can find the pattern HERE to stitch your own.
I think it would be fun to design several more pieces inspired by classic, beloved books and movies. I already have a couple in the works, but would love to know what books or movies you would like to see a cross stitch design for. BTW I FINALLY got the issue fixed that was preventing comments on my site. So please leave lots of lovely comments for me now 🙂
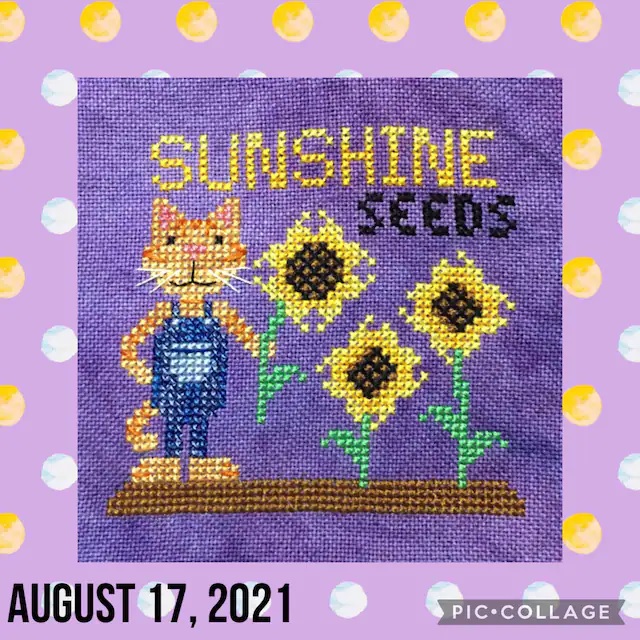
One last thing I wanted to share is a beautiful piece stitched by Jenny. She used my Sunshine seeds pattern, but adapted it to look like her own cat and I think it turned out adorable!
You can find the Sunshine Seeds pattern HERE.
I addition to all the cross stitching I have started on Halloween costumes for the girls! This year I’m challenging myself to only used repurposed materials. It cuts down on costs, better for the environment, and is a fun, creative challenge for me. I’ve already made most of Skyler’s costume already and have just gotten started on Peyton’s. I’ll try to share some pics when they are done.
I think that’s all I have for today. I hope you are having a wonderful week and happy sewing!
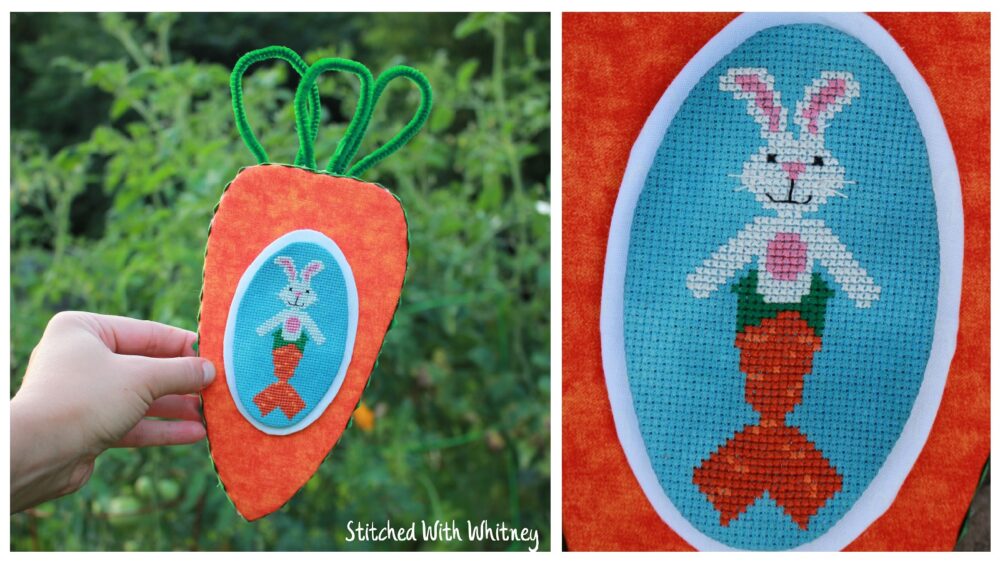
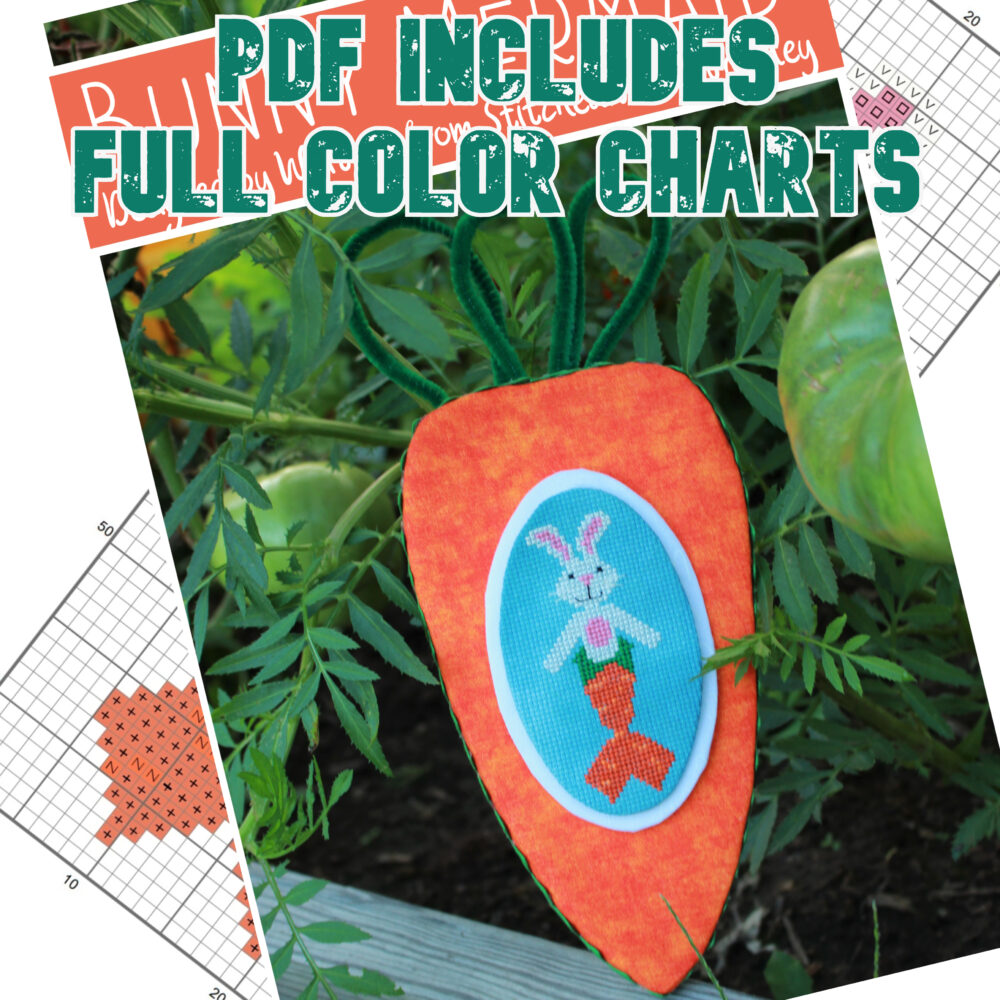
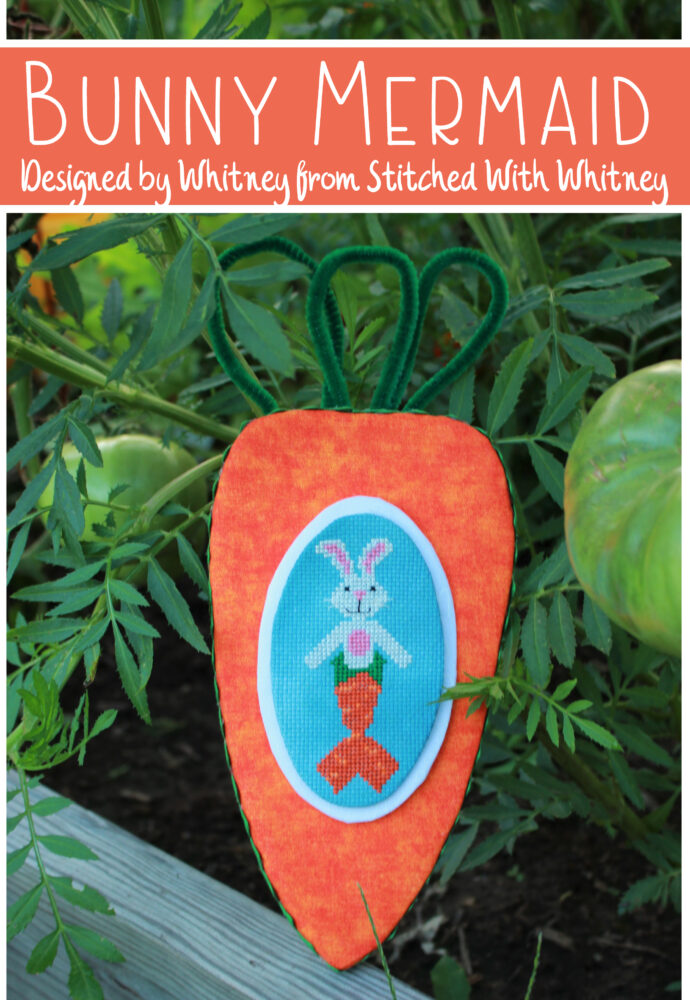
A few weeks ago I shared my newest cross stitch pattern – a Bunny Mermaid! In that post I shared some of the inspiration behind the design. Today I wanted to share how I did the finishing to take the project from a basic cross stitch to a fully finished, and ready to display, decor piece.
Fully finishing projects can be as low or high budget as you make it. For this one I decided to see how affordably I could do it. I knew I wanted the cross stitch displayed on a carrot. I could have splurged and bought a premade wooden carrot. I could have used a piece of scrap piece of wood, cut out a carrot shape, and painted it. Or I could use a piece of foam core (foam board) that I already had, cut out the carrot shape twice (for extra thickness), cover with fabric and use it. The last option is the one I chose – it’s was the lowest price and didn’t require digging out the power tools.
You can watch the entire process (other than cutting the foam) in my finishing video HERE!
I’m really happy with how well it turned out and will keep this style in mind for future finishings.
The full color cross stitch pattern is now available in my etsy shop!
Will you give this finishing style a try for any of your projects?
If you stitch this or any of my other designs I would LOVE to see them! Please share pics using #StitchedWithWhitney
Is there anything cuter than a bunny mermaid?!? Yes there is! It’s a bunny mermaid whose tail looks like a carrot! After designing my purrmaid cross stitch pattern I thought it would be fun to design some other mer-animals. The first one that came to mind was a bunny. I couldn’t seem to get the tail design right at first. It was lacking something, then I got the idea of taking inspiration from a carrot for the tail design and that was exactly what it needed!
I stitched the merrabbit up and absolutely love it! I finished it on a carrot shape made from fabric covered foam board (finishing video coming soon on my cross stitch channel).
I recently sat down in my garden to chat a little about this design. You can watch that video HERE!
The full color cross stitch pattern is now available in my etsy shop.
What other animals would you like to see transformed into mer-friends?!?
If you stitch this or any of my other designs I would LOVE to see them! Please share pics using #StitchedWithWhitney
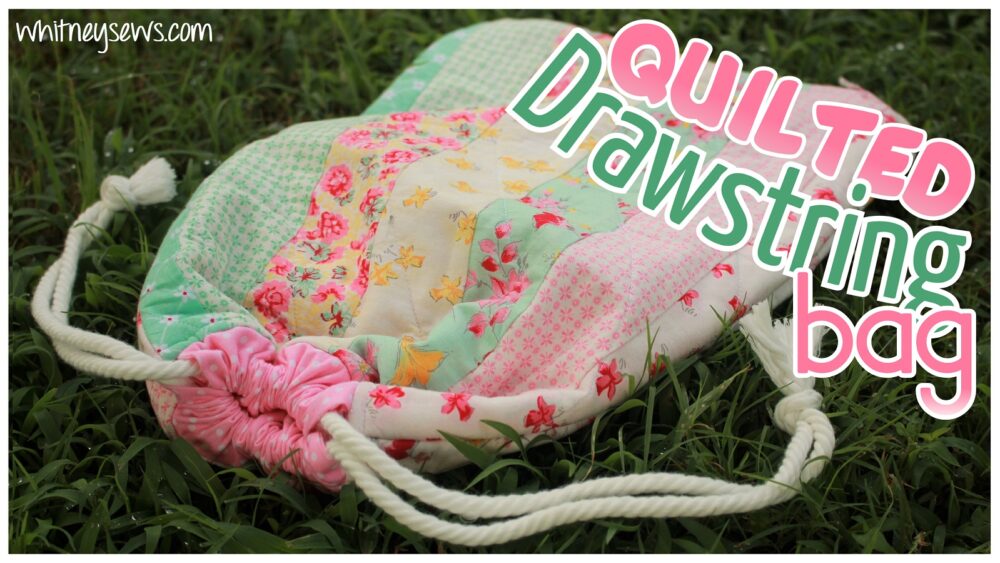
Hello everyone! Today I’m showinig how I made an easy quilted drawstring bag. A little while back my mom gifted me with a nice stitching lamp to use while I’m cross stitching. I wanted to make a bag to store the lamp in to keep it safe and protected, so that is what I’m sharing today.
I took a few measurements and sketched out a quick design then went to my fabric stash to see what I had to use. I found some leftover pieces from a jelly roll I had been gifted (a jelly roll is precut fabrics that are 2.5 inches by the width of the fabric). I sewed the pieces together until they were a bit larger than I needed for the bag. Anytime I’m quilting something I start a little bigger and trim it down later after it has been quilted.
This project was really about using what I had on hand. Instead of a traditional quilt batting, I used fusible fleece. It’s what I had on hand and it worked just fine. I cut the fusible fleece and a lining fabric the same size as each outer piece, about 20 x 14 inches. I ironed the fusible fleece to the back side of the outer fabric then got ready for quilting. After quilting I used a couple of rulers to trim the pieces down to 17 x 12 inches.
You can find all my favorite sewing supplies HERE on Amazon!
Affiliate link helps support Whitney sews
My bag will finish 16.5 x 11.5 inches (not including the casings). If you want to make your bag in a different size you can do so by deciding the size you want/need (don’t forget to add some ease if you are making it to fit a certain item) then adding a half inch to the height and width for seam allowances. Then resize the casings to fit your bag.
Speaking of the casings, I cut 4 pieces 11.5 x 3 inches. The trick I’ve learned over the years is to cut my casing pieces the same width as the bag will finish. Then after the casing pieces are sewn together they will be a half inch smaller. This leaves a little gap on each side of the casings at the top of the bag. It’s just enough room to feed the drawstrings in and look really nice.
You can also see in the photo that I have bound seam allowances. When a project is quilted the outer and lining layers are treated as one unit, instead of having a separate lining that can be inserted to hide seam allowances. So the seam allowances need to be treated differently. I wanted to bind mine so they look nice and the bag will last longer. I cut two pieces from my lining fabric measuring 1.5 inches by the width of the fabric. I was a little unsure about using pieces cut on the straight of grain instead of on the bias, but it actually worked out perfectly!
You can watch the step by step tutorial HERE to make your own quilted drawstring bag!
If you make a bag using this tutorial (or any of my tutorials!) I would love to see pics! Please share them with me on my Facebook page or tag me on Instagram!
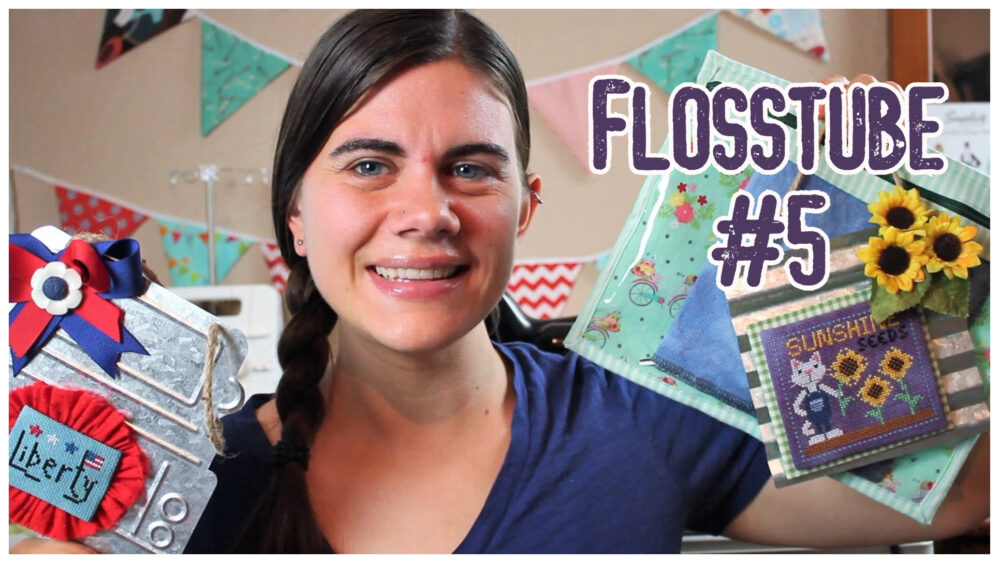
Hello everyone! It’s time for another flosstube video! This week I have lots of things to share – my new cross stitch pattern, a freebie I stitched in about 45 minutes, the project bags I’ve been making, my new youTube channel, a giveaway and MORE!
You can see all these fun things in my video HERE!
I hope you love seeing my stitching! I would love to see pics of what you are working on, so please tag me on Instagram. Until next time, Happy Stitching!
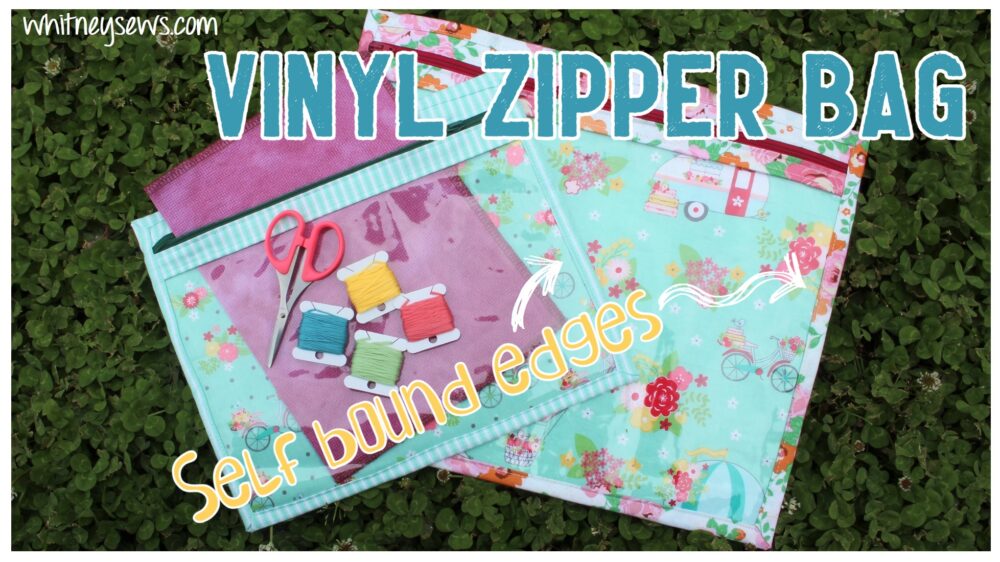
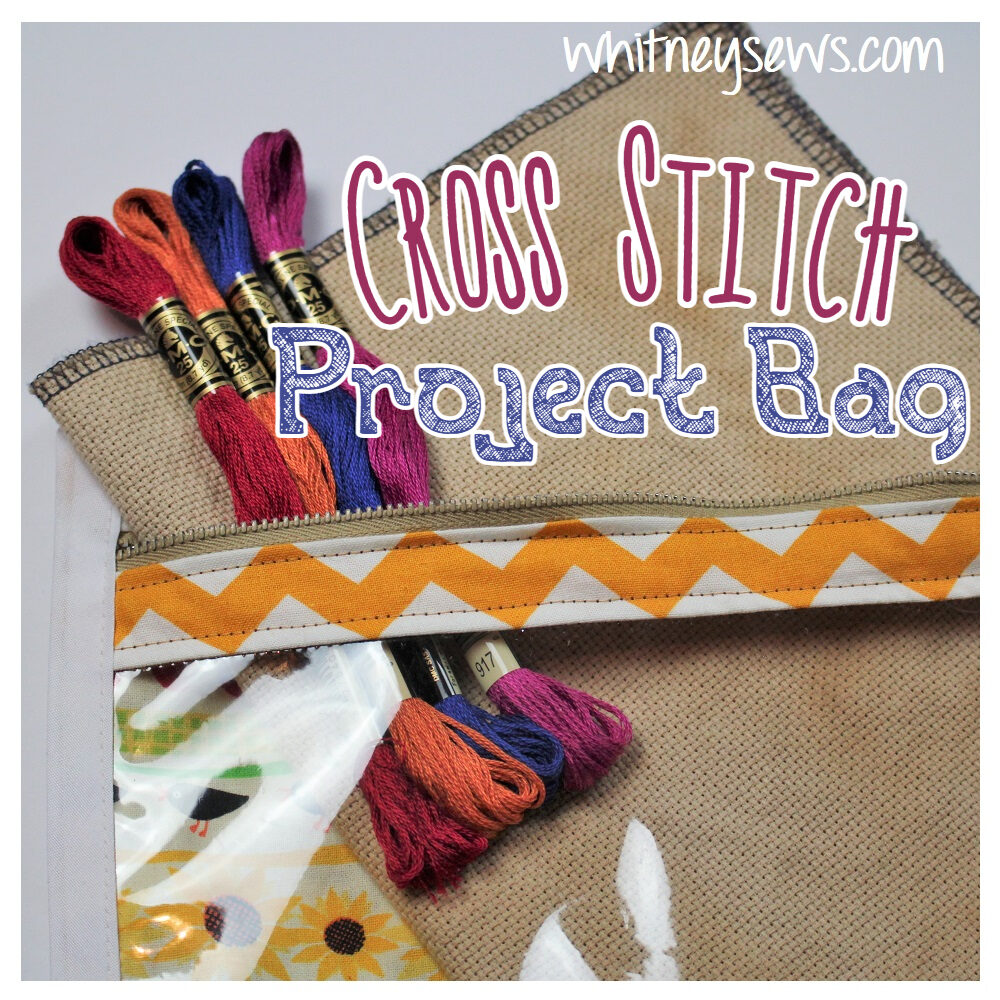
Join me today as I show how to make a vinyl zipper bag. The large vinyl window on the front is perfect for seeing what project you have inside. The edges are all self binding, so no separate binding is needed. Grab your fabrics, a zipper, some interfacing, and the PDF and you are ready to make your own vinyl project bag!
So, what sets this vinyl project bag apart? It’s the self binding edges. This means the back fabric wraps around to the front for a nice bound edge instead of needing to use a separate bias binding. I’ve also added a fusible fleece between the back layers. This offers extra structure and the opportunity to sew some quilting lines.
I say cross stitch bag because that’s what I use my bags for, but feel free to use the bags for any use you have.
I’m so excited to finally be able to share the first pattern in my new Crop of Characters cross stitch series! I have been working on this series the past few months and the first pattern was released today.
Each design in the series features a character or animal and the crop they are growing. At this point I have four designs planned, one for each season, but I may add to the series in the future.
You can find the PDF pattern in my etsy store – Stitched With Whitney If you want to keep up to date with my pattern releases and what I’m stitching check out my new youTube channel and Instagram that are both dedicated completely to cross stitching.
If you stitch up one of my pieces please share pics with me using #StitchedWithWhitney and #CropOfCharacters
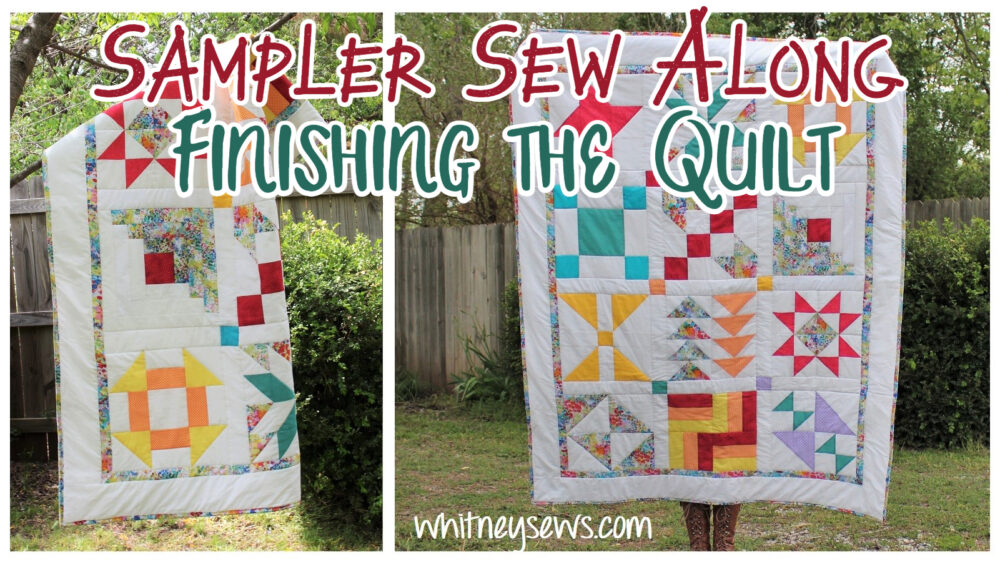
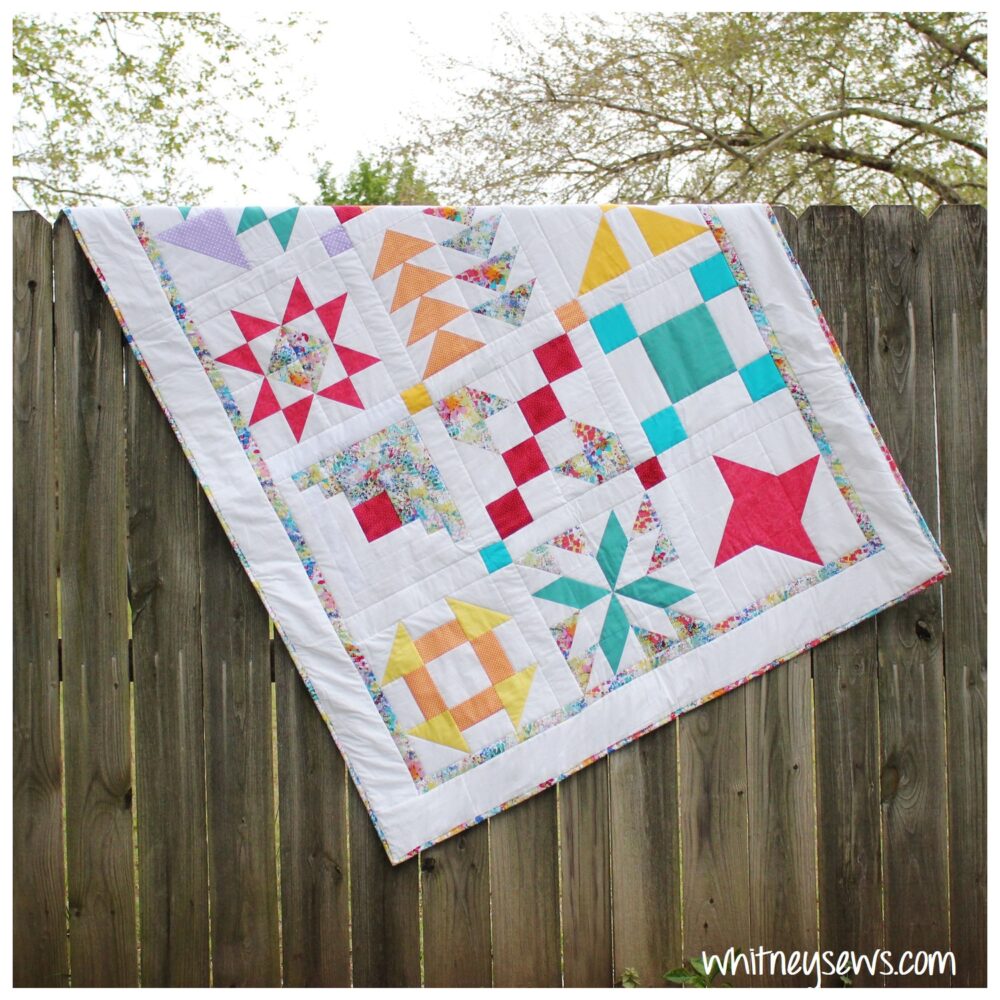
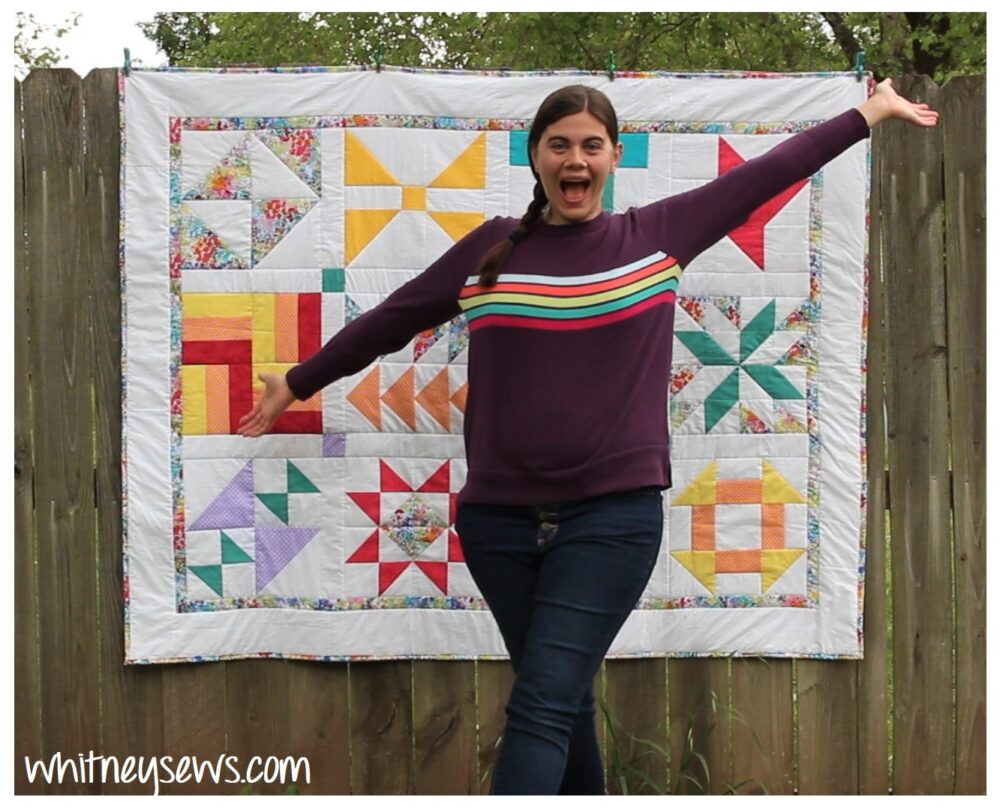
Three years ago I started my Sampler Sew Along series. Throughout the series I shared tutorials for 12 different historical quilt blocks and today I’m going to talk about finishing the sampler quilt. You can find the playlist with each tutorial HERE.
If you’re unfamiliar with sampler quilts, they became popular in the 1840s when block style quilts were still fairly new. Typical quilts repeat one or two blocks over and over to create an overall design, but sampler quilts are a combination of several different quilt blocks with no real correlation to them. The quilts were often a way to practice or experiment with different types of blocks. Other times friends or quilting guild members would make blocks separately and combine them later to make a quilt.
But back to this quilt, or rather the 12 quilt blocks. The blocks measure 12.5 inches square as is and will be 12 inches square when sewn into the finished quilt. You can sew the blocks directly together and have a finished quilt top measuring 36 X 48 inches. Then add a backing and batting, sew some quilting, trim and bind and you have a beautiful sampler style baby quilt.
Or you can add other elements to make your quilt larger. My quilt includes sashing, cornerstones, and borders so it measures 50 X 64 inches – a good lap quilt or throw quilt size.
You can finish your quilt however you want, but if you want to make yours similar to mine I will have the measurements of each piece listed below as well as the notes my mom wrote down while she was finishing the quilt. Yep, you read that right, I asked my mom to help me after I had sewn the individual blocks. She’s better at finishing quilts than I am and had more time to work on it. Huge thanks to my Mom!
In my video HERE I go over what cornerstones, sashing, and borders are along with LOTS of other details about this quilt. You will need to know what each of those terms mean for any of the information below to make sense.
The cornerstones were cut from six different fabrics to a size of 2.5 x 2.5 inches. They will measure 2 inches square in the finished quilt. The sashing is 2.5 inches wide cut and finishes 2 inches wide in the finished quilt. The sashing was cut 2.5 inch wide by the width of the bolt of fabric then cut down into 12.5 inch lengths. It took three width of fabric strips to create the seventeen sashing pieces in my quilt.
With the blocks laid out in their final layout, one sashing piece was sewn to bottom of nine of the blocks (each block in the top three rows). Then a cornerstone was sewn to six of the remaining sashing pieces. Those units were then sewn to the right side of the blocks (excluding the three blocks on the far right of the quilt). The last two sashing pieces were sewn between the blocks in the bottom row. After all the sashing and cornerstones were attached the larger block units were pieced together.
Then the borders were added on to the outer edges. The skinny, multicolored border was cut to 1.5 inches by the width of fabric and finishes 1 inch wide. I believe it took 5 strips to make up the border. One strip for each short end and one and a half strips (pieced together) for each long side. And finally, the white border cut to 4.5 inches, finishing 4 inches wide. I’m not sure how many strips that one took – it’s not in mom’s notes.
After the entire quilt top is together it needs a backing, batting, quilting and binding. I talk more about this in the video HERE. The batting in my quilt is a warm and bright polyester batting that can have up to 10 inches between quilting lines. My mom quilted it using a stitch in the ditch method. This is where quilting lines are sewn following the piecing lines of the quilt blocks. My quilt will be displayed on my quilt ladder and not used or washed often so it doesn’t need a lot of dense quilting. Feel free to quilt yours however you like!
And finally, trim up all the edges and add a binding. I have a step by step binding tutorial HERE. Then step back and admire your beautiful quilt!
I LOVE how my quilt turned out and can’t wait to see everyone else’s finished quilts! Please share pics of your blocks and quilts with #SamperSewAlong and don’t forget to tag me. Until next time, Happy Sewing!
It’s time for me to FINALLY share some of the projects I’ve been working on behind the scenes! I’ve had several cross stitching projects in the works, but had to wait until my etsy store relaunch to really talk about them. Now that I have launched my etsy store with my first cross stitch PDF pattern I can start to share some of the other things that will be coming in the future.
You can see all the fun things I’ve been working on in my video HERE! Make sure to watch all the way to the end *wink*
I know I’ve been sharing a lot of cross stitch content recently and not much sewing, BUT I have sewing videos coming up next that I know you will enjoy! Until next time, Happy Sewing!