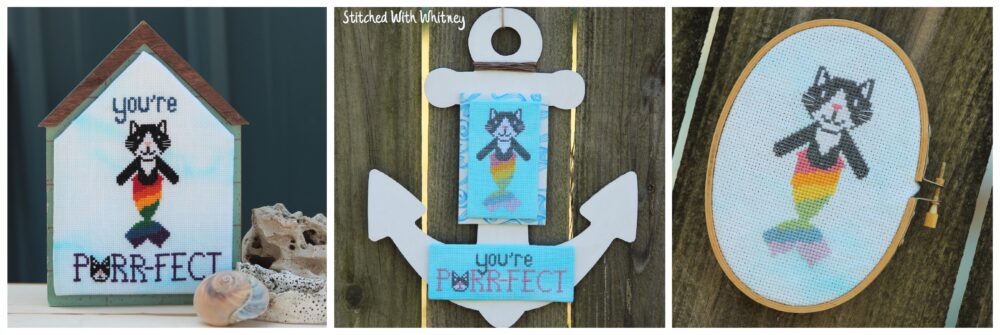
After getting back into cross stitch at Christmas, I quickly realized I LOVE designing my own patterns! I started with a rainbow purrmaid (cat mermaid) inspired by a book I read to my kids. Than the creativity floodgates burst wide open! I have now designed several other pieces (including a replica of my parents’ home) and LOVE stitching my own creations!
I’m obviously designing things I think are cute and I really enjoy, but I know I’m not the only one who will love them! So I have decided to relaunch my long neglected etsy shop. I haven’t sold on etsy in the past 4 years, but just yesterday I relaunched it with a new name! It is called Stitched With Whitney and my first cross stitch pattern is available for sale!
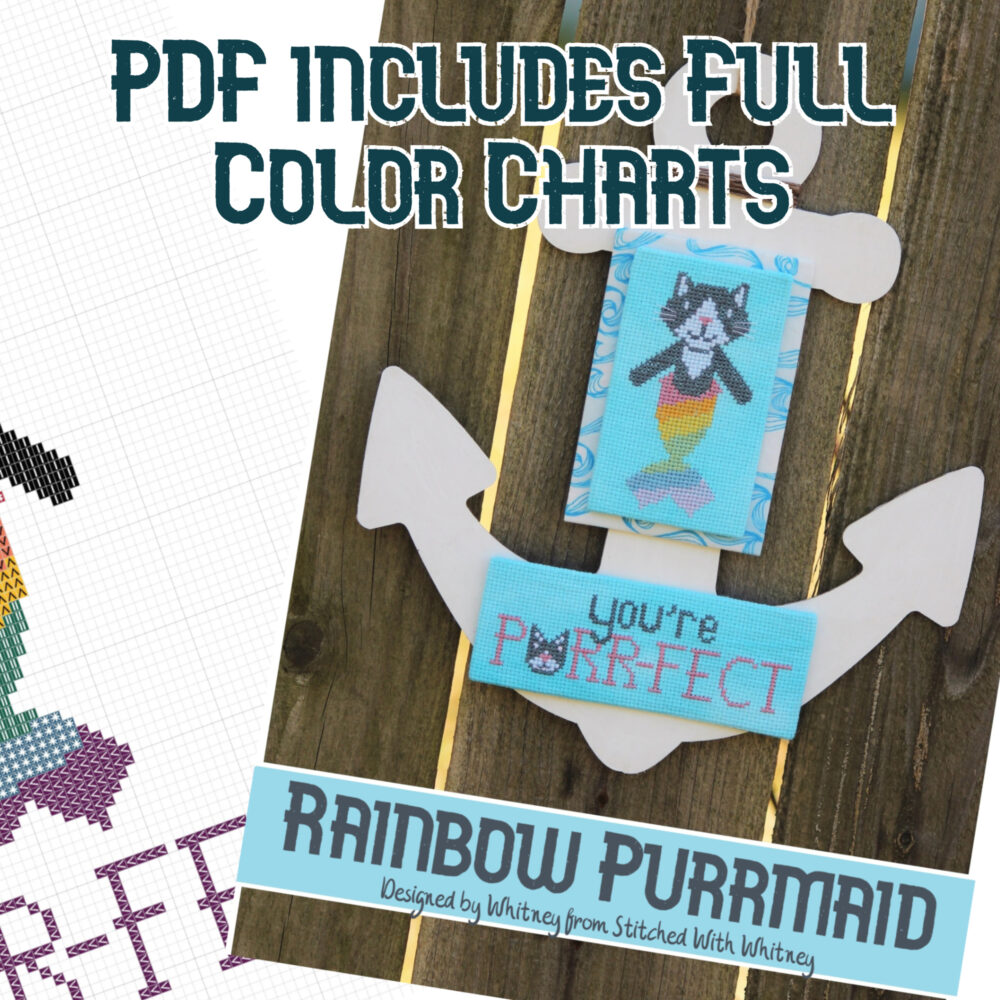
The Rainbow Purrmaid PDF includes full color stitching charts with pastel and primary color options and two different text layouts. Why did I include so many variations?? Because I couldn’t decide which I liked the most and if I can’t decide then I know other people will like having multiple options as well!
I have already designed and stitched several other patterns and can’t wait to start sharing them soon! I also started a Facebook group – Stitched With Whitney where you can keep up to date on my shop and see sneak peeks before anyone else! There are lots of other cute animal designs coming…
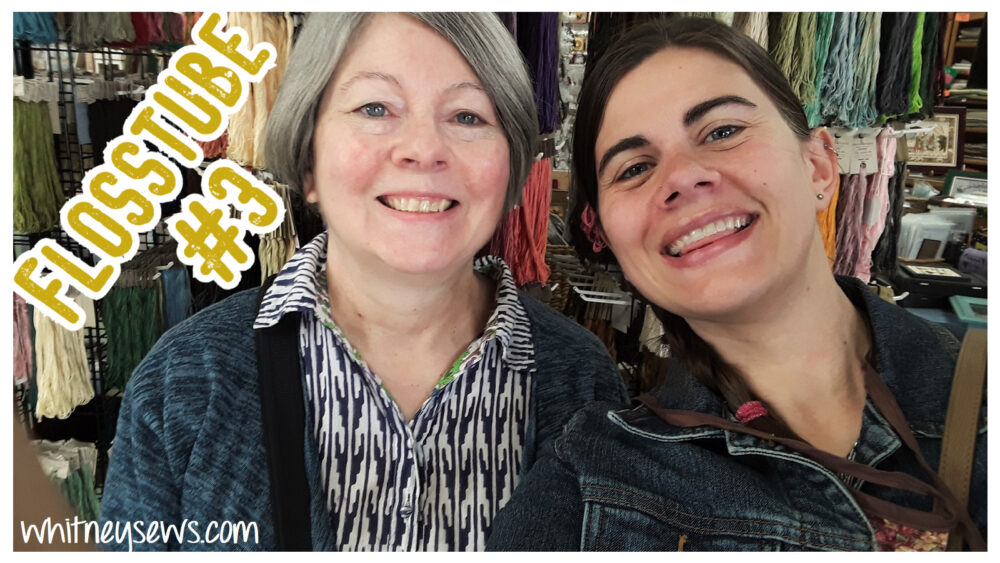
This past weekend I got to go up to my parents’ house and spend time with my mom. We talked cross stitching, filmed a new flosstube video, and even got to go to a local needlework shop WITHOUT the kids! We had a lot of fun and spent two hours wandering around looking at all the cross stitch pieces on display and the patterns for sale. The store was a lot larger than I expected, and we could have stayed much longer, but our hungry stomachs won.
This week I’m sharing the Flosstube video Mom and I filmed together. We showed some of Mom’s previous finishes, current projects, and designs she is planning to stitch soon.
This video is ALL about Mom’s projects, in my next flosstube video I’ll sharing my recent stitching.
While I was at my parents’ house I also picked up my finished Sampler Sew Along quilt! My mom was amazing and took my finished blocks and sewed them together into a quilt top, quilted it, and bound it. It turned out so amazing! I’ll be sharing photos and all the details for finishing the quilt soon.
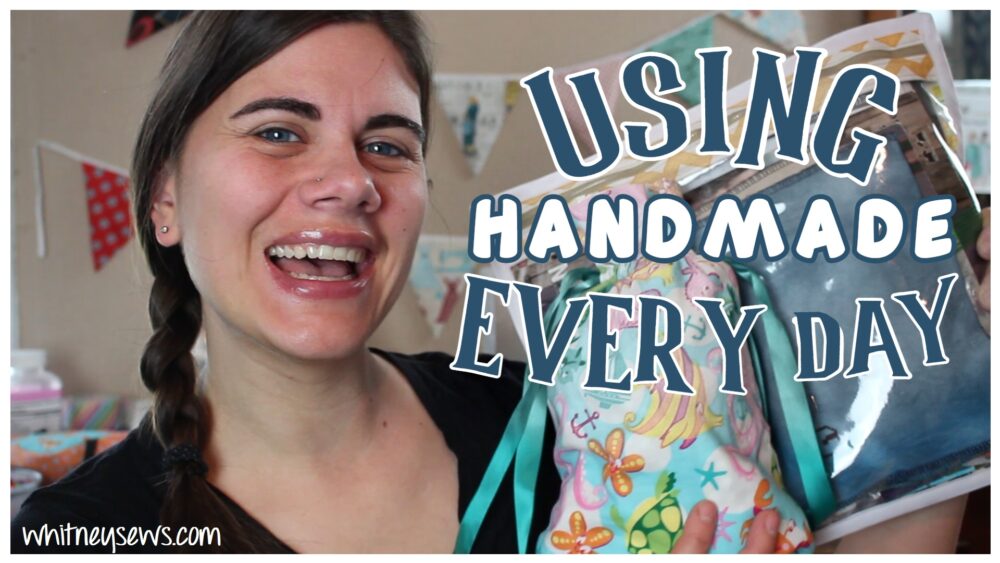
After almost 12 years on youTube I have accumulated many, many handmade and DIY items. So, what do I do with all those DIYs?? I actually use a lot of them!
Three years ago I shared a video all about the DIYs we use daily. You can watch it HERE. But now that my kids are older some of the things on that list have changed.
To sit down and think of all the handmade items we use daily is actually a little harder than it sounds. We are so used to using most things that we don’t even notice them anymore. I came up with 10 or 11 DIYs we use every day at our house. Click HERE to watch!
All the tutorials and links I mentioned are in the video description box on youTube. Click the video embed or linked on this page to take you to youTube to find the links.
Obviously there are many more DIYs we use regularly, but not every day, so they weren’t included in this video. You can get an idea of those items in my DIYs we use weekly video from a few years ago.
What are the DIY or handmade items you use every single day?? I would love to hear from you! You can leave me a comment on youTube or tag me in a pic on Facebook or Instagram.
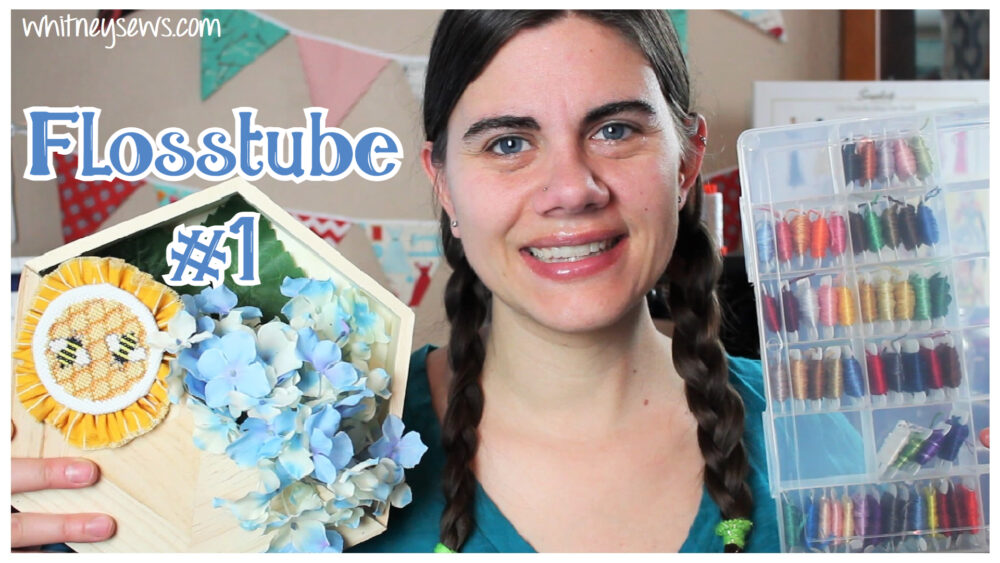
Last month I shared my very first Flosstube video! I wasn’t sure what you all would think about it since it’s a bit different than anything I’ve shared before, but you all are so amazing! I received so many lovely comments from people about my stitching and about the stitching they have been doing! So thank you to everyone who watched my Flosstube video and commented; it meant a lot to me.
Today I am back with my second Flosstube video. I have a lot to share! I did some fabric dyeing, started several new projects, and made a few project bags for organizing my WIPs.
You can watch my new Flosstube video HERE!
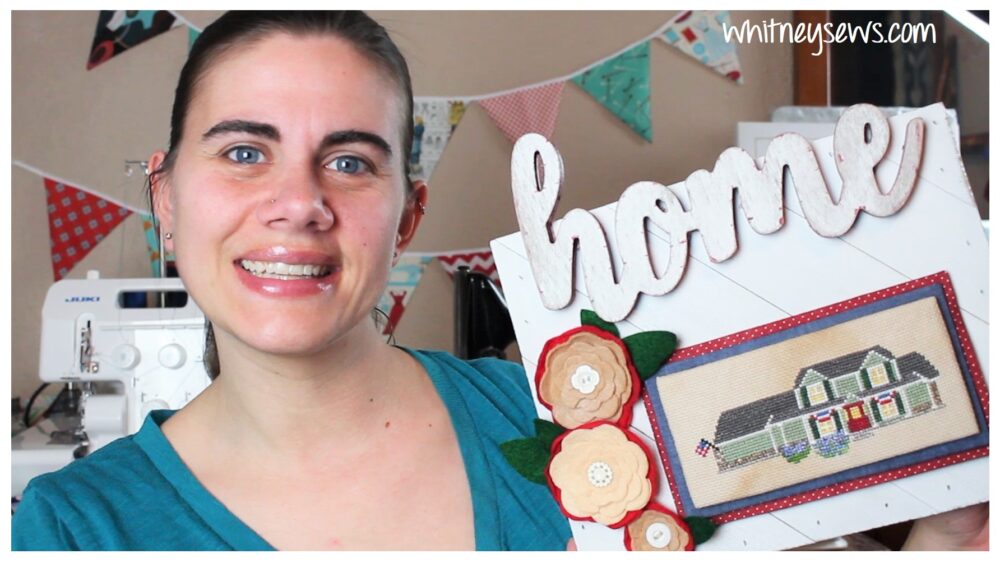
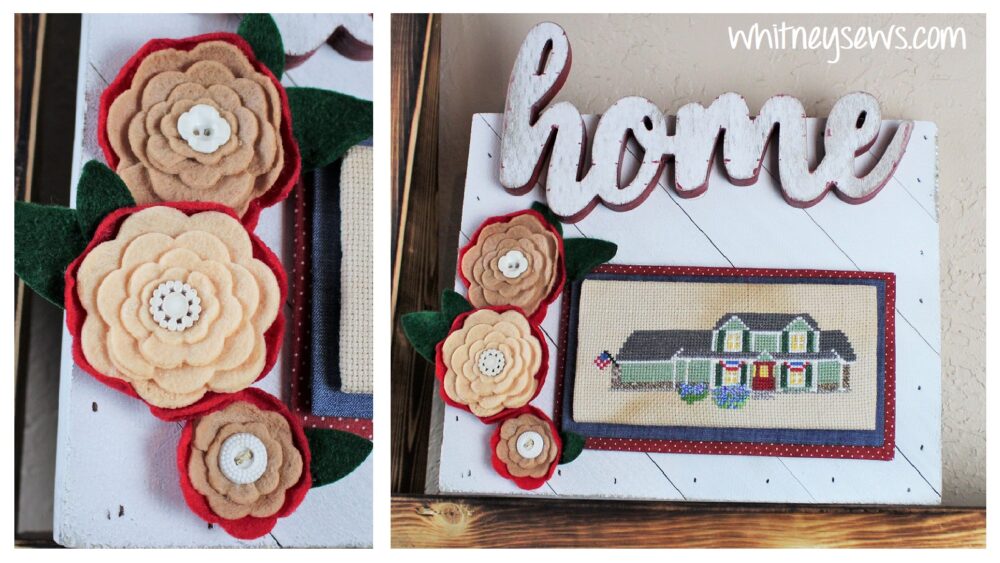
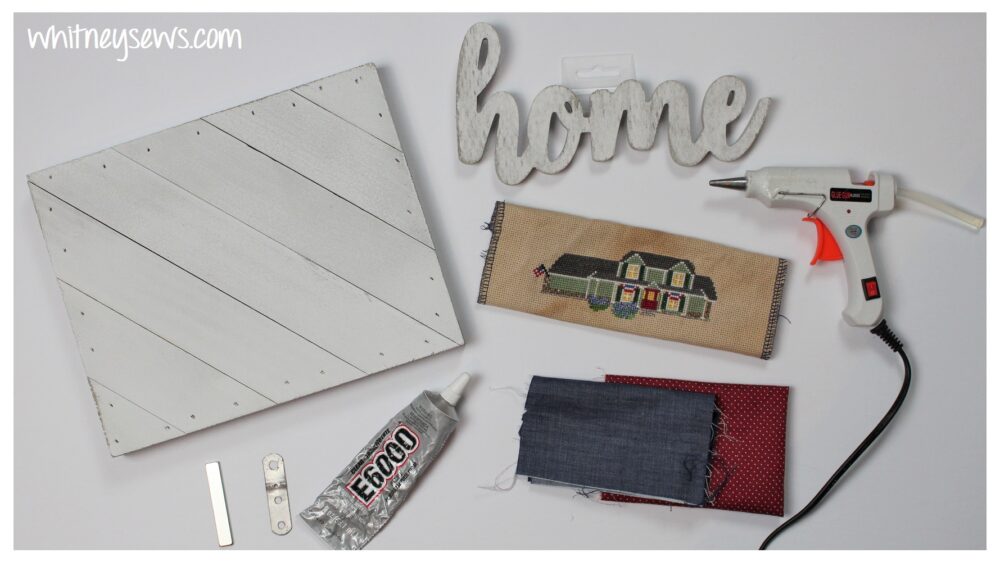
The project I’m most proud of is The Fletcher Home – an original design I made and stitched up for my mom.
It’s definitely my favorite cross stitch so far! The idea come to mind a month ago and with my dad’s help I collected several photos of my parents’ home. I used the photos as reference and even measured them to get an idea of the scale. Then began to design the house one square at a time. It took a bit of work to get some of the angles to look right, but I’m in love with how it turned out! You can read more about the entire project HERE.
I hope you enjoy seeing my stitching! I would love to see them! Feel free to tag me in your project pics on Instagram!
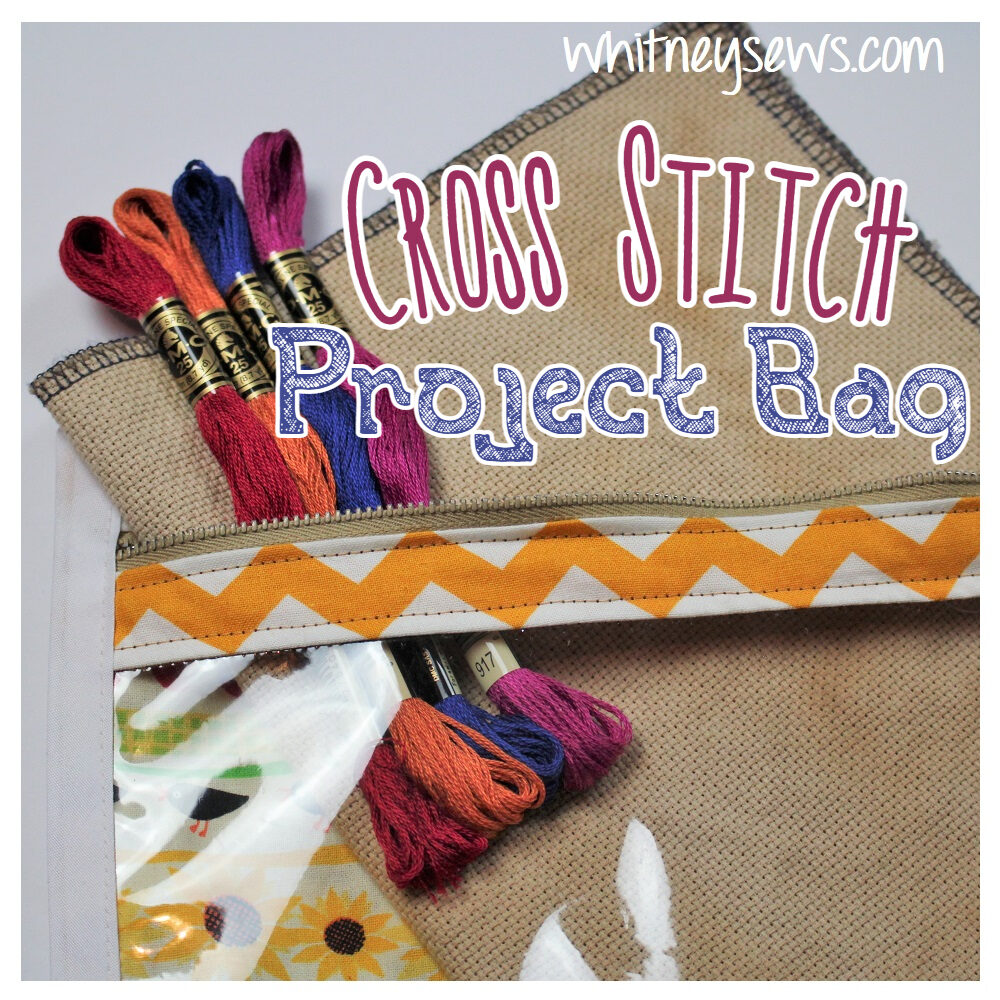
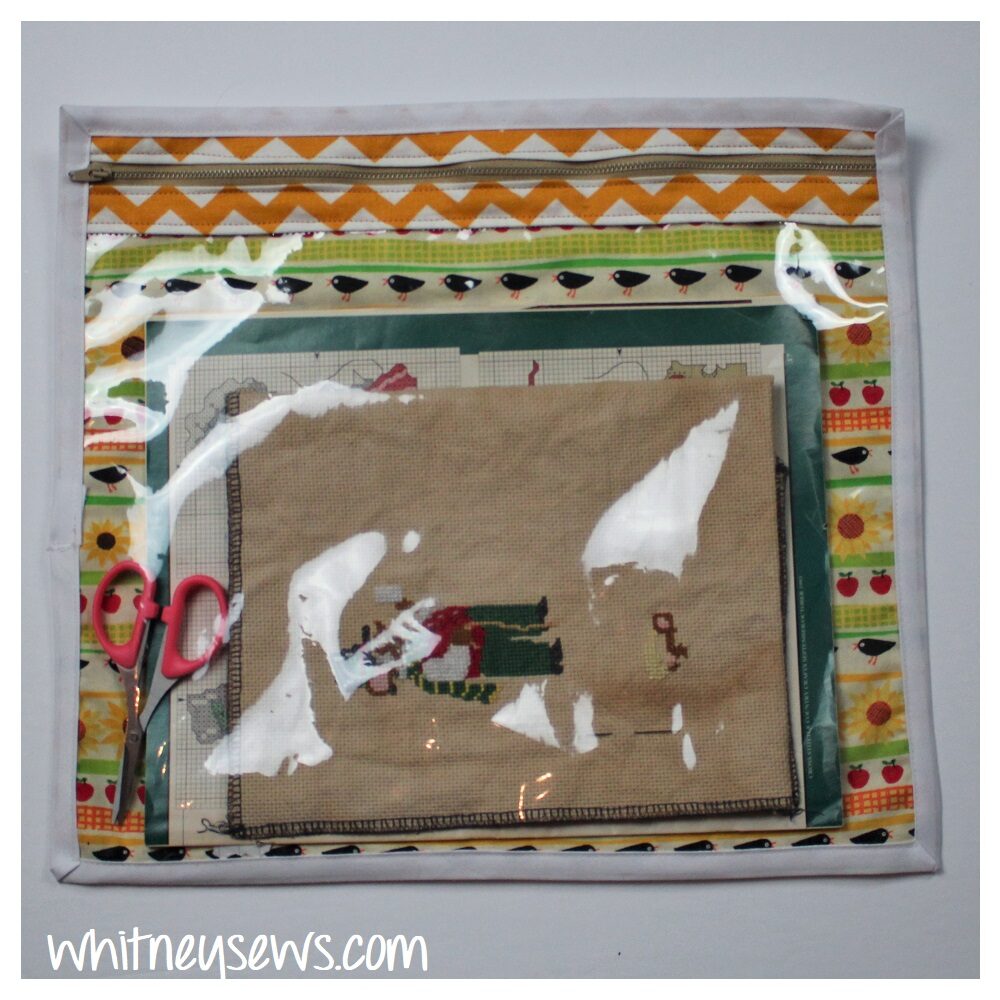
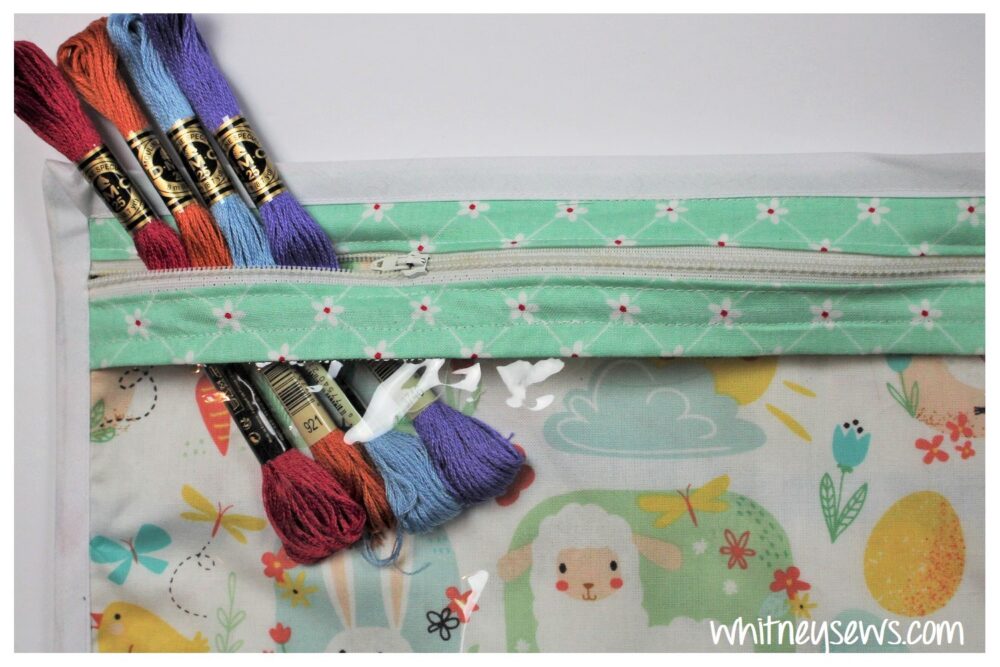
I recently got back into cross stitching and jumped right into multiple projects at once. I found it helpful to have a few cross stitch project bags to keep my projects and supplies sorted and organized.
Each project bag is large enough to hold a pattern, fabric, floss, and scissors. They have a nice long zipper and a large vinyl window. This way I don’t even have to open the bag to know what project’s inside and the pattern can even be read through the vinyl if needed.
I shared a vinyl window bag tutorial a couple of years ago on my youTube channel.
That bag finished about 8 x 9 inches, so too small for this purpose, but the idea is the same.
To make my larger cross stitch project bags I played around with the measurements and made a few different sizes. The one I like the most finishes 12.5 x 14 inches. This is a fat quarter friendly project!
Vinyl (info below on vinyl gauge) – 11 x 15 inches
Back and Inside Fabric – 12.5 x 14 inches
Piece that attaches to the vinyl top edge – 2.25 x 15 inches
Top Edge – 2 x 15 inches
Zipper – at least 14 inches
One package of bias tape
Then I sew the bag the same way as shown in the original tutorial – attaching the vinyl to the smaller fabric and zipper, then trimming that unit down to the same size as the back and inside fabric.
*I have been asked what gauge vinyl I use for sewing. In the past I bought a remnant of vinyl and the gauge wasn’t marked, so I didn’t know. But I recently picked up another remnant piece and it said 12 gauge. I think it is slightly thicker than what I had before and it sewed really nicely, so I definitely recommend that thickness for this purpose.
If you somehow made it this far, but aren’t actually into cross stitching, there are actually lots of other things you can use this bag for. They are perfect for organizing game cards and pieces because they hold a lot, but can store flat. How else would you use one of these large project bags??
I would love to see your DIY bags! Please share pics with me on my Facebook page or tag me on Instagram!
Even though I just recently returned to cross stitching I decided to tackle creating my own cross stitch designs. I love the process of starting with a blank page and filing in one box at a time to slowly create a beautiful image!
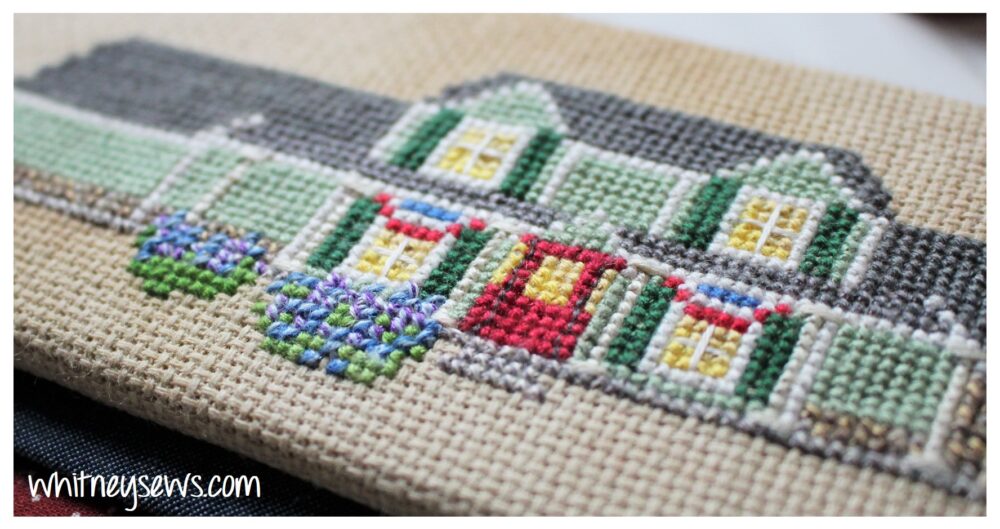
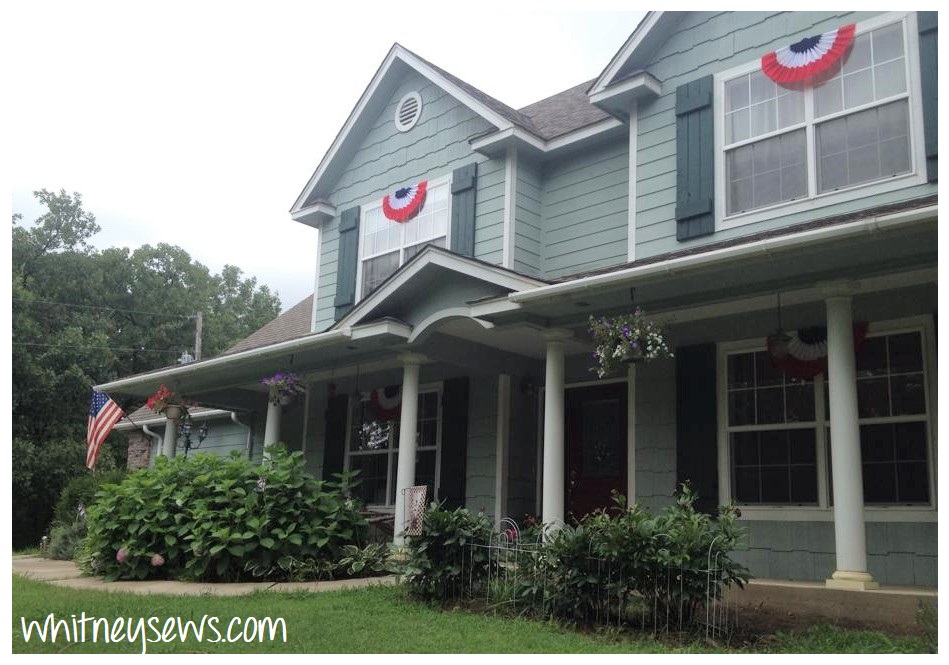
I have been looking at many cross stitched houses and want to design a few of my own. I got the idea to design one that looks like my Mom and Dad’s house! I wanted it to be a surprise for my Mom, but I soon realized I needed to enlist my Dad’s help. He snapped a few pics of their house and sent them to me. With those pics, and several more I dug up, I set about designing a replica of the house.
Along the way I ran into a few struggles, mostly involving getting the roofline, sidewalk, and shrubs right. I had to make a few creative changes so the overall design looks right.
*Get your FREE copy of the PDF pattern below!*
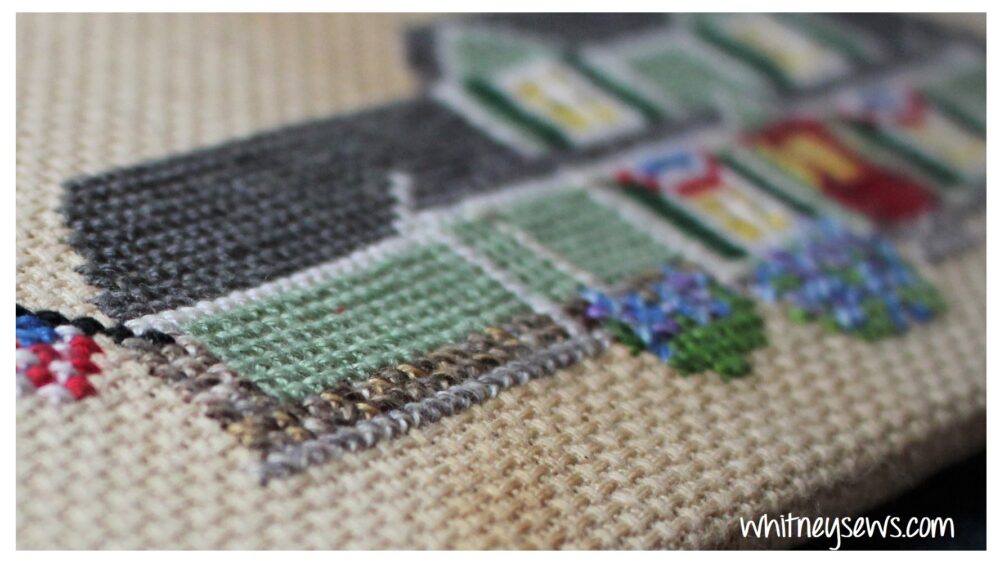
After charting everything I needed to decide on a fabric to use. I ended up going with tea/coffee dyed Aida. I wanted the fabric to have some sort of color, but not actually be colorful.
I started stitching at the corner of the house, starting with the stonework. There is stonework around the corners and lower edge of the house. We all know stones are made of many different shades and colors. It’s not even that each stone is a different color, but there are multiple colors within each stone. I wanted to find a way to show that in my stitching. In the end I did a lot of color mixing. Instead of stitching with two threads of the same color, I used two different color threads. I stitched in various places within the stonework area then switched to two different colors of thread. By the end I had a really unique look
I did a similar process with the hydrangea bushes. I wanted them to really stand out and look like flowers so I mixed several shades of blue, purple, and white. To make them have more dimension (since they are in front of the house) I stitched an X and a half for each. The X that every cross stitch square is filled with, then one extra time over top.
Mom and Dad’s house before the hydrangeas were in full bloom.
I couldn’t figure out a good way to show the larger base at the top and bottom of the pillars. In the end I did three rows of top stitching on each.
I charted the house to have the sidewalk out front, but decided to leave it off the finished design.
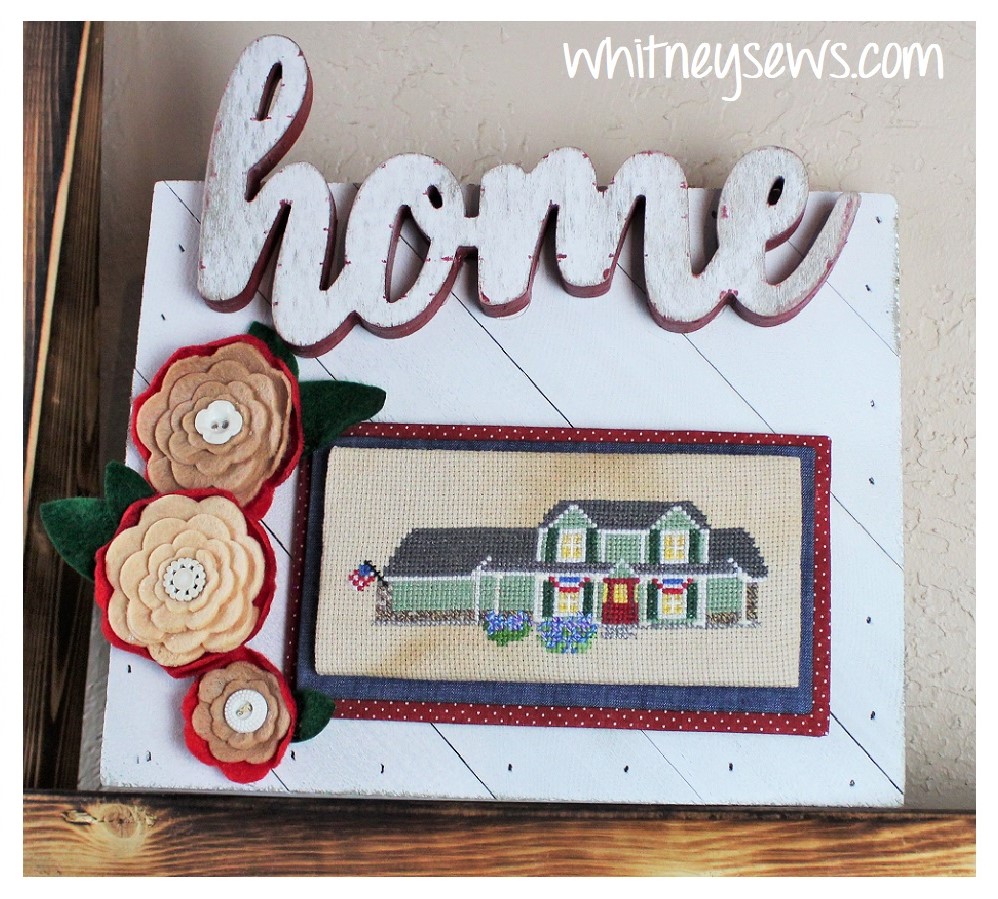
After cross stitching the house I needed to quickly figure out the finishing. My mom was coming to visit and I wanted it to be done before she arrived! I ended up selecting a whitewashed wood piece and a wooden home sign from the craft section at Wal-Mart.
I grabbed a few scraps of fabric from my stash (one that looks like denim and one dark red dot similar to the door color). I happened to have these rare earth magnets on hand and a random bit of metal in my toolbox. I didn’t want to glue the fabric directly onto the wood in case it didn’t bond well enough, so instead I glued the magnet to the wood and the metal to the cross stitched piece.
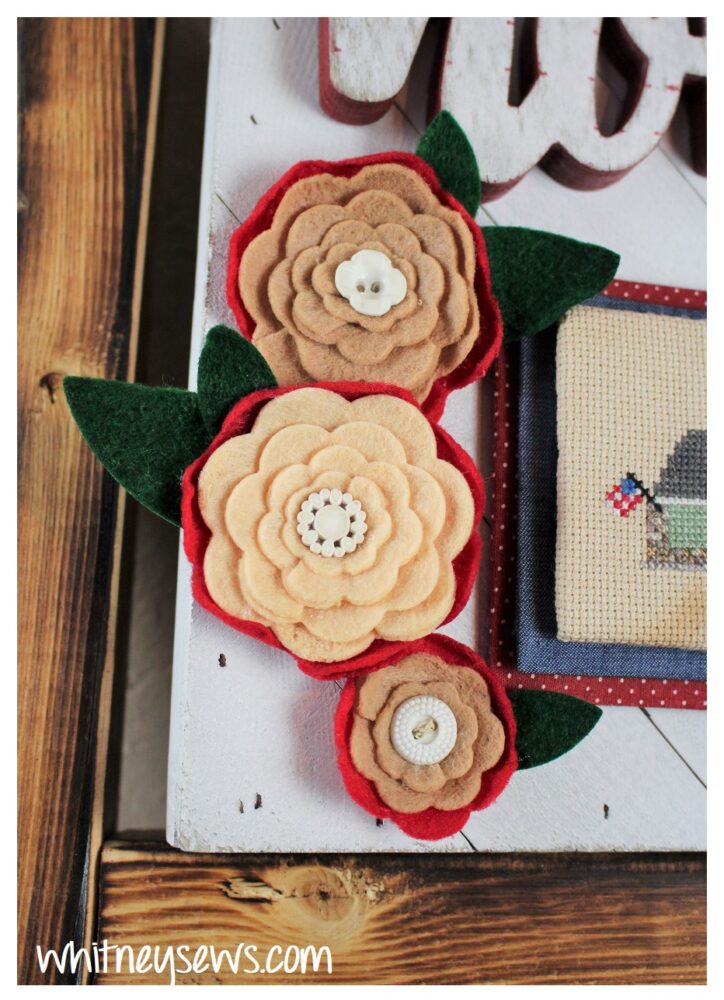
The piece still looked a little unfinished, so I pulled my Accuquilt Go Cutting Machine out and cut several flower pieces out of felt. I put them together and they were the perfect embellishment and exactly the finishing touch I needed.
You can watch the entire finishing process HERE!
If you’re interested in stitching your own version of the Fletcher Home you can! My mom gave me permission to share the PDF pattern.
I hope you enjoy seeing my cross stitch design and finishing! If you stitch your own version I would LOVE to see it! Please share pics using #StitchedWithWhitney and #TheFletcherHome
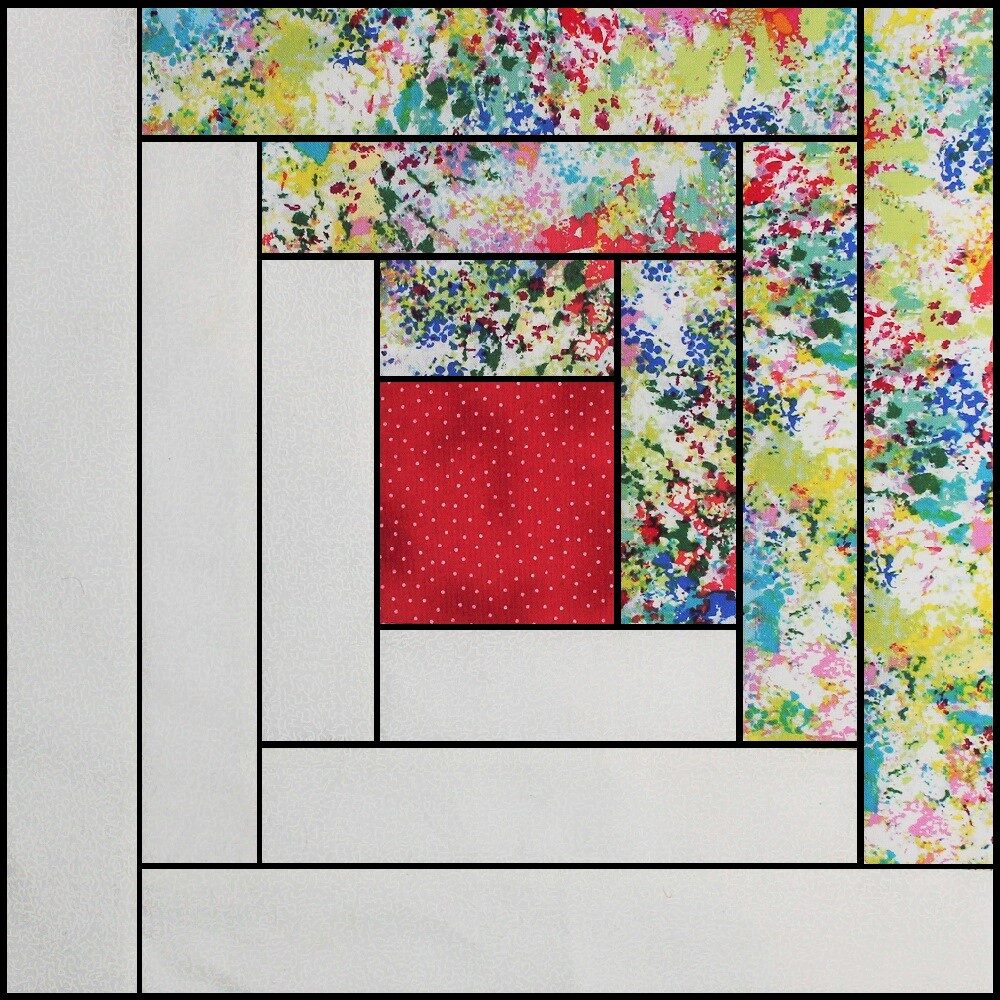
It’s FINALLY time for the twelfth block tutorial in the Whitney Sews Sampler Sew Along! Haven’t heard about it yet?!? Each month I’ll be sharing a step by step tutorial to make a traditional quilt block as well as how to sew the blocks together to create a sampler style quilt that finishes in a great lap quilt/baby quilt size. This week I’m sharing a tutorial for the Log Cabin quilt block.
I share the step-by-step instructions for sewing the Log Cabin Block HERE!
Don’t forget to share a pic of your finished block with #SamplerSewAlong so we all see it!
A couple of weeks ago I shared how I recently got back into cross stitching (after a VERY long hiatus). I am having such a blast stitching that I wanted to jump on the Flosstube band wagon.
Flosstube is the part of youTube dedicated to cross stitch (and other stitching). People usually share their stitching WIPs (works in progress), finishes, hauls, etc.
In my first flosstube video I am chit chating about getting back into cross stitching and what I’ve been working on. You can watch my flosstube video HERE!
And YES my next video WILL be a sewing tutorial! I have been sticking with my goal to post when I have content I want to share and am happy to work on. For a while that didn’t include many sewing tutorials, but just this week I filmed a long overdue tutorial that I hope you will enjoy.
I hope you enjoy the video and let me know if you cross stitch too!
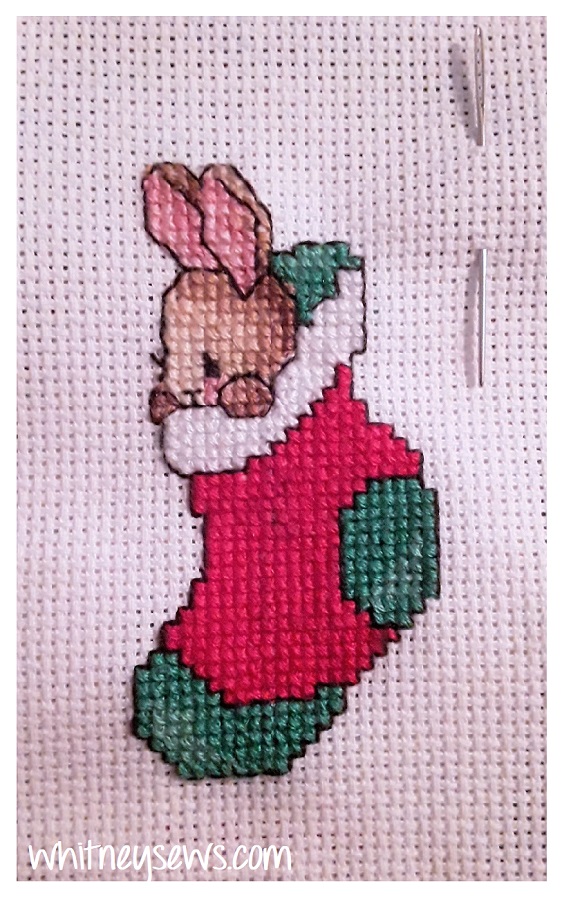
Over Christmas I renewed my interest in cross stitching (read my latest post for more on that). Since then I have been stitching like crazy and wanted to share my latest cross stitch finish with you today.
Back when I was originally cross stitching I never knew what to do with my projects after they were completed. I enjoyed the making process, but never did anything with them after they were stitched. The tipping point for getting back into cross stitch was seeing all the beautiful finishes by Priscilla and Chelsea. They don’t just stick things in a frame, they make every singe piece a little work of art!
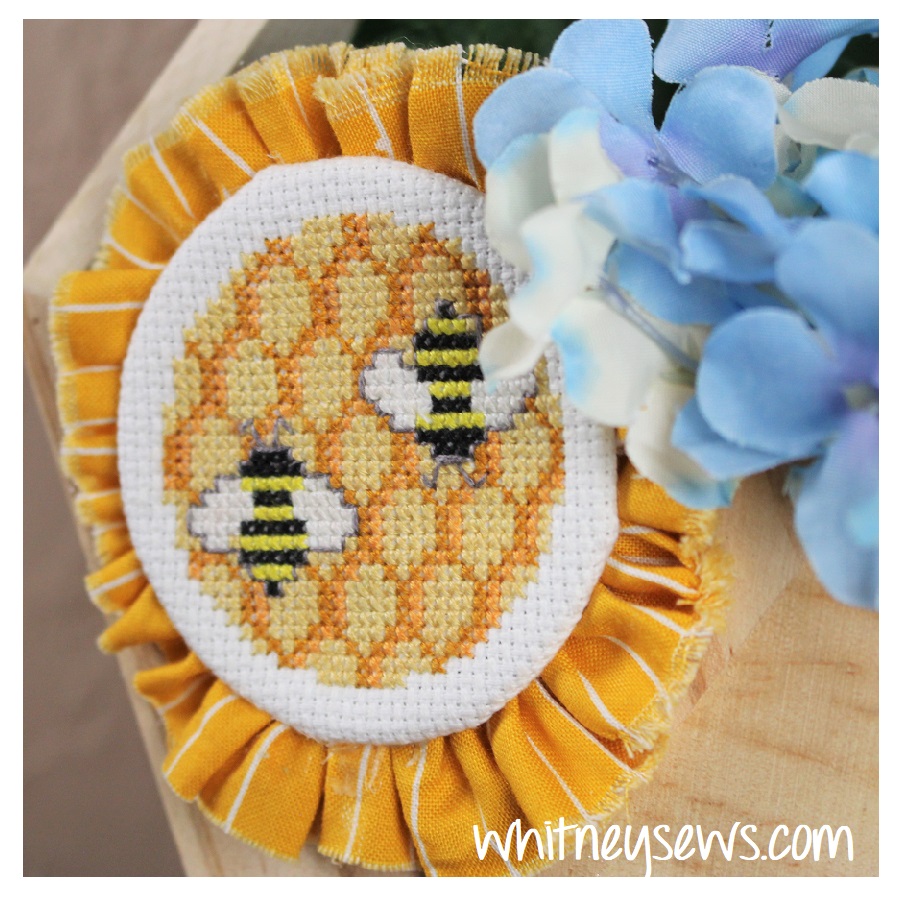
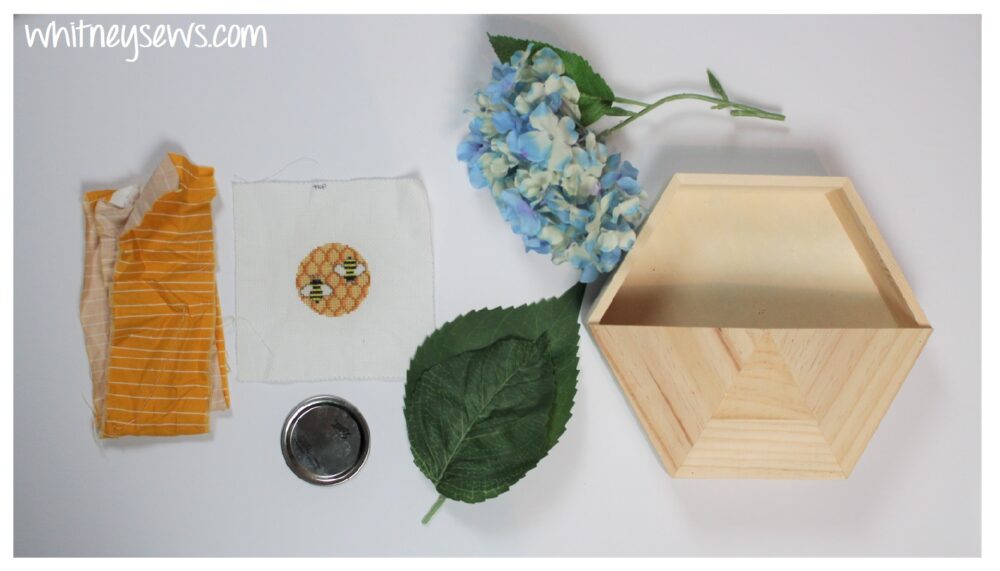
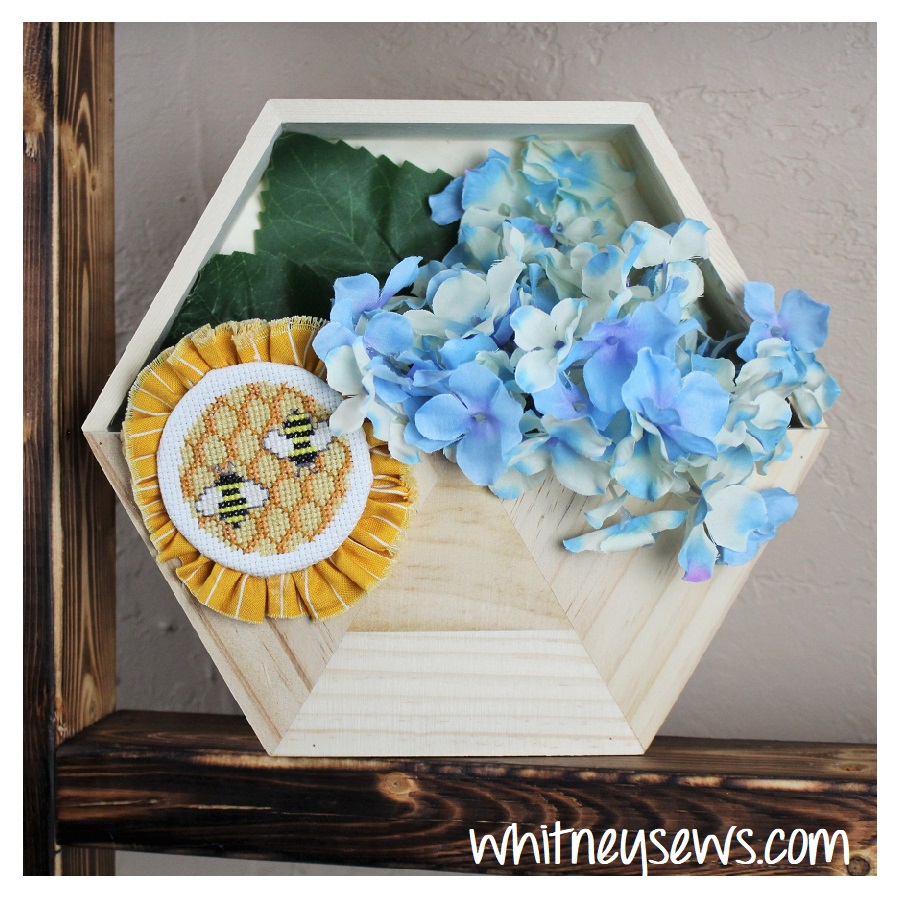
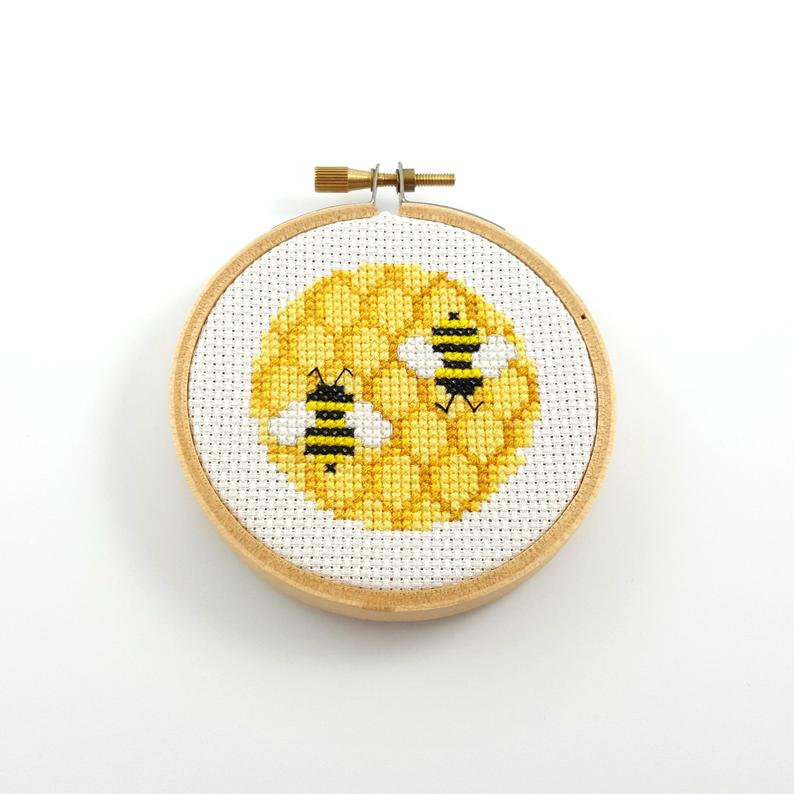
Before I even started stitching the honey comb and bee design by ringcat I knew EXACTLY how I wanted to finish it!
My sister runs her own store and she incorporated bees (a play off her last name) and hydrangeas (her favorite flower) in her banner design/logo. I used that design as the inspiration for the entire project. It’s supposed to be a surprise gift for her, but I can’t keep secrets….I already sent her photos and it’s no longer a surprise.
As soon as I finished the cross stitch, I ran to the fabric store (with a detour to the hardware store to buy a new washing machine because ours quit working). I picked up a half price faux hydrangea and an unfinished birdhouse at 40% off. I had planned on using a wood slice for the backing, but the birdhouse made me think of honeycomb and I could tuck the flower inside and it’s far better than a wood slice would have been!
At home I dug an old canning jar lid out and grabbed a scrap of yellow fabric from my stash. Plugged in the glue gun and got right to work!
I’ve seen lots of people use sticky board to completed cross stitching projects with, but I didn’t have any. I do however have plenty of used (but clean!) canning jar lids and since it’s a circular design it worked perfectly. A few strips of double sided tape and plenty of hot glue for the back.
I am absolutely in LOVE with this entire piece! It feels so wonderful to not only finish stitching a cross stitch design, but to also complete it in a way that is ready to display. No more cross stitches sitting unloved in a drawer like before!
You can see the entire finishing process in my most recent video.
I’m already planning my next cross stitch projects and can’t wait to start them!
Have you had any project finishes lately?? If so I would love to see them! Feel free to tag me in your project pics on Instagram!
Last year I heard of all the people picking up new hobbies while staying to home in the pandemic. I kept thinking “there’s no way I can start new hobbies. I don’t even have time to finish my current sewing projects”. But as the year wore on I began thinking how nice it would be to have some ongoing hand sewing projects I could work on while watching movies with my family in the evening. I remembered my mom and I cross stitching in the late 90s/early 2000s and the hobby fell by the wayside for about 15 years. Unbeknownst to me, my mom started cross stitching again and even began dying her own fabric! A couple of days before Christmas she showed me her current cross stitch projects and introduced me flosstube more specifically Priscilla and Chelsea’s channel. We binged a few of their videos in a row (much to my husband and kids’ chagrin). Her excitement and seeing all the beautiful finishes on youTube and Instagram made me realize I NEEDED to renew my hobby and get back into cross stitch!
Mom had some old craft kits she bought on clearance when we were cross stitching the first time around. I dug through those kits and found one to start right away. I spent 3 or 4 evenings on it and the cross stitch bug had bit! I have a renewed hobby and something to work on in the evenings!
My quick Christmas stitch turned out really cute and now I need to figure out the “finishing” I want for it. One of the really neat things about cross stitch is how people finish out their pieces! HERE is one beautiful example!
While I think up ideas for finishing that piece…I started a new one!
Photo by RingCat on etsy.
It is a bee and honeycomb design from RingCat on etsy.
I know exactly how I want to finish this one! I’m making it as a surprise gift for my sister (turns out I can’t keep a surprise and I went ahead and told her) She runs a small business and her store’s logo has a bee and hydrangeas. So I want to mount the finished design on a larger wood piece with some faux hydrangea flowers. But first…I have to actually stitch up the design.
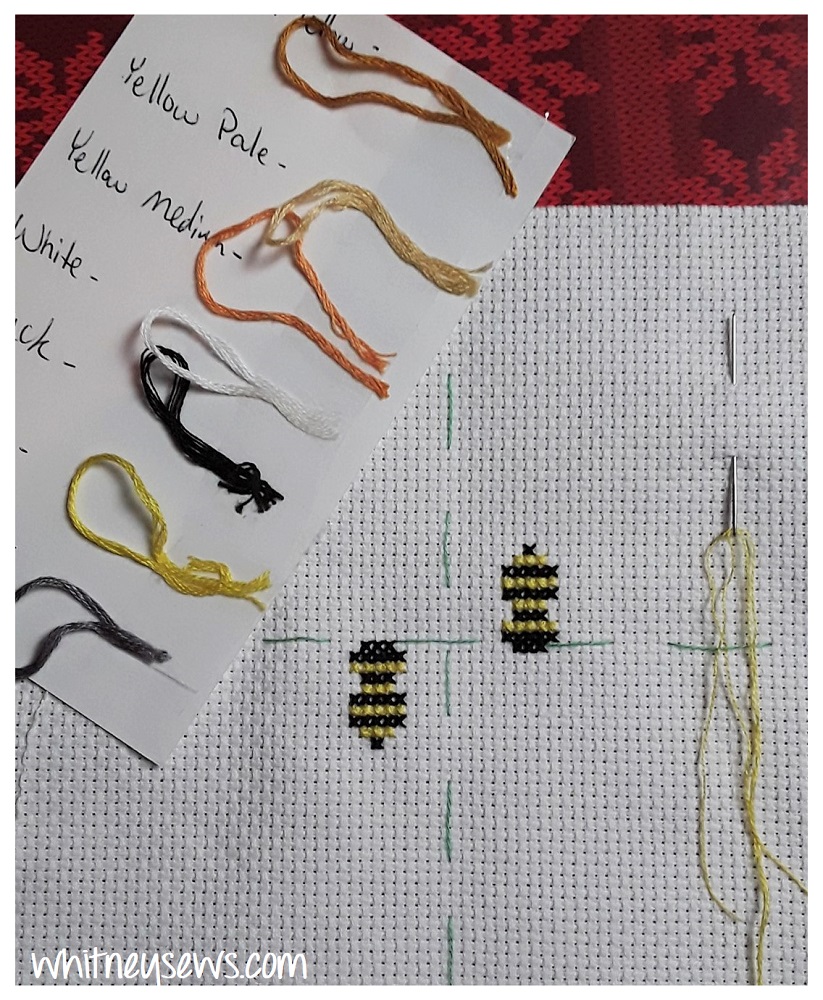
I purchased the PDF design and pulled a piece of cross stitch fabric and flosses from my stash. They came from miscellaneous craft bags from the thrift store many years ago. Very few of the threads had the labels so I held them up to the image on my computer until I found colors I thought looked good together. Are they the exact ones the pattern calls for?? Probably not, but I like them and that’s what counts! The only colors I know for sure are right are the ones used for the bees.
I got the bees stitched up the first night.
To remember which thread is for what color I cut a small bit of each and taped them onto a labeled notecard. This was my evening project for a few nights in a row; a pretty quick and easy stitch. I would love to know if you have picked up any new (or renewed) hobbies recently. Every once in a while I think about trying knitting or crocheting again…but they were SOOOOOO hard for me to do that it is probably better to just hire my friend who is a crocheting wizard to make what I need.
Anyway, hope you enjoyed this post. I’ll be sharing how I finish the honeybee piece in a future post. Until next time, Happy Sewing!